You are using an out of date browser. It may not display this or other websites correctly.
You should upgrade or use an alternative browser.
You should upgrade or use an alternative browser.
Need help pulling shaft
- Thread starter 907Juice
- Start date

Pat O'Connell
Member III
E28 + Picture
Hi Al
My packing is 1/8 too. Nice picture. Looks very familiar.") Splash on Thursday Woohoo.
Splash on Thursday Woohoo.
Best Regards
Pat
1981 E28+ Universal 5411
Hi Al
My packing is 1/8 too. Nice picture. Looks very familiar.
Splash on Thursday Woohoo.Best Regards
Pat
1981 E28+ Universal 5411
JSM
Member III
I did this same exercise last spring. To avoid future headaches take the shaft and flange to a machine shop and have everything properly fitted. They can match the flanges key way to the shaft and provide a proper key as well as checking your shaft to make sure its true. Probably a good time to get the prop balanced as well.
Lots of good shaft / coupling info here:
http://www.pbase.com/mainecruising/new_shaft
As far as the stuffing box get the right size packing and go with what fits, be it two or three rings. Too much packing can cause the shaft to bind making the box run hot and tough to adjust.
Lots of good shaft / coupling info here:
http://www.pbase.com/mainecruising/new_shaft
As far as the stuffing box get the right size packing and go with what fits, be it two or three rings. Too much packing can cause the shaft to bind making the box run hot and tough to adjust.
Last edited:
Alan Gomes
Sustaining Partner
I agree with others who say the 3/8" is probably a typo. But rather than guess that it should be 1/8" (as it is for my stuffing box for a 3/4" shaft also), you really should contact Buck Algonquin and figure this out for sure. E-mail them at sales@buckalgonquin.com. It may be that it takes something else, since there is no necessary uniformity between shaft diameter and the stuffing box packing size; it depends on the box. Please share what they tell you, by the way, because I am planning to buy the identical stuffing box for my haul out in Ensenada next April and it would be good to have the correct packing in hand.
I will say that *if* that box takes 1/8" and you were trying to put 3/8" packing into it, you probably had to hammer it in! If so, that right there tells you it can't be correct. Packing should fit snugly but not tight, if that makes sense. It should not be sloppy loose, but neither should it be too hard to press in. There should be some friction getting it in but not too much. I know my description is vague but I'm not sure how to quantify it. But I will say that if you had a hard time getting it in, and my guess is that you did, then you can figure that the packing is the wrong size.
As for mixing packing sizes in the same box: don't do that.
As for 2 vs. 3 rings: With the right packing, you'll probably be able to fit 3. But I don't think the number of rings is an end in itself. The goal is to keep the water out, other than the small amount needed to lubricate the shaft. Whatever accomplishes that is what you want. Normally that is 3 on boxes like these.
Last edited:
Rocinante33
Contributing Partner
RE problem #2
Yes. Drill a dimple on the shaft. Mine was surprisingly easy to drill. I did use a hardened drill bit and it easily cut into the shaft.
Yes. Drill a dimple on the shaft. Mine was surprisingly easy to drill. I did use a hardened drill bit and it easily cut into the shaft.
Alan Gomes
Sustaining Partner
If you will be bringing the coupling and the shaft to a machine shop to get the key way issue straightened out, and to get the coupler fit and faced to the shaft (which you should do), then just have them drill the dimple while they are at it. Done. Also, it wouldn't hurt to have them lap the taper for a good fit to the prop hub--though you can certainly do that yourself. But again, if they have all the parts, just have them take care of it all at once.RE problem #2
Yes. Drill a dimple on the shaft. Mine was surprisingly easy to drill. I did use a hardened drill bit and it easily cut into the shaft.
907Juice
Continuously learning
I agree with others who say the 3/8" is probably a typo. But rather than guess that it should be 1/8" (as it is for my stuffing box for a 3/4" shaft also), you really should contact Buck Algonquin and figure this out for sure. E-mail them at sales@buckalgonquin.com. It may be that it takes something else, since there is no necessary uniformity between shaft diameter and the stuffing box packing size; it depends on the box. Please share what they tell you, by the way, because I am planning to buy the identical stuffing box for my haul out in Ensenada next April and it would be good to have the correct packing in hand.
I will say that *if* that box takes 1/8" and you were trying to put 3/8" packing into it, you probably had to hammer it in! If so, that right there tells you it can't be correct. Packing should fit snugly but not tight, if that makes sense. It should not be sloppy loose, but neither should it be too hard to press in. There should be some friction getting it in but not too much. I know my description is vague but I'm not sure how to quantify it. But I will say that if you had a hard time getting it in, and my guess is that you did, then you can figure that the packing is the wrong size.
As for mixing packing sizes in the same box: don't do that.
As for 2 vs. 3 rings: With the right packing, you'll probably be able to fit 3. But I don't think the number of rings is an end in itself. The goal is to keep the water out, other than the small amount needed to lubricate the shaft. Whatever accomplishes that is what you want. Normally that is 3 on boxes like these.
No I didn't have to hammer it in. It took some firm thumb pressure but it went in relatively easy. The 3/8 packing went in fairly easy and only needed to tap it with a hammer/tool to seat it.The area inside the nut is WAY bigger than my previous one (see above picture). Thanks for the email and I got a response. I guess they want you running 3/8 packing with only 2 rings.
Sounds like your on the right path. On most sizes we recommend 3 rows of
packing but unfortunately for this size 2 rings is about all that will fit.
2 rings will be fine just make sure you stagger your seems. Hope this helps
out. If any more info is needed please feel free to contact me.
Nick Cadmus
Engineering Manager
Hydrasearch Company, Inc
Alan Gomes
Sustaining Partner
Thanks for posting this! I appreciate it because, as I mentioned, I am going to be obtaining the identical packing box. So I will get 3/8" to have on hand for the swap and will only use 2 rings. There's nothing magic about 3 rings in these boxes, so what Mr. Cadmus says makes perfect sense to me.No I didn't have to hammer it in. It took some firm thumb pressure but it went in relatively easy. The 3/8 packing went in fairly easy and only needed to tap it with a hammer/tool to seat it.The area inside the nut is WAY bigger than my previous one (see above picture). Thanks for the email and I got a response. I guess they want you running 3/8 packing with only 2 rings.
Sounds like your on the right path. On most sizes we recommend 3 rows of
packing but unfortunately for this size 2 rings is about all that will fit.
2 rings will be fine just make sure you stagger your seems. Hope this helps
out. If any more info is needed please feel free to contact me.
Nick Cadmus
Engineering Manager
Hydrasearch Company, Inc
Were you able to get it adjusted correctly with the 2 rings?
907Juice
Continuously learning
Thanks for posting this! I appreciate it because, as I mentioned, I am going to be obtaining the identical packing box. So I will get 3/8" to have on hand for the swap and will only use 2 rings. There's nothing magic about 3 rings in these boxes, so what Mr. Cadmus says makes perfect sense to me.
Were you able to get it adjusted correctly with the 2 rings?
Everything is apart and out of the boat now so I'm not sure about how it will adjust with everything put together. I had initially planned on the packing glands on thirds. But I'm gonna pull it and redo it on the half.
Rocinante33
Contributing Partner
Call them up and ask them. They have great customer support!
907Juice
Continuously learning
If you will be bringing the coupling and the shaft to a machine shop to get the key way issue straightened out, and to get the coupler fit and faced to the shaft (which you should do), then just have them drill the dimple while they are at it. Done. Also, it wouldn't hurt to have them lap the taper for a good fit to the prop hub--though you can certainly do that yourself. But again, if they have all the parts, just have them take care of it all at once.
Yep! Done

907Juice
Continuously learning
Losing my mind!
Well apparently it isn't just that easy... I can't get it to break free and I'm about to call in the pros. I tried your trick and nothing moved. On a side note, how hard did you have to wrench to get it to break free? I pried pretty hard but I don't want to break the strut. Should I go all in? Also, I tried cutting it out and it still won't budge. I sanded down to the metal on the strut to make us there weren't any set screws- nope. I cut out the rubber and I'm going to give it one more try with thicker all thread and a shorter pipe. Any other suggestions?
Juicd
Yeah, removing the bearing really was that easy. Of course, that method requires you to have the shaft already out. We removed the old shaft in a few minutes because we were replacing it and just cut it with a cutting wheel on a grinder. It was a bronze shaft that cut like butter!
Well apparently it isn't just that easy... I can't get it to break free and I'm about to call in the pros. I tried your trick and nothing moved. On a side note, how hard did you have to wrench to get it to break free? I pried pretty hard but I don't want to break the strut. Should I go all in? Also, I tried cutting it out and it still won't budge. I sanded down to the metal on the strut to make us there weren't any set screws- nope. I cut out the rubber and I'm going to give it one more try with thicker all thread and a shorter pipe. Any other suggestions?
Juicd
tenders
Innocent Bystander
I can see how several inches of corrosion might outstrip the threads on the nut, so to speak, but there is no way you're going to break that bronze strut by squeezing it like this. I would make triply certain that there is room for the bearing to move with your threaded rod setup (i.e. that you are in fact pushing it out, not squeezing it on both sides), make sure any spacing washers are tripled or quadrupled or quintupled up so they don't cup as you crank, and not be afraid to take the nut past the breaking point. I may have used a double nut, come to think of it.
If it reallly isn't going anywhere, cut out a 1/2" section of the cutless bearing by assembling a hacksaw inside the bearing and making two longitudinal cuts (or, use a Sawzall instead of the hacksaw, but cut slowly). If the cuts are all the way through the bearing, you will be able to tap the cut strip out with a chisel. At that point there will not be much holding the remaining bearing section inside the strut, but if it still doesn't come out easily make one more cut on the opposite side of the bearing from the removed strip. At that point, it's gotta give.
If it reallly isn't going anywhere, cut out a 1/2" section of the cutless bearing by assembling a hacksaw inside the bearing and making two longitudinal cuts (or, use a Sawzall instead of the hacksaw, but cut slowly). If the cuts are all the way through the bearing, you will be able to tap the cut strip out with a chisel. At that point there will not be much holding the remaining bearing section inside the strut, but if it still doesn't come out easily make one more cut on the opposite side of the bearing from the removed strip. At that point, it's gotta give.
Alan Gomes
Sustaining Partner
Well, it wasn't all that hard to turn the wrench; you can kind of tell from the video how much we were leaning into it. I guess yours is just especially tight. I take it you did get the washers exactly the correct size?Well apparently it isn't just that easy... I can't get it to break free and I'm about to call in the pros. I tried your trick and nothing moved. On a side note, how hard did you have to wrench to get it to break free? I pried pretty hard but I don't want to break the strut. Should I go all in? Also, I tried cutting it out and it still won't budge. I sanded down to the metal on the strut to make us there weren't any set screws- nope. I cut out the rubber and I'm going to give it one more try with thicker all thread and a shorter pipe. Any other suggestions?
Juicd
907Juice
Continuously learning
Yeah, the bearing is a little over 1in. I went to the plumbing store and got an 1 1/4 pipe. It slides through it easily. I actually wanted some strength so I got a socket and backed it up with some washers. They should've been the right size but it didn't matter cause it never budged. I cut a notch on each side hoping to relieve the pressure with no luck either. It looked like the bearing is rolled bass so I could see rings when I was cutting. When the rings went away I stopped. It looked like it went all the way through. I'll try and cut out a notch when I get back to working on it. I moved onto a couple other projects to ease some frustration. I gotta win a couple battles to get my confidence up before I tackle it again.
Last edited:
907Juice
Continuously learning
Done (expletive)
Got the bearing out but it was MUCH harder than the videos and forums showed. It took some redneck engineering, some serious elbow grease, and triple checking but it came out.

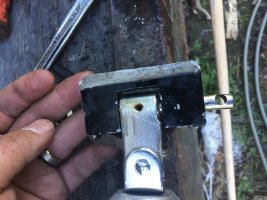
Ok, one more problem (for now...). When I dropped my mast I broke the weld for my gooseneck fitting. I finished the break and tried to remove so I could have a buddy reweld it back to the mast. But I can't get the pushpin (?) to release. Has anyone removed this joint and do you have any suggestions? I got a punch and it doesn't seem to be releasing or is it possible it is a Allen screw? I'm thinking about drilling it out because it is likely just seized from not being removed for 10 or so years. It is attached to the boom right now.
 Side one
Side two
Got the bearing out but it was MUCH harder than the videos and forums showed. It took some redneck engineering, some serious elbow grease, and triple checking but it came out.
Ok, one more problem (for now...). When I dropped my mast I broke the weld for my gooseneck fitting. I finished the break and tried to remove so I could have a buddy reweld it back to the mast. But I can't get the pushpin (?) to release. Has anyone removed this joint and do you have any suggestions? I got a punch and it doesn't seem to be releasing or is it possible it is a Allen screw? I'm thinking about drilling it out because it is likely just seized from not being removed for 10 or so years. It is attached to the boom right now.
Side oneSide two
Attachments
-
 IMG_4227.jpg88.8 KB · Views: 82
Last edited:
That does look like a set screw. I'd drill it out.
Then apply PB Blaster penetrating oil and heat gun and pound away with a drift pin to knock the stainless pin out.
However, if that busted fitting is aluminum, it is possible the stainless pin has corrosion-welded itself to it. Such a bond cannot be broken.
Then apply PB Blaster penetrating oil and heat gun and pound away with a drift pin to knock the stainless pin out.
However, if that busted fitting is aluminum, it is possible the stainless pin has corrosion-welded itself to it. Such a bond cannot be broken.