You are using an out of date browser. It may not display this or other websites correctly.
You should upgrade or use an alternative browser.
You should upgrade or use an alternative browser.
treilley
Sustaining Partner
Most people replace the packing without removing the flange from the rudder post.
The packing should be cut to the length of the circumference of the post and inserted. Cut separate pieces to stack in there and make sure the gaps do not line up.
This is for a prop shaft stuffing box but it is the same principle.
Courtesy of "Maine Sail" http://www.pbase.com/mainecruising/stuffing_box
Last edited:
I'm not sure I have the right visual of where you are in this process. Are we now with the collar under the cockpit sole, and the rudder shaft is through it, and all you need to do is hold the collar, install packing as Tim describes above, and then slide it up and bolt in place?
sveinutne
Member III
Yes David,
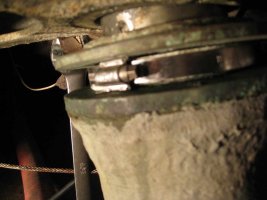
The rudder shaft is through the collar, as can be see at item marked B on my drawing from two days back. It is just that my stuffing is too small to fill the gap in one turn, but it is not enough space for two turns, but I will try to find a way to squeeze it in.
The rudder shaft is through the collar, as can be see at item marked B on my drawing from two days back. It is just that my stuffing is too small to fill the gap in one turn, but it is not enough space for two turns, but I will try to find a way to squeeze it in.
How big is the clearance? I would think that the flax packing should fit snug without making layers on itself. I know you can get it very large - here's a link to 1/2" - about 13mm diameter:
http://store.hamiltonmarine.com/bro...-1/2-x-24----------------101682--/4,2011.html
http://store.hamiltonmarine.com/bro...-1/2-x-24----------------101682--/4,2011.html
They have several sizes available. Scroll down this page and you'll see them listed:
http://store.hamiltonmarine.com/browse.cfm/engine/drive-accessories/2,333.html
http://store.hamiltonmarine.com/browse.cfm/engine/drive-accessories/2,333.html
sveinutne
Member III
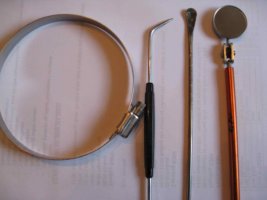
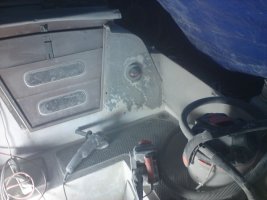
I tried with picking tools, mirror and even hose clamp, as you might see in the pictures, but I could not get the stuffing in place. I think I will try to order a larger size now, but I am not sure if I should order ½” or 7/16. So I think I will order both and see what will fit best.
Attachments
-
 IMG_4761-web.jpg46.1 KB · Views: 31
 -
 IMG_4763-web.jpg60.4 KB · Views: 42
sveinutne
Member III
Use of multiple depth instruments
When the sailboat was laying in Florida, I used the change of ordering equipment from Ebay. When you live in Norway that is often a problem, and the postage cost often more than what you pay for the goods. But I was maybe too eager, so I first bought a Hawkeye depth instrument, and later another Hawkeye with air and water temperature sensor, and finely the Raymarine ST60+ package with three instruments in one package.
So now I have three depth instruments. I could try to sell the two Hawkeye instruments, but then I thought maybe I could use all three.
I think the transducer are sending a bean that has about 30 degree opening angle, so if the instruments should be used at the same time they must be mounted, so only one will give reflection at the same time. My plan is to use one in the front as sonar with maybe a 20-30 degree angle forward. Then the other two will be placed on each side with a 10-15 degrees angle outwards. Then there should be minimum interference and I will get good depth readings even at more then 20 degrees bank to both sides. Where I will be sailing we have a lot of steep underwater cliffs that shoot strait up hundreds of feet. Many come over the waterline, but also many stops just below the waterline.
I have never been in a boat with more then one depth instrument, so I do not know if this is a good idea, and also it would be nice to get some feedback on what angle I should use for best result and minimum interference between them. The two Hawkeye instruments will be stand alone instruments with no communication with the rest. It is only the Raymarine that will be connected to the other Raymarine instruments. Also I hate to drill holes in the hull, so all three transducers will be mounted at the inside of the hull. I know I will not get good water temperature reading this way, but maybe I could put some isolation on the place where it is mounted, so it will get almost the same temperature as the water. It will take a long time to detect any change in water temperature, but that might be a compromise I can accept.
Last edited:
sveinutne
Member III
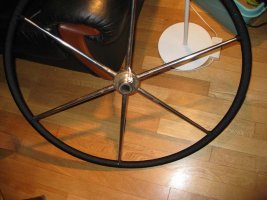
In Norway we are not as lucky as people sailing in Florida, so it is quite cold. To help on this I put 4mm nylon rope around the steering wheel, but the best is the electrical heater that will make the wheel worm to hold. Notice the electrical wire close to the center of the wheel
Attachments
-
 IMG_5138-small.jpg88.6 KB · Views: 69
Last edited:
sveinutne
Member III
Hi Sven,
I have first isolation tape around the wheel, then five copper wires with varnish. I think the wire is 0.1 mm in diameter, and each wire has 12-15 ohm resistance, so with 12 volt it will be about 1 amp in each wire. Total 5 amps and 60 watts, but it will have an on-off switch, so it will not be on for long. I have 5 batteries with 110 Amp hours each, so for short trips the power is no problem. I am also planning to put in a 24 or 32” flat screen on the wall above the galley table. It will take additional maybe 100 watts, so I need to be careful with how much power I use. But I have a 400 watt wind generator and some other sources of power, so I think it will be OK.
The flat screen will have two purposes. It will entertain my 15 years old daughter with DVD films, and I hope to use it with the PC as plotter, but I am not sure if I will be able to see it from the steering wheel, so this needs to be tested. If I can find a mouse I can use from the cockpit that will communicate with the PC, so I can zoom in and out from the wheel it will be fine.
Last edited:
sveinutne
Member III
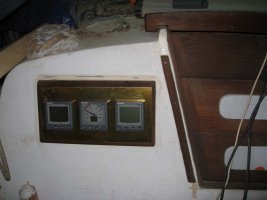
Got the brass plate cut, but the glue that was holding the plastic has not been removed yet, so I hope it will look better when I get it cleaned up. I am also considering flush mounting of the instruments. It might look better to get the instrument further in, but I will try this first.
Attachments
-
 IMG_5141-small.jpg66.8 KB · Views: 70
sveinutne
Member III
Snow is melting
It is +5 degrees outside, so it is time to start working on the boat.<?xml:namespace prefix = o ns = "urn:schemas-microsoft-com fficeffice" /><o
 ></o>
></o>
I have very little experience with fiberglass, but I asked some experts, and they gave me a lot of advice. It is easy to say you should sand it down to the old fiberglass and put on a new layer of fiberglass and start building from there.<o></o>
The engine room was very bad, so I tried several different ways to get the old oil and dirt out, but it was not so easy. I finely ended up grinding and sandblasting before putting on two layers of new fiberglass and two layers of topcoat.<o></o>
The room behind the engine room on port side where fenders and equipment is stored looked also very bad, so it got the same treatment, and are now shining white. This did not go as easy as it sounds. I think there has been a fire from the engine or the compressor for the refrigerator. The wood in the sealing was burned and a lot of burned wood had to be removed and rebuild with fiberglass.<o></o>
Now with 5 degrees outside, and can start to work on the outside again. On a shiny day I can get 15 till 20 degrees under the cover, so it is possible to also work with fiberglass on the outside. In the picture you can see the right side after some sanding. The sanding is almost killing me. It feels like I am getting some lung disease from all the dust, so I wonder if I can do it in a different way.<o></o>
<o> </o>
It is +5 degrees outside, so it is time to start working on the boat.<?xml:namespace prefix = o ns = "urn:schemas-microsoft-com
fficeffice" /><o></o>I have very little experience with fiberglass, but I asked some experts, and they gave me a lot of advice. It is easy to say you should sand it down to the old fiberglass and put on a new layer of fiberglass and start building from there.<o
></o>The engine room was very bad, so I tried several different ways to get the old oil and dirt out, but it was not so easy. I finely ended up grinding and sandblasting before putting on two layers of new fiberglass and two layers of topcoat.<o
></o>The room behind the engine room on port side where fenders and equipment is stored looked also very bad, so it got the same treatment, and are now shining white. This did not go as easy as it sounds. I think there has been a fire from the engine or the compressor for the refrigerator. The wood in the sealing was burned and a lot of burned wood had to be removed and rebuild with fiberglass.<o
></o>Now with 5 degrees outside, and can start to work on the outside again. On a shiny day I can get 15 till 20 degrees under the cover, so it is possible to also work with fiberglass on the outside. In the picture you can see the right side after some sanding. The sanding is almost killing me. It feels like I am getting some lung disease from all the dust, so I wonder if I can do it in a different way.<o
></o><o
> </o>

It is +5 degrees outside, so it is time to start working on the boat.[snip] The sanding is almost killing me. It feels like I am getting some lung disease from all the dust, so I wonder if I can do it in a different way
Hi,
Good to hear you're thawing out and making progress. I am assuming you are +5 C not F, so this is almost balmy

Have you tried a "dustless" sander? I am thinking of one that actually connects to a shop vacuum. It might be worth the investment for the quantity of work, especially under the tarp and below decks.
sveinutne
Member III
Yes, two of the sanders got connection for vacuum or external bag, but the two most efficient tools do not have such possibility. If you go into the professional market and are willing to pay $500 or more, I know you can get a lot of good tools. I might look into that if the dust really starts to bug me. Now I only sand for one hour a day, and clean it up with a vacuum cleaner, but under the cover the air get filled with dust and if this was a workplace I think the healthcare people would have closed it down.
Hi,
You're probably on the same track as I am, but given the scope of the work, it might be worth investing in some Fein tools (or equivalent):
http://www.fein.de/corp/us/en/custom/index.html
Expensive, yes, but when you talk to the folks who do it for a living, they invariably get a grin and tell you there is a reason why they are expensive, and they're worth every penny when you get into serious work. If you're like me, you'll never regret the investment in a top notch tool that lasts your lifetime.
I think you are right - if this was in industry, they would shut you down for occupational health hazard. I don't let "officials" into my garage either....
Sven
Seglare
Svein,
That dust can really be bad for you especially if it is FG or antifouling paint. There is a reason why the health authorities would shut you down.
How about a positive pressure face mask or suit ? That might be just as expensive. Or really good forced ventilation under the cover ?
Even an Ericson isn't worth years of future health problems.
What, you didn't ask for my advice ?
-Sven