Ericson 41 Florida - Norway

sveinutne

Member III
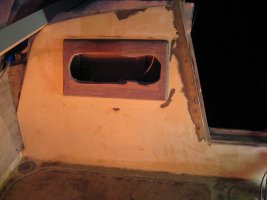
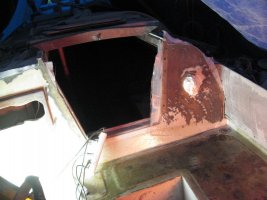
I guess 40 years of saltwater and high humidity has taken the best out of the brass through- hull pipes. So now I am replacing all of them. The good thing is that we finely have gotten some warmer weather. Today it was 12 degrees, and I could start on the fiberglass work. With a 2000 watt IR lamp to get some extra heat I could start to put fiberglass in the cockpit. After removing the 3 mm thick diamond pattern anti-skid mat, the floor in the cockpit was a bit wobbly, so two layers of new fiberglass would do it good.
I have gotten samples on TBS – Non-slip Deck covering, and Antislide, and also tested some paint with anti slide powder. TBS cost about €75/m2 and Antislide €29/m2. TBS looked and felt better then Antislide, but the price was more than the double, so it was a hard choice. Powder to put in the paint to get anti slide effect was at a very low price, so it would be about 1-3 €/m2 depending on how much powder one mix in, so the cost will be in the polyester and fiberglass, depending on how many layers one would like to put on. From my short testing I got the feeling that paint with powder would give almost the same friction as the Antislide or other friction cover. I have tried to find the results of some comparisons test on the net, but I have not found any. If I do not find something very negative with the paint with friction I will start with it. If I later want to use some TBS or Antislide, I guess I can just sand gently and glue it on. So now all the top of the boat will get a layer or two of new fiberglass and some hardtop with anti slide powder in the top paint. I am putting the polyester directly on the molded in anti skid from Ericson. I hope this will give good bounding and no negative reaction. So far it looks OK.
 

Martin King

Sustaining Member
Blogs Author
For renewing the factory non skid areas, I have had very good results
repainting with LP paint salted with polymeric non skid particles.

Martin
 
Last edited:

sveinutne

Member III
Thank you Martin for your comment. The polyester is making a good bond to the factory made anti slide. The only problem is that I will need to use some filler to get some of the bumps out. I guess after a layer or two with polyester and fiberglass, a layer of paint will make it easy to see the bumps, and make it easier to put on the filler, more sanding and then the final layer of topcoat with anti slide powder will make the boat look good again. When it start to look better, I will start to call it yacht again.
 

sveinutne

Member III
I unpacked the mast yesterday. It was a hard job. It was packed very well, so I had to work for two hours to get the case open. Removed the six wheels at the mast top, and they looked OK, some washing and lubrication, and they are ready to go back in again. Half way down the front side of the mast, the wheel will need to be replaced. Also the top 3 meters of the mast will need a lot more then just polishing. I hear people wash and rub the mast before polishing with wax, but I think I will need to do a lot more. If someone know how to restore the mast, I am very interested in good tips.
 

Attachments

  • mast-top-s.jpg
    mast-top-s.jpg
    114.5 KB · Views: 49
  • mast-wheel-s.jpg
    mast-wheel-s.jpg
    67.9 KB · Views: 40
  • mast-damage-s.jpg
    mast-damage-s.jpg
    77.1 KB · Views: 46
Is mast rash like road rash?

If the damage is cosmetic only, you might look at "road rash repair" kits for aluminum automobile wheels. Some sort of putty, then re-painted, and you can't tell a repaired wheel from a new one. Concept might work for masts, too.
 

sveinutne

Member III
Thank you Gary,
I will look into this, and see if it will help. After the dents and notches are filled in, I will need to put some sort of paint or vanish on the mast, to keep it nice.
 

sveinutne

Member III
Martin King is really boosting my hopes. When I look at my boat with dust and fiberglass in all direction it looks almost hopeless to get it in good shape. Then I look at the before and after picture Martin King has posted and it does not look so bad.
Then I know it can be looking good, so if I can get my boat to be only half as good I will be pleased. This is the pictures I look at when I feel I have chewed over too much.
 

Attachments

  • Portsidebefore.jpg
    Portsidebefore.jpg
    57.2 KB · Views: 55
  • DSCN2845.jpg
    DSCN2845.jpg
    62.6 KB · Views: 63

sveinutne

Member III
Now I have started on putting fiberglass in the cockpit. It does not look good now, but I hope it will in the end. Martin King is really boosting my hope so I also want to show before and after pictures, but maybe the after pictures will be a downer. We will see.
I use a 2000 watt IR lamp to get the temperature up from 10 till 20 degrease.
 

Attachments

  • IR-lamp on left.jpg
    IR-lamp on left.jpg
    63.7 KB · Views: 49
  • IR-lamp on right.jpg
    IR-lamp on right.jpg
    77.1 KB · Views: 49

sveinutne

Member III
Here you can see the back side of 2000 watt IR lamp in action. It is tied to the steal tubing in front of the steering wheel. The wheel is removed at the moment. I usually work 1 hour in the afternoon, but this weekend, I work 1 hour in the morning and 1 hour in the evening. With 15-20 degrees each layer hardens in less then 6 hours, so I can do two layers a day, but my layers are only small patches at the time, so it will take a long time to finish if I do not find a more efficient method.
When all the fiberglass is on in the cockpit area, I will paint it, so all the bumps will show, then sand and put in fillers where needed, and sand some more and put on a new layer of paint. Then if finish is OK I will put on a layer of paint with anti-skid. This was more work then I had expected, but that is life. If the result is as good as I hope, then the rest of the deck is in for the same treatment. I was complaining about the temperature in Norway, but now with 10 degrees outside, it might be better then Florida with 30 degrees. Now I can work under the cover with no heatstroke, and the polyester is hardening very slow, so I can take the time I need to get the parts in place and get the polyester on. Then when I feel it is OK, and turn on the IR light and get the temperature up from 10 till 20 degrees when I leave the area.
 

Attachments

  • IR-light.jpg
    IR-light.jpg
    99 KB · Views: 147
Last edited:

sveinutne

Member III
Sorry for long delay in posting. My mother passed away some time ago, and we decided to sell her house. It was a lot of work to go through all her belongings and find out what to keep. Now that work is done and the house is sold, so I can concentrate on the Ericson again. I am now far behind my original plan, so I have decided to keep the yacht in the garden for one more winter, but then I hope to have it ready for an early spring start.
Now I plan to have all the outside work done during the summer while the temperature allow for outside fiberglass work.
The entire top has been removed for friction padding, and sanded down and gotten a new layer of fiberglass. I am now in the process of painting it in white. The cockpit got some extra teak on the sides for added strength. I will post some pictures soon.
 

sveinutne

Member III
Thank you all for your concern about my loss. She suffered from increasing senile dement, so to be honest I feel I lost the person I knew as my mother some years back, and she became almost 88 years of age, and she had a rich good life. So if my life will be as good as her, I will not complain.
 

sveinutne

Member III
I have not given the ”Heart of Gold” a new name yet, but I have been thinking of “ORBO”. This is from an Irish company claiming to have invented a way to get more energy out then you put in. For a sailboat this should be nice. To get more energy back from using the sailboat. Like recharging your batteries. Maybe I am thinking in a more philosophical or recreational matter then the Irish company, but I like the idea.
If you are interested in reading more about it, they have a web site: www.steorn.com
 

sveinutne

Member III
Someone mention in an other tread that the rudder on the Ericson would sink. I do not know if that is true or not for my rudder, but I sanded it down all the way to the wood/fiberglass, and I could feel it was full of water, so I will take it inside and let it dry during the winter in some hot dry environment before I put on a layer of fiberglass and paint it again. If it will still sink or not after it has been dried up, I do not know, but it might be close.
 

Emerald

Moderator
Hi,

you need to do some core samples. Most of the Ericson rudders were foam filled and do float (I believe some of the early E-31s had a resin soaked chopped asbestos based core, and these did not float - not sure what other variations may have occurred in other models).

So, what I ran into was I could not get the foam core to dry and I ended up splitting the rudder in half and rebuilding it. Here's a link to the project:

http://home.comcast.net/~independence31/rudder/rudder-intro.html
 

sveinutne

Member III
Hi David
Interesting project on your rudder. I hope I will manage to get away with a smaller project on my rudder, but I am not sure how. My rudder looks almost intact, but with some small holes water have gone trough. One idea is to just leave the water inside and wrap it up with new fiberglass, and make it waterproof, but on the other side I would like to get as much of the water out. Maybe I could put some IR lamps next to it and almost steam the water out? Or use a vacuum pump and suck it out? Or maybe the vacuum will put to much strain on the sides of the rudder and make it colaps?
 

sveinutne

Member III
Hi David
You made me think more about the rudder problem, and I might have a way forward.
1. Dry the outside of the rudder with some heating until it is dry enough to put on some fiberglass.
2. Make it waterproof with several layers of fiberglass, and make a small hole for the vacuum tube.
3. Dry it up with vacuum, and maybe some heating at the same time.
4. Close the hole with epoxy and paint.
What do you think of this approach?
 

Emerald

Moderator
I like the sound of it at first. I think time is going to be the key. What I'm wondering is how long it will take to draw the moisture out through the foam. I wonder if the rudder was oriented vertically, with the vacuum at the bottom, heat lamps on the side, and a vent hole at the top if you would both draw air through that would dry it and at the same time let heated (vaporized) moisture escape through the vent while drawing water out the bottom at the same time. The foam in these rudders is very dense and it took years to absorb the water, so I'm just wondering how much we can accelerate the removal. The problem I kept running into was the foam below was holding moisture in the foam above. When I thought something was dry, I would probe up deeper into the core to just find saturated foam further up, but I was dealing with just gravity to drain and I did not heat it. It would be interesting to try your approach and see. Since you aren't launching for another season, you have much more time than I had to try this :egrin:
 

sveinutne

Member III
Yes, I think time might be a key factor her, but if I drill a long hole from the bottom all the way almost to the top, the distance the water or steam need to travel will be about 30 cm through the foam before it reaches the hole where the vacuum is. If we get good vacuum, less then 750 mm Hg water should evaporate at room temperature and come out. I would estimate 2-10 days of vacuum should do. But I am not sure how to find out if this is a success or not. I could weigh the rudder before and after and find out how much water I have taken out, but I will not know how much water I have left inside the rudder.
 
Top