You are using an out of date browser. It may not display this or other websites correctly.
You should upgrade or use an alternative browser.
You should upgrade or use an alternative browser.
Ericson 30+ 1983 - Discovery - Port leaks, Bottom Paint
- Thread starter mjsouleman
- Start date
Reply Loren/Shelman
Thank you for your contributions.
There are so many options to port re-seal/replacements.
It is my hope that our discussion will help current and future Ericson owners find useful ideas, options and solutions.
Thank you for your contributions.
There are so many options to port re-seal/replacements.
It is my hope that our discussion will help current and future Ericson owners find useful ideas, options and solutions.
side track question
This snowy weekend here in Washington D.C. I will drill out the Stainless steel frame screws.
However, with time on my hands I got to thinking about Discovery's bottom.
The previous owner did a very nice job keeping her clean. Her bottom is smooth but there is barely a film of paint on her.
I'm thinking a light sanding because there are not layers of built up paint to remove.
But I read about soda blasting followed by an application of antifouling then 2 layers of paint.
I was thinking just paint but now I am thinking I should add antifouling to my list.
Help?
dt222
Member III
Depends
I think the advice will depend on how and where you use your boat. There are numerous threads on bottom care. What you most often see is a discussion on how to remove what is there, and then a discussion on what to replace it with. Unless your boat is lifted out of the water after every use, generally something is put on the bottom to reduce/retard organic growth. The other concern is to prevent the creation of osmotic blisters. Different treatments address each of these. Anti fouling paints usually fall into 2 categories- a hard coating, or a coating that sloughs off over time. To prevent blisters, you often will see a "barrier coat or coats applied, then anti fouling over that. If you are sure that your bottom has only gel coat present, and it is in good shape (no blisters), there should be no need to soda blast it you may be able to get away with applying anti-fouling only.
A good place to start is to ask other sail owners in your area. What do they do.
Don
Don
Location: upper- mid Chesapeake Bay
I took Discovery out after the second season I have owned her.
Because I do not know her history, I would rather be overly protective.
From your suggestions, I am leaning toward
1. Barrier coat
2. Anti-fouling
3. good bottom paint
Sounds like a lot of money.
MJS
Location: upper- mid Chesapeake Bay
I took Discovery out after the second season I have owned her.
Because I do not know her history, I would rather be overly protective.
From your suggestions, I am leaning toward
1. Barrier coat
2. Anti-fouling
3. good bottom paint
Sounds like a lot of money.
MJS
Tom Metzger
Sustaining Partner
From your suggestions, I am leaning toward
1. Barrier coat
2. Anti-fouling
3. good bottom paint
I'm curious why you separate anti-fouling and bottom paint. Almost by definition bottom paint is anti-fouling.
Were they separate, the paint would have to go on ahead of the anti-fouling coat.
Tom
Tom,
You made the assumption I know what I am talking about... I proved my ignorance, but that is why I seek information from the Ericson Experts like you.
No, I did not know they are one and the same but do appreciate the correction.
MJS
Tom,
You made the assumption I know what I am talking about... I proved my ignorance, but that is why I seek information from the Ericson Experts like you.
No, I did not know they are one and the same but do appreciate the correction.
MJS
Blasting, barrier coat and bottom paint: $15,000 for a recent E38.
So, if no pox of blisters or hanging chads of ancient paint, just clean and renew paint as required. Like politics, all bottom paint is local, meaning what works best in your local area, meaning a recommendation from a boatyard or club.
Also, note any pending legislation regarding copper and other poisons in local marine environment. Here, for example, regs are being written to change the whole game and probably require hull stripping eventually and restrictions on paint.
And if you have a diver clean the hull monthly, as many do, paint is less important than anybody thinks.
(I changed the thread title to reflect the topic change from ports to paint, but that's a cheap trick: it's better to start a new thread, or better yet revive an old one--much easier for "search".)
Last edited:
dt222
Member III
I agree with Christian- it's all local. Here in Maine most of us can go with a barrier coat (depending on age/condition of the hull) and an anti-fouling paint- usually an ablative version- I happen to like Petit Hydrocoat- a water-based ablative (sloughs off). Unlike warmer waters, I can get by with manually scrubbing below the water just once a season, and can get at least 2 seasons out of a coat- lightly sanding before launch.
You would never top coat over anti fouling pain- that would seal it in and provide no protection.
I'd wait to see what some of the other Chesapeake sailors have to say.
Don
You would never top coat over anti fouling pain- that would seal it in and provide no protection.
I'd wait to see what some of the other Chesapeake sailors have to say.
Don
Paint
Great information as expected.
Chesapeake area sailors - what is your take?
Only 90 days till sail season in the Chesapeake area and lots of work to do before then
Great information as expected.
Chesapeake area sailors - what is your take?
Only 90 days till sail season in the Chesapeake area and lots of work to do before then
markvone
Sustaining Member
Bottom Paint Options
Hi Mark,
You didn't mention blisters that you would like to be repaired, so I would say you have two options:
Light sand and paint on anti-fouling paint.
Most Maryland yards require dust-less sanding, so having a random orbital hooked up to a shop vac may be required. It's still dirty work and holding even a light sander over your head for hours will test your fitness. I did this myself this August since I stay in the water all winter. A week of half days for just sand and paint should cover it with temps warm enough to paint. I used Pettit Ultima SR60 paint, expensive but I found a lot of happy local user's on web forums.
or
Total paint removal (via blast, sand or strip), then barrier coat, then bottom paint. This adds a level of blister protection (between the gelcoat and the anti-fouling paint) but is a lot more time and material intensive. If your bottom paint is really thin now, you might be able to sand it off yourself and save the cost of blasting but this is dusty, dirty, labor intensive work (see above). It will be hard and take time. A blaster will be done in a day and it may be money well spent.
I would suggest calling Doug at Huco Builders, (410) 647-2001 and ask about glass blasting vs soda blasting. He feels the soda blast leaves the hull too smooth and it then needs to be 60 grit sanded to give it some "tooth". Also, soda blasting can be quite messy and some yards don't allow it. Glass blasting (broken glass pieces and water) leaves the gelcoat with the required tooth and is a much easier clean up for them. His quote for me this August was $1296 to glass blast my 36 (cost = boat length x boat length). After total paint removal, you'll need to make sure your hull is totally dried out or you will trap the moisture in the hull You'll then have at least 5 coats of barrier paint to get to the required mil thickness to be effective. This has strict re-coating requirements to avoid having to sand between coats. After this, you are back to painting bottom paint like step 1 above. I'll be doing this in a few years during a full winter haul-out.
Mark
Paint - Continued
Hi Mark,
Thank you for your response. Discovery's bottom looks good to me but all the blue tinged paint is gone.
I had a long time marina hand at Holiday Hill Marina in Mayo tell me her bottom looked good also.
Because I do not know Discovery's history, this is my first time painting, and I want to prevent problems, I am reaching out to the Ericson Crew to do it correctly.
MJS
Afrakes
Sustaining Member
Paint........ Find out what's there
Choose a spot on the rudder and begin lightly sanding a small area about 6" in diameter. Record each layer of paint as you sand deeper. Hopefully the PO used alternating colors for each coating so you can distinguish one from another. Use one grit of paper for all sanding. As you sand pay attention to how much effort is required to remove each layer. That will also tell you how well adhered one layer is to another. Stop sanding if you hit a barrier coat. That may be tough to determine but there should be a noticeable difference in adhesion. If you get down to gelcoat you will then know the coating history of the bottom assuming the rudder was treated the same way. On my boat I used InterLux 2000e barrier alternating white and gray coats so a future owner would get a clue of what is there.
Choose a spot on the rudder and begin lightly sanding a small area about 6" in diameter. Record each layer of paint as you sand deeper. Hopefully the PO used alternating colors for each coating so you can distinguish one from another. Use one grit of paper for all sanding. As you sand pay attention to how much effort is required to remove each layer. That will also tell you how well adhered one layer is to another. Stop sanding if you hit a barrier coat. That may be tough to determine but there should be a noticeable difference in adhesion. If you get down to gelcoat you will then know the coating history of the bottom assuming the rudder was treated the same way. On my boat I used InterLux 2000e barrier alternating white and gray coats so a future owner would get a clue of what is there.
Paint
Thanks al,
The detail you provided is what a novice like myself needs. I find most that experienced members speak in generalities because the concepts are so ingrained they gloss over the details. As these older boats require more TLC, capturing Ericson crew knowledge is important.
MJS
Thanks al,
The detail you provided is what a novice like myself needs. I find most that experienced members speak in generalities because the concepts are so ingrained they gloss over the details. As these older boats require more TLC, capturing Ericson crew knowledge is important.
MJS
markvone
Sustaining Member
Bottom paint layer details
Mark,
Here are some detail pictures from my bottom sand and paint in August. My paint was not thinning down to the grey barrier coat underneath, except at the waterline, but it was last painted in Oct, 2009 and the paint had lost all effectiveness showing heavy fouling and even hard barnacles.

I was only planning to be out of the water for a week. I was planning on a light sanding and two coats of paint, plus zincs on the prop shaft and strut, plus replacement of a thru-hull and my speed transducer. After light sanding of the old bottom paint I could tell it was well attached to the grey barrier layer under it.


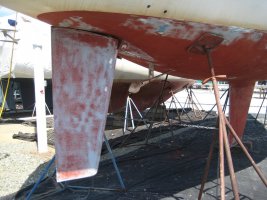
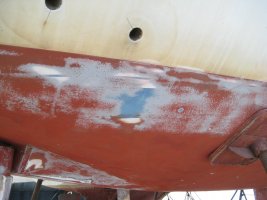
You can see how the red bottom paint mostly came off the rudder down to the grey barrier coat. The two white spots in the upper front indicate where I actually sanded through the grey barrier and down to the white gelcoat. This will have to be repaired in the future in order for the barrier to be effective. In the detail picture of the waterline, you can see the layers of paint that I have. I only had red bottom paint (two coats per the previous owners Oct 2009 yard bill) and no other colored layers. Under the red bottom paint was a grey barrier coat ("epoxy seal" per the Oct 2009 yard bill) that was harder than the red. I suspect I only have one coat of barrier because it seemed thin and I didn't find alternating grey/white layers. Barrier coats usually are applied with around 5 alternating white and grey coats to get ~ 10 mils total dry film thickness.
Under my grey barrier you can see white gelcoat and the two blue (thick and thin) factory gelcoat boot stripes - my bottom paint covers the boot stripe on the stbd aft side of the boat to account for the heavy fuel tank.
You may find that your hull has various layers of bottom paint, but it doesn't sound like it. You may also have no barrier coat, just white gelcoat, but check carefully because the barrier coats usually are applied with alternating white and grey coats. So the outer barrier could be white like the gelcoat, but any sane person would start and end 5 coats of barrier with the grey coat. If you wish to add a barrier coat, before you apply bottom paint, you will need to get all the existing bottom paint off, down to the gelcoat. If your existing bottom paint is really thin and sands off easily and you have the time and energy, you can sand it off yourself. Or you can have it removed via blasting. Once the bottom is down to gelcoat you need to make sure the moisture levels in the hull are low before you apply the barrier coats or you will trap the moisture in the hull laminate instead of keeping it out. Letting the sanded hull sit all winter before painting in the spring is common.
I am planning to repair my barrier coat during a full winter haul out when I next need to re-paint the bottom, probably in 2-3 years.
Mark
Mark,
Here are some detail pictures from my bottom sand and paint in August. My paint was not thinning down to the grey barrier coat underneath, except at the waterline, but it was last painted in Oct, 2009 and the paint had lost all effectiveness showing heavy fouling and even hard barnacles.
I was only planning to be out of the water for a week. I was planning on a light sanding and two coats of paint, plus zincs on the prop shaft and strut, plus replacement of a thru-hull and my speed transducer. After light sanding of the old bottom paint I could tell it was well attached to the grey barrier layer under it.
You can see how the red bottom paint mostly came off the rudder down to the grey barrier coat. The two white spots in the upper front indicate where I actually sanded through the grey barrier and down to the white gelcoat. This will have to be repaired in the future in order for the barrier to be effective. In the detail picture of the waterline, you can see the layers of paint that I have. I only had red bottom paint (two coats per the previous owners Oct 2009 yard bill) and no other colored layers. Under the red bottom paint was a grey barrier coat ("epoxy seal" per the Oct 2009 yard bill) that was harder than the red. I suspect I only have one coat of barrier because it seemed thin and I didn't find alternating grey/white layers. Barrier coats usually are applied with around 5 alternating white and grey coats to get ~ 10 mils total dry film thickness.
Under my grey barrier you can see white gelcoat and the two blue (thick and thin) factory gelcoat boot stripes - my bottom paint covers the boot stripe on the stbd aft side of the boat to account for the heavy fuel tank.
You may find that your hull has various layers of bottom paint, but it doesn't sound like it. You may also have no barrier coat, just white gelcoat, but check carefully because the barrier coats usually are applied with alternating white and grey coats. So the outer barrier could be white like the gelcoat, but any sane person would start and end 5 coats of barrier with the grey coat. If you wish to add a barrier coat, before you apply bottom paint, you will need to get all the existing bottom paint off, down to the gelcoat. If your existing bottom paint is really thin and sands off easily and you have the time and energy, you can sand it off yourself. Or you can have it removed via blasting. Once the bottom is down to gelcoat you need to make sure the moisture levels in the hull are low before you apply the barrier coats or you will trap the moisture in the hull laminate instead of keeping it out. Letting the sanded hull sit all winter before painting in the spring is common.
I am planning to repair my barrier coat during a full winter haul out when I next need to re-paint the bottom, probably in 2-3 years.
Mark
Attachments
-
 IMG_1768.jpg114.1 KB · Views: 320
 -
 IMG_1770.jpg81.5 KB · Views: 279
EMKoper
Member II
MJS -
Great thread ... I am on a parallel track with you with some minor twists and maybe a little less difficulty (though i have moved slowly on my portlight trying to avoid damage or destruction to the frame and/or boat itself).
I found a key to getting the portlight out was an electric scraper with thin (slightly flexible) attachment that did a bang-up job macerating the adhesive/filler from the inside (I have no idea what type of adhesive was used, but a lot of it was used). The weekend prior I spent 4 hours digging with a small knife and screwdriver where the $15 electric scraper did the same amount of work in 20 min and I finished up the job in less than 30 min more ultimately having to apply minimal force to pry out the frame (thank goodness for nice mid-Jan weather in eastern VA prior to this snow).
After macerating the goop from the inside, from the outside I used a very flexible 3" putty knife which was the 2nd key tool in this portlight extraction ... once I tapped the edge of the knife behind the window frame (gently done... started with just a few millimeters, slow tapping, a little more, went very slowly). Once I made it though the sealant all the way to the frame, I could twist the putty knife away from the boat surface to avoid scratching the gelcoat and then gently tapped the knife along the length of the frame separating the frame from the boat cutting through the adhesive. I used a medium sized rubber mallet and light/medium tapping -- 20 min to go around the outside 2x before applying any significant force to pry out the frame.
I think if I did a second portlight (that one on port side of the boat might be calling to me....) if installed similarly, I think I'd have it all out out in ~ 1 hour with no damage/destruction to the boat or window frame.
Question: What adhesive/sealant are you going to use when you re-install the portlight frame? That isn't 3M4200 included in the Catalina Direct reseal kit, is it? I was considering 3M4000 which is a little less "adhesive" than 4200 ... you mentioned butyl tape ... my portlight frame doesn't has enough mechanical force to rely on a tape versus an adhesive/sealant I am pretty sure (though butyl sounds like a magical thing in the right situation). Could you post a photo of the portlights you are dealing with to compare?
Question: How are you going to re-epoxy/seal the laminate around the window? I am going to use a penetrating epoxy sealer (smiths) and repair a small delaminated area with epoxy before reinstalling the portlight ... my wood had already been painted white, probably a result of a previous owner's portlight adventure.
Thanks for sharing the details ... looking forward to seeing the conclusion!
Can you tell us more about this? Most portlight assemblies are designed for a mechanical connection, with caulk....
EMKoper
Member II
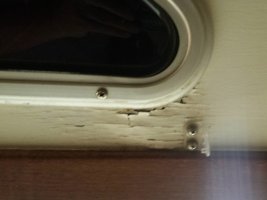
I think mine are standard, vintage 1985 Ericson Lewmar portlight (Lewmar 4L/R-like ... trapezoidal in shape) .... there is a fairing that attaches from the inside (13 small screws, but the structure is soft aluminum) that "mechanically" fastens to the portlight frame (and hence mechanically sandwiches to the structure of the boat) but I wouldn't consider it structurally sufficient to hold tight a non-adhesive tape (butyl or otherwise) to any degree. It looks/feels more cosmetic to me, overall, so presume I would need an adhesive/sealant ... if I'm off, let me know.
(photo shows frame from inside, installed, prior to my un-installing it)

(photo shows frame from inside, installed, prior to my un-installing it)
Attachments
-
 Starting Point.jpg55.4 KB · Views: 394
Paint - Continued
Mark,
That was the best explanation, thank you. Your bottom pictures look similar to Discovery's except Discovery's bottom has almost no blue paint, barnacles, and the under coat shows.
The rudder has blue paint on it but it also had lots barnacles.
You are great and I will follow your example to save my Discovery.
MJS
2nd Port Removal
Electric scraper:
Wish I had known. I used the same technique you used (knife, scraper and wood wedges), took me two weekends, strained back and about 8 hours.
Aluminum frame:
I purchased the reseal kit (see earlier writing) and am now researching technique to seal glass in gasket especially where the gasket bulges at the corners.
Powdered aluminum frames
Reading about the reseal techniques, I came across the topic of Powdered Aluminum Frames,
http://www.catalinadirect.com/forums/fr_topics.cfm?forum_id=86
http://www.catalinadirect.com/forums/fr_topic.cfm?topic_id=10329
MJS
Electric scraper:
Wish I had known. I used the same technique you used (knife, scraper and wood wedges), took me two weekends, strained back and about 8 hours.
Aluminum frame:
- My frame came away twisted due to the adhesion of the 3M4200.
- Once my frames were removed I had to drill out 2 SS screws.
I purchased the reseal kit (see earlier writing) and am now researching technique to seal glass in gasket especially where the gasket bulges at the corners.
Powdered aluminum frames
Reading about the reseal techniques, I came across the topic of Powdered Aluminum Frames,
http://www.catalinadirect.com/forums/fr_topics.cfm?forum_id=86
http://www.catalinadirect.com/forums/fr_topic.cfm?topic_id=10329
MJS