Fuel tank pull on E33RH

Loren Beach

O34 - Portland, OR
Senior Moderator
Blogs Author
You will have adjust my old price for inflation, but here is the thread about our replacement.
 

Dave G.

1984 E30+ Ludington, MI
Somehow getting the original builder to make a replica has some appeal to me although maybe not the most modern solution .
Like Grant I think a 40 gallon tank is crazy big & maybe was a "special order" on your boat. The cost of that tank will also depend on how many baffles and clean out/inspection ports. I would guess your new tank will push $2k. I get that an exact replica will plug and play but think it will cost you much more than 20-25 gallon version. Fuel weighs about 8lbs a gallon plus the weight of the tank itself. That's a lot of weight on the port side no ? I only have a 18 gallon tank and have never needed more...just a thought.
 

K2MSmith

Sustaining Member
Like Grant I think a 40 gallon tank is crazy big & maybe was a "special order" on your boat. The cost of that tank will also depend on how many baffles and clean out/inspection ports. I would guess your new tank will push $2k. I get that an exact replica will plug and play but think it will cost you much more than 20-25 gallon version. Fuel weighs about 8lbs a gallon plus the weight of the tank itself. That's a lot of weight on the port side no ? I only have a 18 gallon tank and have never needed more...just a thought.
It wasn’t option . 40 gallons is the standard tank size . I do have the option of not filling it up . I currently use the motor to get in/out of the marina but at some point who knows ? If i ever decide to move back to Channel Islands you’re motoring all the time and may want the extra capacity.
 

Prairie Schooner

Jeff & Donna, E35-3 purchased 7/21
We had a new 40 gal aluminum tank fabricated for our 35-3 in May of this year. IIRC it was $1500. Rhode Island. A marine fabricator.
 

Loren Beach

O34 - Portland, OR
Senior Moderator
Blogs Author
Custom tanks have advantages.
Good opportunity to add clean out ports and a new fuel level sender, which we did. Size/capacity might be adjusted down if desired.
Inspect all hoses and the ground connection tab to see if they are in the best locations, too. I changed our vent outlet location, for instance.
 
Last edited:

K2MSmith

Sustaining Member
Custom tanks have advantages.
Good opportunity to add clean out ports and a new fuel level sender, which we did. Size/capacity might be adjusted down if desired.
Inspect all hoses and the ground connection tab to see if they are in the best locations, too. I changed our vent outlet, for instance.
Good idea with the level sender . I’ll have to figure out where to get one of those . The tricky part of the installation is the big fill hose and vent hose are connected on the side of the tank with not much room to move it around . I’m sure there is a way to do it .
 

Attachments

  • 6E9B6401-BB2B-42C1-9CDC-BD3C0ADB1A50.jpeg
    6E9B6401-BB2B-42C1-9CDC-BD3C0ADB1A50.jpeg
    217.2 KB · Views: 1

K2MSmith

Sustaining Member
Two down and three to go . Cheap 20.00 Chinese oil pump from Amazon , vinyl hose from Ace h/w, Kawasaki fuel filter from Amazon ( suggested by a member) . About 3-4 min per can to fill. . The filter was spotless after each can so I guess fuel was clean ( at least near top of tank ) . So my thoughts are to reuse this fuel . The gardener said he would also take it for use in a farm tractor or I can put it back in new tank .
 

Attachments

  • 2A241043-BAC1-42AE-BF57-8A909B4DD8E1.jpeg
    2A241043-BAC1-42AE-BF57-8A909B4DD8E1.jpeg
    151.5 KB · Views: 5

K2MSmith

Sustaining Member
It’s taken me a while to get to this point with a standing rigging replacement, bottom paint and holidays in the middle of the task ...

I was finally able to suck all the fuel out of the tank and dry the inside, find proper disposal/ recycling of the excess fuel. I kept 15 gallons filtered in new cans to put back in eventually after the new tank goes in. (is that a good idea ?).

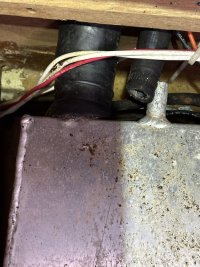
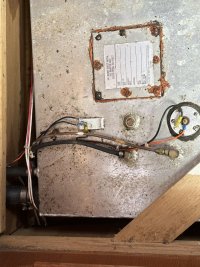
Now I just need to figure out how to get the tank out . The good news is that I can “rock” the empty tank with the supports removed , so I’m thinking if I can just get all the hoses and wiring off, it will just lift out .

Any suggestions on how to remove the large filler / vent hoses on the side with little clearance (see lower left side of the tank in this picture) ? Those hose doesn't come off easy. Next, I am going to try to use a small screwdriver to wedge in between the hose and it's fitting on the tank.. Some will say I should just cut the hoses and replace them, but I don't think that will be straightforward becase the hoses are hidden behind the interior and obviously have a signficant bend in them to reach the deck fitting.

PS. for those interested (and I may have mentioned this in this post already). The guy in Costa Mesa who made this original tank for Ericson (
Berry Tanks) is going to make me a new tank in his shop. I just need to drive the old tank to SoCal. I think it will be worth it.

IMG_1036.jpeg
 

Loren Beach

O34 - Portland, OR
Senior Moderator
Blogs Author
Any suggestions on how to remove the large filler / vent hoses on the side with little clearance (see lower left side of the tank in this picture) ? Those hose doesn't come off easy. Next, I am going to try to use a small screwdriver to wedge in between the hose and it's fitting on the tank.. Some will say I should just cut the hoses and replace them, but I don't think that will be straightforward becase the hoses are hidden behind the interior and obviously have a signficant bend in them to reach the deck fitting
My .02 worth: replace all the hoses, fill, engine supply, return, and vent hose while tank is out. Then you're OK for another couple decades.
Is the photo from right above a settee? Perhaps you can provide an access plate from either side or both. If you put in an access plate from the front you'll need to make an accurate cut so that a teak trim "picture frame molding layout" will hide the joint, Fiddly work, but if I can do this (and have done similar) then most any amateur can do it. :)
 

K2MSmith

Sustaining Member
My .02 worth: replace all the hoses, fill, engine supply, return, and vent hose while tank is out. Then you're OK for another couple decades.
Is the photo from right above a settee? Perhaps you can provide an access plate from either side or both. If you put in an access plate from the front you'll need to make an accurate cut so that a teak trim "picture frame molding layout" will hide the joint, Fiddly work, but if I can do this (and have done similar) then most any amateur can do it. :)
Yes the tank is in the port settee - all 40 gallons worth. I’ll have to investigate the filler hose routing a bit more . The fuel feed to engine is either copper or brass tubing . That disappears into the woodwork as well .
 

Prairie Schooner

Jeff & Donna, E35-3 purchased 7/21
. . . I kept 15 gallons filtered in new cans to put back in eventually after the new tank goes in. (is that a good idea ?). *1
. . .
Any suggestions on how to remove the large filler / vent hoses on the side with little clearance (see lower left side of the tank in this picture) ? Those hose doesn't come off easy. Next, I am going to try to use a small screwdriver to wedge in between the hose and it's fitting on the tank.. Some will say I should just cut the hoses and replace them, but I don't think that will be straightforward becase the hoses are hidden behind the interior and obviously have a signficant bend in them to reach the deck fitting. *2
. . .
*1 - I used an inline filter to pump out / save the fuel. At a buck a piece, I used another one to put the fuel back in the tank. (edit: Looking further up this thread, I see that's what you did.) I figure a boatyard's large storage tank gets a fair amount of moisture and crud in it so I feel safe with this. In fact, I'm thinking I may start taking all fuel in a jug and filter pump it from there to the boat.

- https://ericsonyachts.org/ie/threads/e35-3-replacing-fuel-tank.17731/post-165018

*2 - We replaced all hoses. It was enough work to access that I never want to go in there again. Heating the hose connections with a hair dryer or heat gun seemed to help a lot with removal. For the deck fill I took the cap out and heated the metal fitting. Really tight access, tho.

Good luck, Jeff
 
Last edited:

Christian Williams

E381 - Los Angeles
Senior Moderator
Blogs Author
If you have a "vacuum" oil change pump, you can pump the fuel tank out with that. Takes a while, but works reliably. And there's no rush because you have to maneuver the 5-gallon transfer jugs around anyhow between fillings.

I previously tried rattle siphon (jug sat too high), $10 drill pump (broke in 5 minutes), and almost spent $100 on a fuel transfer pump I'd never use again.
 

K2MSmith

Sustaining Member
If you have a "vacuum" oil change pump, you can pump the fuel tank out with that. Takes a while, but works reliably. And there's no rush because you have to maneuver the 5-gallon transfer jugs around anyhow between fillings.

I previously tried rattle siphon (jug sat too high), $10 drill pump (broke in 5 minutes), and almost spent $100 on a fuel transfer pump I'd never use again.
I bought one of these ( see attached ) and I think it was based on your recommendation of a similar product in another post . It worked beautifully. I did purchase a cheap 12v transfer pump prior to this but it failed after 10 gallons. Also I would notice tiny sparks at my the hose / filter connection while using it . My only explanation for this was that the fuel was “dieseling” or igniting due to small pressure fluctuation at that point . After that experience I, got the hand pump. I’m going to use it to change my oil as well .
I ended up sucking six 5 gallon containers out . I found a community recycling center that takes the fuel ( limit 10 gallons/ month ) but let me keep the containers. I kept the first 10 gallons I pumped out ( filtered ) with the electric pump to put back in the tank after replacement. The marina gas station doesn’t allow you to bring a small tank to carry out so it’s worth considering keeping some of the fuel .
 

Attachments

  • IMG_1042.jpeg
    IMG_1042.jpeg
    75.9 KB · Views: 5
Last edited:

K2MSmith

Sustaining Member
Back to the fuel tank removal . All the hoses come off except the large filler hose and the tank is free but won’t come up without removing it . I’m wondering if I should just find the right hose cutting tool and cut it off . I’m nervous about the replacement. The hose snakes around into invisible places in the wood work to the deck fill. Has anyone done this job before ?
 

Attachments

  • IMG_1083.jpeg
    IMG_1083.jpeg
    172.2 KB · Views: 2

Kenneth K

1985 32-3, Puget Sound
Blogs Author
Try heating the hose with a heat gun or blow dryer then try pushing and twisting the hose further onto the tank nozzle (hoses push easier than they pull). Once the adhesion seal is broken, pull and twist to remove the hose.
 

Frank Langer

1984 Ericson 30+, Nanaimo, BC
Back to the fuel tank removal . All the hoses come off except the large filler hose and the tank is free but won’t come up without removing it . I’m wondering if I should just find the right hose cutting tool and cut it off . I’m nervous about the replacement. The hose snakes around into invisible places in the wood work to the deck fill. Has anyone done this job before ?
If twisting doesn't work, one can buy small house removal tools that have a pointed end to slide gradually into the hose/fitting to loosen the bond. I've seen them used and they may be helpful.
Frank
 

K2MSmith

Sustaining Member
Finally got the tank out . I used a little screw driver for a hose hook . IMG_1087.jpeg
I expected to see a lot of residual diesel that didn’t make to the bilge , but there wasn’t that much and bottom of tank was fairly dry . (‘Mmm) . The tank was emptied about a month ago and I put absorbing pads inside the tank , maybe that’s why . I’m going to bring the tank home and put a bright light inside in the dark to see if I can see pinholes. In the meantime , I plan to clean out the hull and paint it with bilge paint in that area while tank is being fabricated. It’s also raining heavily here , so good opportunity to check if water is going down there. This tank is 43 years old .
 

Kenneth K

1985 32-3, Puget Sound
Blogs Author
I pulled my diesel tank a few years ago and haven't gotten around to re-installing it yet. With tank is out, it's pretty handy to re-work battery cables and other wires that are hard to access in the forward tank compartment. I rigged a temporary, plastic fuel tank while the aluminum one is out.

Last night, I finally got around to cutting inspection ports and begin cleaning the tank. There was about 3/4" of sludge in the bottom corner of the tank. The fuel pick-up tube sits about 1.5-2" above this bottom corner, so I can see how sediment contamination could become an issue on a long journey in churning seas. I didn't have any tank leakage, but I'm debating having that lower corner of the tank replaced, or, maybe having a second layer of aluminum welded on top of the existing layer.

20240207_215028.jpg 20240207_214804.jpg 20240207_223007.jpg

I'm putting in Seabuilt access plates. Luckily, I bought them a few years ago. I think they were about $190. Now they run about $300!

plate8.gif
 
Last edited:
Top