E35II Companionway Hatch Rebuild

PDX

Member III
Martin

I suspect the thread you linked would be very helpful, but unfortunately I can't get the link to work. Can you see if there is a better link address for the thread?

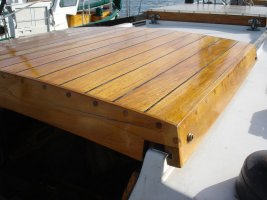
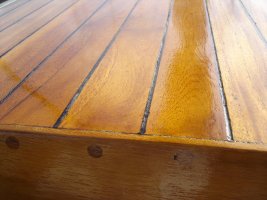
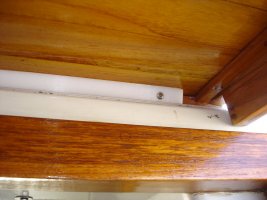
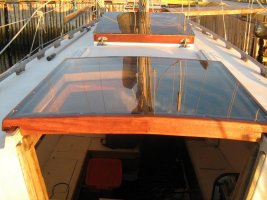
I have to build three new hatches for our boat. I prefer the curved all teak look. The boat had only wooden hatches originally (mahogony plywood I believe). One of the hatches is sure to get walked on from time to time insofar as it is in the lazarette and is quite large. I'm trying to end up with something that is both nice looking and durable.

Thanks for your help and info.
 

Martin King

Sustaining Member
Blogs Author
PDX,

Sorry 'bout the link. I can't get it to work either. Anyway it showed
basically what I covered in this thread on the slider. If you have any
questions just ask. I'm here to help.

Martin

PS, Most regulars here use their real names. Just sayin'...
 

PDX

Member III
"PS, Most regulars here use their real names. Just sayin'...[/quote]"

Not to worry. I'm not an Ericson subversive. I have complete loyalty to your dad's designs.
 

jmoses

Member III
E-35 Hatch Rebuild and Gaps

ALL,

Very nice job on the form-built hatch. I wish I thought of that 8 years ago when I built my hatch. Constructing a new hatch as per original design is, well, a real pain in the a**. The compound angles (i.e. camber with sloping pieces) drove myself and a professional woodworker a bit loco. We got it done, but the form methodology is a WAY better idea.

Gaps in hatch. Two solutions ustised on my E-35 MKII: you can take the hatch off in its entirety by removing the SS track screws and lifting the hatch off. I glued a good piece pliant closed cell foam weather to the lower forward inside edge of the hatch athartship piece which rests against the raised sill when hatch is in closed position. That solved the wind/splash leaks in the forward edge of the hatch when closed. My after side solution at the washboards is, well, pretty crude, I stuff a rolled up towel in the gap when on board.

You'll need to be careful since making the boat nearly airtight makes for a condusive environ for mold growth. Since I travel alot, the washboard/hatch gap makes for a bit of air flow and has reduced mold growth drastically (I sealed my boat up pretty well when in San Fran).

Hope that helps..........

John M.
 

jthistle

Member II
hatch...

For the past 3 months I have been puttering about this hatch Idea...started it. Put it away. got back at it....measured - said bad words. Started again. Ruined one. Started again. Etc.

Now I have the frame built as per original design. With Compound angles, Camber - twists and turns and very rudementary Joinery. I think it is almost square....

Now its time to fit it to the boat... I need assurance that I have to remove the stainless runners and attach them at the same time I put the new hatch on? True?

any input is appreciated. I'll send some pics when I get the frame cleaned up so as my mistakes are not so noticeable. Sawdust and epoxy make a wonderfull team.

Cheers
jason
 

Brisdon

Inactive Member
I did a new hatch a few years ago, when I go down to the boat later, I'll take a picture of it. Last time I refinished it, I added Delrin skids, so it wouldn't drag on the runners. That was a big improvement.
 

Brisdon

Inactive Member
Anyway, here is the one I did a few years ago. I added the Delrin skids on the under side last time I refinished it because it was too hard to scoot. Now it glides nicely.
 

Attachments

  • DSC02621.jpg
    DSC02621.jpg
    89.5 KB · Views: 114
  • DSC02622.jpg
    DSC02622.jpg
    98 KB · Views: 92
  • DSC02623.jpg
    DSC02623.jpg
    79.1 KB · Views: 109

jthistle

Member II
Delrin

Brisdon,
Thanks for the pics...and the tip on delrin. That looks dooable. I have the hatch frame completed and now just to fit a plywood square for cover and epoxy and finish.

Great job...
jt
 
Last edited:

Brisdon

Inactive Member
I bought a piece on line from one of the big plastics distributors. It cuts on a table saw. I can't remember which outfit sold it to me though. I ended up using what I had left for a door saddle (which is completely ridiculous). It was there and it was the right thickness, and in it went.
 

jthistle

Member II
Hatch Installed - Pics

Ok...here tis. For good and for bad. The main thing is - it fits! This has been quite the learning process. I decided last minute to use acrylic for the top...then I brought it to the plastics guy and he said I had to use Lexan because the screw holes were too close to the edge - a good and expensive decision. - Anyway...I'm glad its done - Here tis!

Cheers
jt
 

Attachments

  • hatch 1.jpg
    hatch 1.jpg
    92.2 KB · Views: 403
  • hatch 2.jpg
    hatch 2.jpg
    93.6 KB · Views: 2,155
  • hatch 3.jpg
    hatch 3.jpg
    76.4 KB · Views: 377
Top