You are using an out of date browser. It may not display this or other websites correctly.
You should upgrade or use an alternative browser.
You should upgrade or use an alternative browser.
I Can See Clearly, Now...
Prior threads...
http://www.ericsonyachts.org/infoexchange/showthread.php?t=4600&highlight=acrylic+hatch
http://www.ericsonyachts.org/infoexchange/showthread.php?t=2703&referrerid=28
Hope this helps.
Loren
Prior threads...
http://www.ericsonyachts.org/infoexchange/showthread.php?t=4600&highlight=acrylic+hatch
http://www.ericsonyachts.org/infoexchange/showthread.php?t=2703&referrerid=28
Hope this helps.
Loren
exoduse35
Sustaining Member
not to change the direction of this thread, but I have a different problem maybe some one can help with... My 35-2 has the original teak boards and curved top hatch cover in beautiful varnish but the hatch cover allows wind and cold air in at the front and rear. i would like to seal it but haven't found anything that will do the trick and look good and not be as complex as my interim fix of stuffing rags into the space after closing. I know there has to be some live aboards from up north that have the solution, so share please!
Keeping the wind and cold air at bay.
Edd, Consider having a canvas maker sew a one-piece cover with a skirt hanging down on the front of the sliding hatch that entirely covers the hatch and the drop boards as well. With sand in a pocket along the bottom edge, you could assemble the boards and slide the hatch closed on the canvas already in place. I'm sure that would go a long way toward keeping much of the wind out. We have just such a canvas on our boat and even our here in SoCal, I use it toward the end of the season for that very purpose. YOu might also consider fitting a sea hood as is on our boat. That way the canvas could snap to the trailing end of the the hood. When everything is opened up, the canvas is simply rolled up and temporarily stowed on the sea hood or in your case, forward of the sliding hatch. Regards, Glyn Judson, E31 hull #55, Marina del Rey, CA
Edd, Consider having a canvas maker sew a one-piece cover with a skirt hanging down on the front of the sliding hatch that entirely covers the hatch and the drop boards as well. With sand in a pocket along the bottom edge, you could assemble the boards and slide the hatch closed on the canvas already in place. I'm sure that would go a long way toward keeping much of the wind out. We have just such a canvas on our boat and even our here in SoCal, I use it toward the end of the season for that very purpose. YOu might also consider fitting a sea hood as is on our boat. That way the canvas could snap to the trailing end of the the hood. When everything is opened up, the canvas is simply rolled up and temporarily stowed on the sea hood or in your case, forward of the sliding hatch. Regards, Glyn Judson, E31 hull #55, Marina del Rey, CA
exoduse35
Sustaining Member
Thanks Glyn, but no cigar.. I all ready have the cover you described to protect that varnish. It does make a big difference though as the air coming through the rear where the slats are is minimal compared with the front edge. My slip faces directly into the wind and just a little breeze is enough to whistle under the front, love it all summer but in the winter...It would seem that there must be some way to add a weather stripping of some sort. Please keep trying though as I'm pulling my hair out over this one (making the draft even more noticeable) Edd
End the draft!!
Edd, Do not despair. Why not consider making your own sea hood? It would solve the issue of the frozen north winds from invading and add beauty to your boat at the same time. Here's a link to a great site I visit every evening to catch up on the latest. http://www.lackeysailing.com/iota/march08/30708.htm It so happens that Tim is scratch making a sea hood for his latest project and the way he describes the accompanying photos, it could be done by you too with a few tools. Check it out and get inspired. I fitted a 10" hatch to of a couple of Ericsons on the front cabin slope and had to make a teak frame to mate the two surfaces. I devised a pretty simple means of determining the arc needed to be cut and would be happy to share it with you back channel. So if you're interested, email me at glynjudson@roadrunner.com and I'll send a description and some photos of the end product. Good luck, Glyn Judson, E31 hull #55, Marina del Rey, CA
Edd, Do not despair. Why not consider making your own sea hood? It would solve the issue of the frozen north winds from invading and add beauty to your boat at the same time. Here's a link to a great site I visit every evening to catch up on the latest. http://www.lackeysailing.com/iota/march08/30708.htm It so happens that Tim is scratch making a sea hood for his latest project and the way he describes the accompanying photos, it could be done by you too with a few tools. Check it out and get inspired. I fitted a 10" hatch to of a couple of Ericsons on the front cabin slope and had to make a teak frame to mate the two surfaces. I devised a pretty simple means of determining the arc needed to be cut and would be happy to share it with you back channel. So if you're interested, email me at glynjudson@roadrunner.com and I'll send a description and some photos of the end product. Good luck, Glyn Judson, E31 hull #55, Marina del Rey, CA
Sea Hoods (aka Hatch Garages)
"Making a Sea Hood" is covered very well in a how-to article with pictures in Daniel Spurr's Boatbook: Upgrading the Cruising Sailboat. Pg 171 - 175.
First edition, Seven Seas Press. 1984.
New molded sea hoods used to be available from Cascade Yachts in Portland, OR. Now known as
http://www.chinookcomposites.com/
They recently sold off most of the Cascade sailboat molds, and may or may not still have the tooling for these smaller parts. Worth a call, IMHO.
Loren
Companionway Doors
Check out the Companionway Doors at www.zarcor.com.
Great idea, just like the Stern Seats which I have fabricated and installed
from the same StarBoard type material :nerd:
The Doors are on my list...got the detachable hinges at Minneys.
The back of the Hatch can be sealed with neoprene gasket material.
My goal is to be able to take a wave over the bow and not drown down below
in the process. Can't even wash the boat down without water leaks
Will get pics of the new Hatches.
Keep your Powder Dry
exoduse35
Sustaining Member
Thanks guys, Now all I need is to figure a way to tell the wife that The boat needs more of my time and money without serious injury or loss of life. Guess it is a good thing I found a good one that doesn't mind my having a mistress. She just wishes that boats weren't such demanding mistresses! It does look like a wood sea hood would Be the ticket. I have seen the in glass bit didn't like that i would loose the beautiful wood to a plastic envelope while sailing, it is bad enough that I need to cover it at the dock. Hadn't figured out that wood works too (sometimes there is a gap in my brilliance) It looks like a fun project and I have till the fall before it becomes a big issue again so I'll get to work on one soon
Edd
Edd
CaptDan
Member III
I have seen the in glass bit didn't like that i would loose the beautiful wood to a plastic envelope while sailing, Edd
My opinion: offset by yet another glass item not needing cosmetic attention.
Plus, my poorly finished hatch is HIDDEN by the glass sea hood WHILE sailing.
It's one of those 'glass'-half-empty-half-full deals.
Another helpful post from your E-Bud in crime,
Capt Dan G>E35II "Kunu"
Well....now that the V-Berth and Cabin Hatch are finished
It's time to start the Companionway Hatch rebuild.
Has anyone completed this project
Happy Hatches
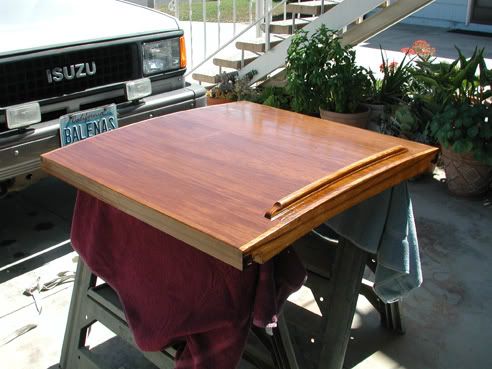
You mean something like this?
Build a form
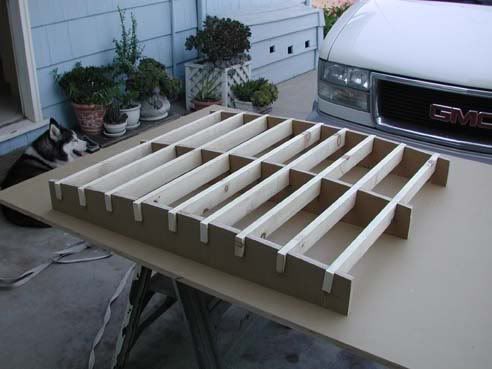
Resaw and edge glue teak "veneer"
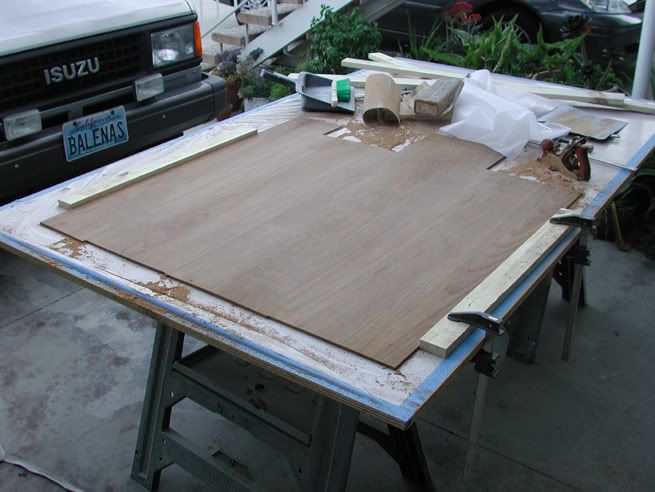
Vacuum bag ply sandwich to form
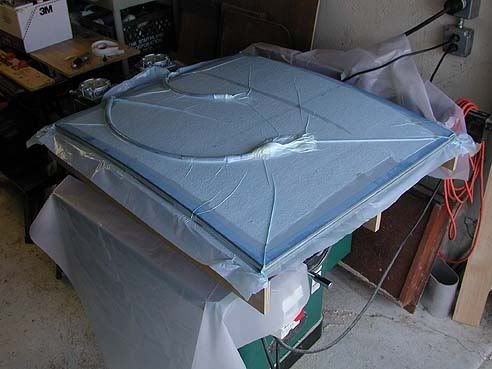
Add sides, runners, varnish, etc.

On Queenie there is quite a gap between the top board and the sliding hatch. I haven’t tried this yet but as I was reading this thread the thought popped into my head that a piece of that insulating foam tubing that is used on copper pipes slid over the top edge of the top board might do the trick of sealing up that gap.
Dear Mr King,
YOU SADDEN ME! Here I have been so proud of my work! and the finish of my wood! Then you post that! Now I just feel so inferior!Thanks Loads
THATS BEAUTIFUL
Thanks Edd. From your previous posts, you sound like someone who
appreciates the look and feel of wood aboard-and the skill to make
that happen. I like the cut of your jib. If you are serious about building
a sea hood in wood, realize that you don't have to make a box with
right angles, but can build something with sloping sides and nicely
radiused edges.
Martin
exoduse35
Sustaining Member
I am. I will. And I thank you for the words and lesson in pictures. These craft are works of art in both beauty and function, I only hope to keep it that way. The tricky parts are (1)to find a deficiency and (2)to create a solution that not only works but looks like it belongs and always was there. Very hard to do on these YACHTS!
Martin
First, the hatch is beautiful. Some questions:
How thick is your "veneer?" 1/8" or better?
Can the hatch be walked on?
How close do the stringers centers need to be in order for the hatch to be walked on? I am assuming the frame you are using for vacuum bagging is not the actual hatch frame? Or is it?
I have thought of using okume marine plywood, with reliefs cut into it to make it flexible, epoxied onto a curved frame to support the teak veneer. Have you ever tried that?
Thanks.
PDX,
You might want to check out this thread:
http://www.ericsonyachts.org/infoexc...=sliding+hatch
The teak "veneer" is 1/4" as are the baltic birch plys for a total
thickness of 3/4 ". Yes it would support the weight of your average
human, but mine lives under a dodger and a sea hood, so it never sees
that kind of abuse. The bending form is strictly that, and is not part of
the finished piece. If you are building for strength, then bent laminations
are the way to go with the grain oriented in 90's or 45' to each other.
I don't like the idea of kerfing plywood to achieve a curve especially
when you need max strength for a given thickness. If you are looking
at alternative construction, a better solution would be coopering solid
wood into a curve, and adding splines for additional strength.
Martin