E29 Finally launched after 2.5 year refit

jkenan

Member III
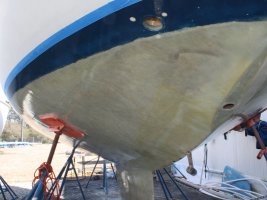
Just wanted to show the results of my work over the last 2.5yrs. It started with a bottom job, and I got a little carried away. Ended up completing the following:
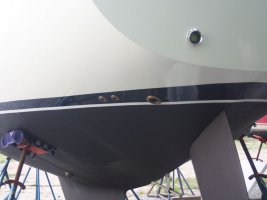
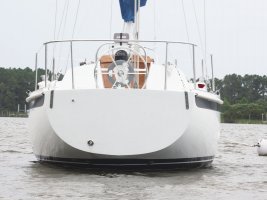
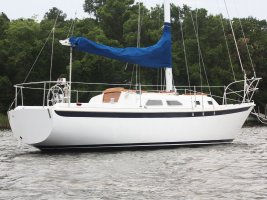
1) Repaired cracks and gouges, epoxy filled holes for mounting hardware, and painted hull and deck & binnacle with Interlux Perfection
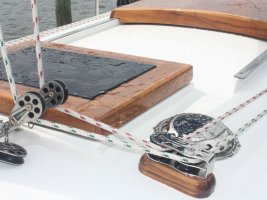
2) Rebedded all deck hardware, replacing cleats and organizers
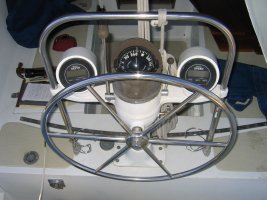
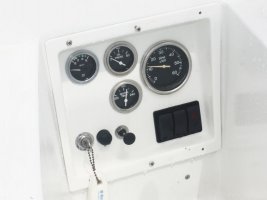
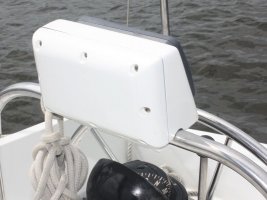
3) Built GPS housing and Engine control panel
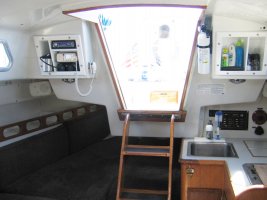
4) Refinished hatches
5) Replaced chainplates (discussed in earlier thread)
6) Replaced Rudder with FOSS rudder - the improvement in handling is remarkable - better upwind perfomance, and and much better balanced helm. Also replaced quadrant with bronze as old aluminum one was siezed to shaft and significantly corroded. New chain as well.
7) New shaft, PSS shaft seal, and engine mounts
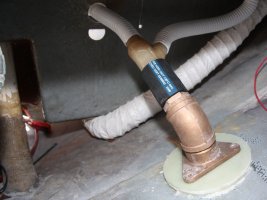
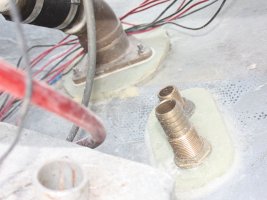
8) Replaced all thu-hulls - and relocated some. Enlarged scuppers to 2-inch, and moved them above the water line. There are four holes now below the water line (there were 8!) - raw water in, head discharge, sink discharge, and speedwheel.
9) Lightning grounding system.
10) Replaced all electrical wiring with marine grade tinned, and heat shrunk all terminals.
11) Replaced all engine hoses.

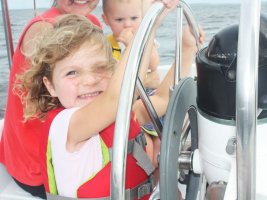
I sailed the boat hard the last weekend for sea trials in 20 knots (family was NOT onboard - took them out in 10 knots after initial trials). The biggest concern I had was the chainplate area, which I reglassed after cutting away a four foot by 2 inch section in order to remove old and corroded chainplates, and all of this held up beautifully during an intentional jibe (not a full force jibe, but wanted to test the rig with a sudden shock), and a minor knockdown.

The only things that went wrong were:
1) I lost steering b/c I had not tightened the u-bolts on the cable sufficiently (it took sailing closed hauled in 20knots after several trials with full 135% genny and 1 main reef to achieve this). The boat immediately hove-to, and I was able to fix it underway.
2) After reefing the genny on the roller furling in 20 knots and sailing pretty hard again, the roller ended up slipping allowing the reef to come out. With the drum now spinning independantly of the torque tube, I had to send the unit back to Harken for repair and replacement of a part or two. Fortunately, this happened the very last day of our vacation, so we had plenty of sailing. We'll see how this issue turns out, but I'm glad it happened there instead of on a trip with the family when we might really need it.

Overall, I am very pleased with the results, and glad to be sailing again! Here are some pics...
 

Attachments

  • E29-7.jpg
    E29-7.jpg
    113.2 KB · Views: 121
  • E29-1.JPG
    E29-1.JPG
    147.1 KB · Views: 205
  • E29-2.JPG
    E29-2.JPG
    63 KB · Views: 156
  • E29-4.JPG
    E29-4.JPG
    88.9 KB · Views: 152
  • E29-5.JPG
    E29-5.JPG
    118.7 KB · Views: 154

paul culver

Member III
Very nice work! Question on your engine control panel: did you make it yourself or buy it? The one on my E29 is in need of replacement and I'd like to buy a prefab if I knew where to get it.

Paul
E29 "Bear"
 

Sven

Seglare
Congratulation on the outstanding work.

Question: Your RPMs and temp show life but oil and amps are lifeless ?

Do you do house calls ? :egrin:


-Sven
 

robjpowell

Member II
Looks wonderful. One Q -did you make/have made the Binnacle frame? I am trying to design something for my 1976 E35-2 and any extra pictures you could post would be great -especially showing how it is mounted to the sole and/or steering column.
Thanks
Rob
 

jkenan

Member III
Very nice work! Question on your engine control panel: did you make it yourself or buy it? The one on my E29 is in need of replacement and I'd like to buy a prefab if I knew where to get it.

Paul
E29 "Bear"

I wanted a larger engine control panel to accomodate switches for the blower, courtesy lights, engine panel lights, and another guage (I want to add a fuel gauge). I made it by taking a block of wood (basically about 4pcs of 1" x 10" x 10" poplar laminated together, and using a bandsaw and router, getting it to the right shape for a mold. Then I glued that to a larger flat piece for a flange, epoxied the whole thing, polished, and cast some fiberglass matt on it. A little fairing and paint, and she was done. The GPS housing was made the same way, except the glass cast on the wood was the female mold for the GPS housing, whereas the glass cast on the wood for the engine panel was the final part. I've attached some photos of the GPS housing being made (sorry, didn't take any of the panel).

It did take some time, however. Would be happy to share the mold with anyone.
 

Attachments

  • Mold1.JPG
    Mold1.JPG
    101 KB · Views: 63
  • Mold3.JPG
    Mold3.JPG
    83.9 KB · Views: 66
  • Mold4.JPG
    Mold4.JPG
    168.1 KB · Views: 68
  • Mold5.JPG
    Mold5.JPG
    163.8 KB · Views: 76

jkenan

Member III
Congratulation on the outstanding work.

Question: Your RPMs and temp show life but oil and amps are lifeless ?

Do you do house calls ? :egrin:


-Sven


Thanks for the comment on house calls :egrin:

When the engine is off, that's where those two guages sit for whatever reason. When it is running, they register appropriately. Dunno why.
 

jkenan

Member III
...did you make/have made the Binnacle frame?...

That's how the binnacle was when I bought the boat in 2005. Believe it was how the boat was originally made. Here's a photo I made during a pre-purchase inspection....
 

Attachments

  • binnacle.JPG
    binnacle.JPG
    125.1 KB · Views: 242

napleskayak

Junior Member
Wow!

Congrats and thanks for the pics. I am in the middle of my 1976 E 29 restoration and a little bit overwhelmed so these pics were very inspiring. I have done a few boats before but never to the degree that I am into now. A few questions;
1. Did you get the windows redone or do them yourself?

2. Do you have more pics of the control lines led aft? I have been trying to map this out and make it nice and easy and relatively affordable and yours just looks wonderful

3. How about down below? My boat needs lots of work after water damage from a leaking hull/deck seam as well as the leaking windows.

Your hatches are very cool. I have rebuilt mine already and they are varnished in the garage. I copied the factory ones but yours honestly look better
 

mherrcat

Contributing Partner
What engine do you have? How much room do you have between the shaft coupling and the PSS Shaft Seal? I am curious if a dripless seal will fit behind my M-18 engine; it's a tight fit...
 

jkenan

Member III
I have done a few boats before but never to the degree that I am into now.

Same here. I definitely bit off more than I could chew, but am finishing everything in smaller 'bites'. There is still a lot to do, all if it house systems (we can daysail, but not cruise just yet).

1. Did you get the windows redone or do them yourself?

Havn't done the windows, but need to. For the short term, my plan is to take a probe and basically gouge out as much of the old leaky bedding compound as possible along outside AND inside perimiter of the window from on the exterior only - then I will run a bead of caulk, work it into the seam, clean it up, and hope it holds for a year or two. Then I'll replace the windows, and I mean replace because I believe the only way I can get my existing windows out is to destroy them, they are so firmly bedded....:mad:

Do you have more pics of the control lines led aft? I have been trying to map this out and make it nice and easy and relatively affordable and yours just looks wonderfu

Picture attached. I've two reef points in the main. Red lines are clew, green lines are luff (running through the organizers), all led aft to a 3-line clutch on either side. The reef points use 4 of the 6 clutches. Main halyard goes to port, spinnaker to starboard. Jib halyard cleats off at the mast since it is furled and gets raised/lowered infrequently. I wish I'd experimented more with the position of the origanizers on deck a little more - they are Garhauer stacked 4-sheave organizers (footprint is same as a two sheave). The lines will cross somewhat, and may look a little awkward, but the space available for the organizers is limited on the E29, so I figured the footprint of the stacked unit would optimize space.

3. How about down below? My boat needs lots of work after water damage from a leaking hull/deck seam as well as the leaking windows.

That's a future project. I installed new trim around the companionway and hatches in this round, and a few improvements in previous rounds but I'd like to do more. A friend I made at the boatyard finished the inside of a Tartan 27 in cedar, and was absolutely beautiful. I'd love to refit the interior, but just don't have the time or the money after what I've already done. The good news is my interior is definitely passable, will serve is well for the interim. Photo attached highlighting cabinets I made for radio and galley

Your hatches are very cool. I have rebuilt mine already and they are varnished in the garage. I copied the factory ones but yours honestly look better

Thanks for the compliment!
 

Attachments

  • CntrlLines.JPG
    CntrlLines.JPG
    106.6 KB · Views: 156
  • Interior1.JPG
    Interior1.JPG
    96.1 KB · Views: 165
Last edited:

jkenan

Member III
What engine do you have? How much room do you have between the shaft coupling and the PSS Shaft Seal? I am curious if a dripless seal will fit behind my M-18 engine; it's a tight fit...

Atomic 4 with .75" shaft. Had plenty of room for the PSS seal, with about 5 inches to spare. Sorry, can't help with the M-18.
 

selous

Inactive Member
Beautiful job! Well done! After having done some extensive work on my E27 I can relate to the amount of work you put into your boat,she looks lovely.
Did you find any loss of performance when close hauled because of the new position of the shrouds? I Imagine you cannot sheet in quite as close as before.
 

selous

Inactive Member
Oh,got another one for you.Did you roll and tip the topsides? I painted my hull with perfection and found that no matter what I did I ended up with brush marks when tipping(probably because of the wind) so I did a lot of sanding and did the last two coats with just a roller.had some bubbles but got a better finish than with tipping.
 

jkenan

Member III
Did you find any loss of performance when close hauled because of the new position of the shrouds? I Imagine you cannot sheet in quite as close as before.

I think there may be a sacrifice when sailing with a jib or racing blade. The E29 has outboard genoa tracks, and the exterior shrouds don't interfere with the sheeting angle of the 135% genny sailing close hauled, no matter where the car is along the track. The frontmost 6" of track is un-usable with exterior shrouds, but that area is never used with a 135% genny. A jib or racing blade may be affected perhaps, but only in extreme close-hauled sailing. I consider that a negligible sacrafice as the E29 is more of cruiser than a racer, and is happiest on a close reach or beam reach (IMHO). Others may disagree.
 

jkenan

Member III
Oh,got another one for you.Did you roll and tip the topsides? I painted my hull with perfection and found that no matter what I did I ended up with brush marks when tipping(probably because of the wind) so I did a lot of sanding and did the last two coats with just a roller.had some bubbles but got a better finish than with tipping.


I sprayed the Perfection using an Ingersoll Rand HVLP automotive spray gun. Did all of this outiside, and wore all the protective gear (you never want to spray two-part paint without proper protection). The folks at Interlux were very helpful - they would advise what ratio of thinners (2316 and 2333N) to use based on temperature and humidity. The hull came out great, with the exception of a few bugs that seem to like the thinner. The deck was little more challenging with all the nooks and crannies, and did not come out as smooth, but is still a radical improvement from what it was. I still have to paint the non-skid areas with the non-skid additive.
 

selous

Inactive Member
Thanks for the info.I still have the deck to paint and would love to spray but can't trailer the boat and the marinas around here insist on the boat being tented if sprayed so it looks like I'll have to roll it on again which I'm sure like the hull will be a great improvement over the tired gelcoat.
 

bigd14

Contributing Partner
Blogs Author
Congratulations John, she looks great! Top notch refit. Must be nice to be back in the water. Thanks for documenting your progress, I have applied many of your techniques on my E27 restoration.

Doug
 

Lucky Dog

Member III
Very nice, I am at least a year behind you with a refit. Would you tell or show more about the 2" cockpit drains, their location and do they drain in the stern?

ml
 

jkenan

Member III
Would you tell or show more about the 2" cockpit drains, their location and do they drain in the stern?

ml

I've attached some photos of my scupper installation, and other thru-hull installations. All thru-hulls below the waterline have seacocks, and thru-hulls above the waterline use hose barb fittings (these include scuppers, bilge, and sump lines). Every thru-hull has a fiberglass backing pad made per Mainsail's technique - I made a fiberglass sheet about 3/8-1/2 inch thick, and cut circular backing pads from it with a hole saw (1/4 inch pilot bit), then epoxied them into place. To insure the mating surface would be parallel to the installed flange, I used thick blocks of wood with a straight 1/4 hole drilled through it for a long fastener - the pad was epoxied in place and then a fastener passed through the wood, pad, and hull, bolted to the outside and clamped down. The resulting pressure would hold align the pad to the block of wood, which was acceptably level with the intended installation. After the epoxy kicked, I drilled the required hole thru the hull/pad for the 2" thru hull, and countersunk bolts to hold the flange down from the outside of the hull and epoxied them into place. All flanges installations are caulked with 4200.

The 'Y' that connects two scuppers to each thru-hull is a Centek standard "Y" fitting that accepts two 1.5" hoses and connects to a 2" hose. It is not listed on their website (http://www.centekindustries.com/fittings.html), but they will make them for you if you request it. I've since double clamped all hoses, and replaced the hoses coming from the cockpit drains with heavier duty, smooth walled hose.

These drains are much more efficient than the original installation, and there is no 'slurping' noise when underway (which I was worried about pre-launch).
 

Attachments

  • ScupperDrain1.JPG
    ScupperDrain1.JPG
    94.7 KB · Views: 90
  • ScupperDrain2.JPG
    ScupperDrain2.JPG
    106.5 KB · Views: 87
  • ScupperDrain5.JPG
    ScupperDrain5.JPG
    67.6 KB · Views: 91
  • ScupperDrain7.JPG
    ScupperDrain7.JPG
    98.4 KB · Views: 95
  • ScupperDrain6.JPG
    ScupperDrain6.JPG
    92.2 KB · Views: 100
Top