Waterline Inside Hull

Joe

Member II
I have to install a new head in my daughter's boat. To get the venting loops high enough (but not unnecessarily high), I need to find the waterline accurately. I assume this is going to involve some 30' of clear tubing with one end dunked over the transom after getting the whole tube full of water, and then using the loose end to mark the water level. Will this work or is there a better solution that escapes me?
 

Glyn Judson

Moderator
Moderator
Finding the waterline inside the boat.

Joe, Simply attach a lenght of clear or reinforced vinyl tubing to the closed raw water seacock in her head, hold it above what you judge to be the outside waterline and open the seacock. The waterline you see in the tubing will be it. Use 3-4 feet of tubing to be waaay safe. Try to get the vent loop as high as you can and as much toward the centerline of the boat. Mine is at chest height in the far forward corner of the head enclosure almost smack-dab over the keel and I cover it with a bath towel on a hook placed above it. Go for it. Glyn Judson, E31 hull #55, Marina del Rey, CA
 

Joe

Member II
Thanks! It's uncanny how I never seem to think of the obvious. I also need to know the waterline at the galley so I'll either use a longer tube from a single seacock or do it twice at different seacocks. I assume the reason to have the vent loops as close to the centerline as possible has to do with heeling?
 

Glyn Judson

Moderator
Moderator
Waterline and heeling.

Joe, You're exactly right. Picture the vent placed far to the outboard of the head and imagine that it would take very little heel to put it below the waterline. Now move that same loop to the centerline of the hull and you can see the improvement. Raise it higher and the story gets even better. The following is just a suggestion based on my personal experience with two different E31's and their respective waterlines relative to the top of the toilet bowl(s). The waterline on my boat is about 1/4" below the very top of the china bowl. The waterline on hull #33 is about 1/4" above the bowl. Same boats, same brand of head (Groco K-H) but two different waterlines. The fact that mine is so close to the top of the bowl convinced me years ago to place the vent high and centered. As well, I used a Groco 3/4" bronze vent that when installed between the raw water seacock and the head pump, fails to close the little vent hole on top of the bronze casting. Well, it should, I've installed it backwards on purpose. For anyone to pump the head, one needs to place their finger over the vent hole in order to suck water past the vent. The mere act of walking away from the head and presumably taking one's finger with him insures that the head can't siphon water into the boat and sink it. That was not the case with my friends boat, hull #33. He relied upon memory to shut off the seacock after each use of the head. Twice in two weeks he left the boat for approxomately 45 minutes to shop at West Marine only to come back to find the cabin sole awash in sea water. That precipitated a call to me and we added that same loop in the same place on his boat, problem solved. Glyn Judson, E31 hull #55, Marina del Rey, CA
 

Joe

Member II
"...and presumably taking one's finger with him..." :)

I'll do the same. Thanks.
 

Glyn Judson

Moderator
Moderator
Waterline and heeling.

Joe, Despite every attempt, I've yet to be able to post images to this list. Email me back channel at glynjudson@roadrunner.com and I'll send you three images of my head and plumbing installation that include Nylon washer stand-offs under the toilet base which allows for fresh water flushing under it and prevents green stains, etc on the fiberglass. Glyn Judson, E31 hull #55, Marina del Rey, CA
 

Sean Engle

Your Friendly Administrator
Administrator
Founder
Joe, Despite every attempt, I've yet to be able to post images to this list. Email me back channel at glynjudson@roadrunner.com and I'll send you three images of my head and plumbing installation that include Nylon washer stand-offs under the toilet base which allows for fresh water flushing under it and prevents green stains, etc on the fiberglass. Glyn Judson, E31 hull #55, Marina del Rey, CA

Hey Glyn -

Email me the pictures directly, and then I'll let you know what the issue is - and (as a bonus offer) I'll create an FAQ on it for others to see.... :nerd:

//sse
 

Rocinante33

Contributing Partner
A BIG 5thanks to Sean

Sean,

Thanks so much for taking care of all the details with respect to the site! It really makes it a great tool for the whole community of Ericson sailors, wherever they are in the world!!!
 

Glyn Judson

Moderator
Moderator
Waterline and heeliing.

Joe, Some explanation is necessary.

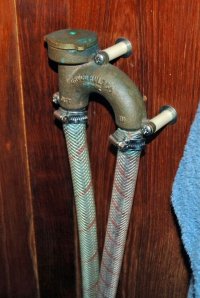
1. Hull #55, Head #1.jpg is simply for orientation. It shows the raw water intake in the bottom right corner of the photo coming from a seacock under the head sink. It will be useful to know that in the next photo. By the way, that's the starboard side of the boat you're looking at with the head facing aft against the bulkhead that separates it form the V-berth.

2. Hull #55, Groco vent 3/4".jpg shows the raw water intake hose on the right attached to the Groco vented loop where it reads IN. The other side of the loop leads to the intake of my Groco K-H head and reads OUT. Those white spacers come with the bronze loop.

By pumping the head you can see that I'm pulling water past the loop, opposite to the way the vent was designed to operate. To make the vent close, one would have to push water through the loop and that was not what my intent ever was. By sealing that hole, the water can be drawn up and past the vent to supply the toilet. It requires me to use a finger to seal the hole at the same time I pump the head with the other hand. Of course, this would work with an electrical head as well. It's simply the safest failsafe method I could come up with. Like I said earlier, that vent is at about chest height, as close to the center line of the boat as I could get it. It might interest you to know that in a conversation with a tech rep at Groco years ago, I mentioned my use of that vent in reverse and he responded by telling me that he recommends that same method.

I think the layout of your E25 is possibly the same as my E31 in that the head is on the starboard side just aft of the V-berth. That being the case, the loop is mounted on the bulkhead separating the two and to the left, in the corner of the head enclosure.

The loop is through bolted with really cool barrel nuts on the V-berth side of the bulkhead (see page 566 in the 2007 West Marine Catalog) and Phillips head machine screws in the head that you can see. I added the flat washers at the bulkhead to help spread the load when/if grabbing the loop in heavy seas, etc.

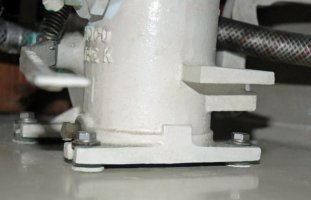
3. Hull #55, Groco standoffs.jpg shows stacked 1/4" Nylon flat washers (page 581 in the 2007 West Marine Catalog) I installed between the bronze toilet base and the fiberglass riser it's lag screwed to. There's now an air space between them which allows me to pour a glass of fresh water in there to wash salt, dust and hair away so it can't remain, turn green and stay damp. I stacked two or three washers and bedding compound under each lag screw as best I can remember.

Note also the raw water feed hose on the right of the photo leading up the bulkhead to the loop and the supply hose from the other side of the loop on the left, clamped to the head raw water intake barb.

I hope I haven't confused you and that the photos will be of some help.

Later,

Glyn
 

Joe

Member II
Glyn:

The pictures and explanations are of enormous help to me (and others, I'm sure).

Thanks very much.
 
Top