Rub Rail Replacement

Sailsteve

Member
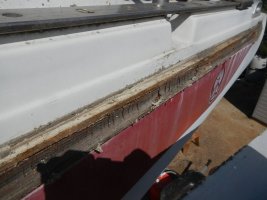
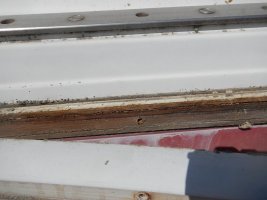
I'm about to replace the rubrail on my E36-RH for the second time in about 12 years. I found a new product that looks really tough and somewhat simple to install... It's an Italian made rubrail available from Jamestown Marine. The brand is Tessilmare and the samples they sent me look strong enough to hold up for a long time. If you go to the Jamestown Marine web site they have a neat video on the rubrail installation process (http://www.jamestowndistributors.co...title=Tessilmare+Radial+Rub+Rail+Installation). The only installation issue I have is the lip around the hull-top-deck joint. It is sticking out too high to allow me to get the new rub rail close to the boat. I would like to belt sand or grind down the lip until it is almost flush with the deck and sides of the boat. The big question I have is... Is the lip structural (does the boat need it to hold the deck and hull together, or can it go away.

Has anyone had experience with getting rid of the lip? Has anyone had experience with the Tessilmare rub rail?
 

skipper

New Member
Rubrail Problem R/H 36

I'm about to replace the rubrail on my E36-RH for the second time in about 12 years. I found a new product that looks really tough and somewhat simple to install... It's an Italian made rubrail available from Jamestown Marine. The brand is Tessilmare and the samples they sent me look strong enough to hold up for a long time. If you go to the Jamestown Marine web site they have a neat video on the rubrail installation process (http://www.jamestowndistributors.co...title=Tessilmare+Radial+Rub+Rail+Installation). The only installation issue I have is the lip around the hull-top-deck joint. It is sticking out too high to allow me to get the new rub rail close to the boat. I would like to belt sand or grind down the lip until it is almost flush with the deck and sides of the boat. The big question I have is... Is the lip structural (does the boat need it to hold the deck and hull together, or can it go away.

Has anyone had experience with getting rid of the lip? Has anyone had experience with the Tessilmare rub rail?
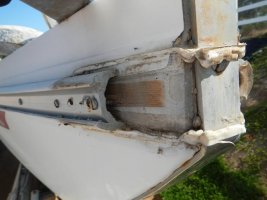
My R/H 36' 1982 is missing a 5' section which I would like to replace just that section do to the same problem. If you have a section you would like to sell I would be interested.
 

Sailsteve

Member
My R/H 36' 1982 is missing a 5' section which I would like to replace just that section do to the same problem. If you have a section you would like to sell I would be interested.

I since the Tessilmare rubrail kits come in 45 foot lengths I will have to buy two of them and I should have a 5' section left. I don't know if you understand that this is not the standard Ericson rub rail that came with the boat. In any case, I would be happy to sell you a piece of what I don't need.

I will probably order the part soon. At the moment the winter is stymieing all of my boat projects. Too damn cold to do anything.
 

Sailsteve

Member
do you have a pic of the lip?

Dave,

I haven't taken a photo of the lip because its height varies along the length... It is very short at the bow, almost flush, but rises to almost a half-inch above the hull at other places. The actual nub that sticks out, that's the sandwich between the deck and the hull, is about a half inch thick. I am thinking of taking a grinder or a belt sander to get it almost flush to the deck and hull joint. My question is, is that lip a part of the structural integrity of the boat? If I sand it down will the deck separate from the rest of the boat? I don't think it is the case, but I just want to make sure before I do it.

Steve
 

toddster

Curator of Broken Parts
Blogs Author
There is a page in the manual (for the 29, anyway) describing the joint construction. As I understand it, the lips were screwed together for temporary support before the inner part of the joint was glassed over, then the part with the screws on it was cut off. The only remaining purpose of the "lips" was to hold the rub-rail screws (which they do very poorly after 40 years.) Grinding off the lips and glassing them over ought to make the joint twice as strong.
 

leighton

Member I
The Lip

do you have a pic of the lip?

Here are some photos from the E35-2 vintage '76, bow & stern:
DSCN2219.jpgDSCN2233.jpgDSCN2236.jpg

The lip appears to be more prominent midships, but I've left the rub strake on for now to protect that strip of wood that the screws bed into. When I finally make my way to the outside of the boat, I plan on grinding the lip flat and glassing over it before the LPU goes on. I think that should provide a more secure deck-hull joint than the clamping efforts of the vinyl strake. It never leaked, but I don't know why not.
 

toddster

Curator of Broken Parts
Blogs Author
Hmm. That's a bit different from the smaller boats. Not exactly sure what's going on there.
 

Dave N

Member III
Tom, yours is the same as mine. The story goes that Ericson inserted the wood piece to spread the deck and hull for another inch of head room. The joint was then glassed over inside with several layers making it water tight. The track was then screwed to this wood strip without going thru the glass hull. The wood on mine was pretty well rotted. So we replaced it with some white oak and screwed the new Wefco rail to it. Pics are in an album at my name. We considered grinding it down and glassing it as you suggest but felt it would be a lot more time and effort. Here is a pic of an E 35 that did grind it away and glass over,
 

Attachments

  • mainDPZIND6C.jpg
    mainDPZIND6C.jpg
    6.9 KB · Views: 507

tcooper

Member II
36 RH rubrail design

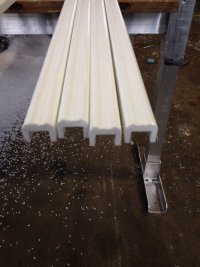
I'm replacing my 36 RH rub rail on my 36 RH as we speak, the flange on the 36RH if it's not sealed will allow water into boat. If the rub rail is not sealed well water runs off deck onto rub rail and go into boat, not lots of water but nuisance leak. I decided to make my own rub rail made of king board, using standard woodworking equipment. Because plastic is 8' long I'm using a plastic welder so each side will be one long piece. I put a groove in the top edge which will be a SS strip screwed in.

Bottom line it's important to have the edge created from the deck to hull joint be sealed, I chose to make my own because didn't like any of the profiles, lot of damn work but it's filled our long Michigan winter.


Tom C
36 RHIMG_0321.jpg
 

skipper

New Member
Plastic rub rail.

Looks like it will work. You confirmed my thought of ware the water was getting in when it rained. Is that channel PVC?
 

Sailsteve

Member
So... as I read through all of this my take-away is that the lip does not affect the structural integrity of the boat, but it is a source of leaks. So, I will grind it down and either glass it over or fill the existing gaps with Marine-Tex or West System epoxy, and then sand that smooth before attaching the new Tessilmare rubrail. If someone sees a mistake in any of that please let me know before I ruin everything.:nerd:

Thank you all.
 

Loren Beach

O34 - Portland, OR
Senior Moderator
Blogs Author
So... as I read through all of this my take-away is that the lip does not affect the structural integrity of the boat, but it is a source of leaks. So, I will grind it down and either glass it over or fill the existing gaps with Marine-Tex or West System epoxy, and then sand that smooth before attaching the new Tessilmare rubrail. If someone sees a mistake in any of that please let me know before I ruin everything.:nerd:

Thank you all.

One comment if I may.
Decades ago they glassed over the joint on the inside with heavy roving. If not wetted out just right, and then not layered over with some cloth, you could get pin holes in the roving layer that would admit small but vexing amounts of rain water.
A friend of mine had this problem with his early 80's Ericson, and IIRC the yard reefed out the old sealant in the outside crack and filled it in with either sealant or thickened resin. His model did not not have any wood in the joint, however.
Original alum. cover was put back on and it has never leaked inside again in the ensuing two decades.

My take on this is that you could attack the leak from the inside, but this would require removing and restoring interior parts. The "outside fix" is less invasive, and would likely have to be done anyway.

Best,
Loren
 
Top