Following
@Tom Guild's lead, I ordered two oval tubes from
Timeless Tubes. I ordered them to the same specs as Tom: Stainless Steel 316L, Oval Tube, 37 x 21 x 2mm thick walls. Since I was not confident in the length, I ordered them over-long (2.85m) and cut them to size. Since I planned to cut them to size, I had Timeless send me unattached endcaps. It Turns Out I could have ordered the tubes to size (2.49m) with the endcaps welded on but my risk tolerance (self confidence) was too low.
I worked with Geoff Day to generate the initial quote, but he resigned from Timeless after I placed the order (strictly coincidental). Tom McMillian inherited the order and all went well. The fabrication and shipping beat their estimated lead times; the quote was for two to three weeks for fabrication and one to two weeks for shipment. I ordered them May 27, they were shipped June 13, and I received them June 18.
The cross section of the tubes is a near perfect match to the wood handrails:

In preparation, I removed the wood handrails (one intact, one in pieces), cleaned off the adhesive/sealant (Anti-Bond for the win!), and filled the existing screw holes with thickened epoxy (I cheated and used MarineTex).
The cabintop mounting is 2.5" for the fore attachment point, then 14" gap followed by a 5" landing, repeated until the aft end which was about 5". I figured 19" on center but my mounting screws came out slightly shifted by the end so the "landings" are slightly less than 19" on center but not enough to cause a problem.
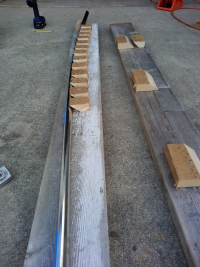
I had some 10' 2x10 lumber in my "scrap" pile so I used one as a mockup cabintop and one to make a bending jig. I cut a length of 2x6 on a 45 degree angle and then cut it into 5" sections to match the cabintop handrail "landings". I screwed the "landing" sections to my 2x10 lumber with offsets of 0" (fore), 0.5", 1.0", 1.25", 0.75", and 0" (aft). I was able to make the unbent tubing conform to the cabintop bend, but I was uncomfortable with the force necessary. Holding the rail in position while drilling screw holes etc. would have been very challenging without prebending the rail.
Cabintop simulation jig:

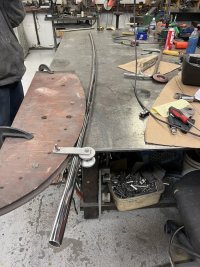
I made a bending jig out of my second 2x10 by using the "landing" offcut (45 degrees) cut into short sections and then screwed in an arc on the bending jig 2x10. I arbitrarily made the arc to be 4' long with 1.5" offset in the center. This worked OK but a little more radius would have been helpful (maybe 2" offset in the center). Note that the bending jig bends with the bottom side of the rail "up" so that the 45 degree angle traps the tube rather than having to fight it from "popping out" of the jig.
I first bent the port rail mostly with the jig as pictured, then I moved the "stopper" block to the other side of the curve and finished bending the other end of the tube. That way the tube itself gives you plenty of leverage to bend the portion that needs to be bent.
Once I had the port rail bent, I unscrewed the blocks and refastened them "mirror image" to do the starboard rail.
Bending jig:

Bending the rail:

The cabintop jig with the starboard rail "installed" and the port rail next to it. The blue tape is where the "lands" on the cabintop are. As you can see, there isn't a lot of bend, but it made installation go smoothly with only a little force needed to make the rails conform to the real cabintop.

I temporarily used #12 pan head screws to attach the rails because they were available at the local WM store. I bought a box of #14 1.5" long Stainless Steel Oval Head Screws for Sheet Metal from McMaster-Carr for the final installation.
Results...
Fore attachment point:

Aft-most full landing showing the slight offset of the screws:

Aft attachment point:

The white spots are the old screw holes that I filled using MarineTex. Those screw holes are the only ones visible with the rails installed.
ToDo:
- Remove the handrails at the end of the season and have end caps welded on.
- When I reinstall the rails, I'll countersink the top screw holes in the rails and use the pretty oval head screws.
 file-57.jpeg203.8 KB · Views: 91
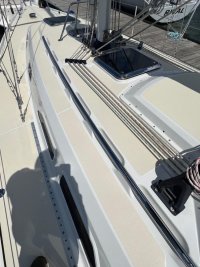 thumbnail.jpg151.3 KB · Views: 85
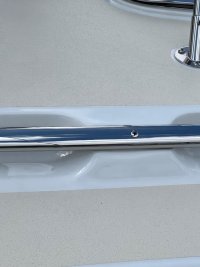 thumbnail2.jpg111.7 KB · Views: 83
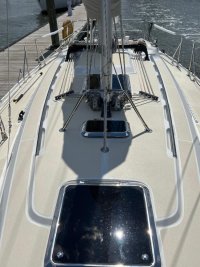 thumbnail4.jpg151.4 KB · Views: 79
 thumbnail5.jpg154.2 KB · Views: 77
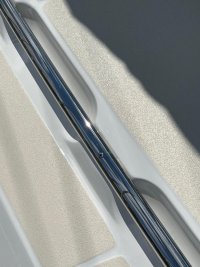 thumbnail6.jpg159.8 KB · Views: 74
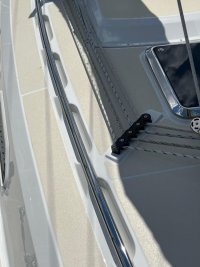 thumbnail7.jpg113.9 KB · Views: 74
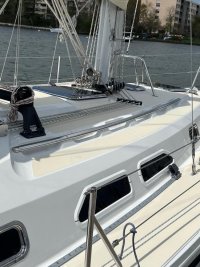 thumbnail8.jpg145.3 KB · Views: 85
 thumbnail9.jpg161.5 KB · Views: 86