peaman
Sustaining Member
The faucet assembly with detached shower head/hose were badly corroded, as well as the drain fitting in the very dull basin. Further, the faucet leaked and the vanity countertop was stained.
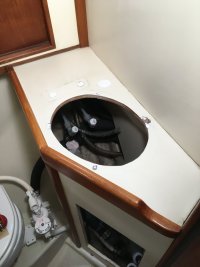
Over the winter, I purchased a new faucet/integral shower head and a new polished stainless basin. I removed the old fittings and the very thin teak trim, and I filled all of the holes in the vanity top, except for the basin opening.

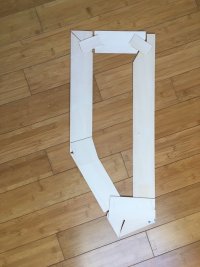
I purchased a (entire 4'x8'!) sheet of Formica in the matte almond finish to match the original and existing. To get the best possible fit, I got some thin "planks" of bass wood from my local hardware store and glued pieces together to match the exact shape of the Formica top.

When I was satisfied with the fit, I used sheet metal shears to cut the new Formica sheet to the exact dimensions needed. After sanding the old top lightly to get some tooth, I glued the new Formica to the original using a couple of foil packets of WEST epoxy. Usually, contact cement is used with Formica, but one wrong move would have spoiled a fair amount of work. I spread glue around all edges, and also where the new faucet would go, and I also spread some stripes, etc to make sure there would be good adhesion, without any inconvenient oozing.
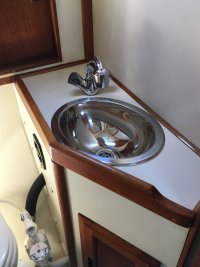
The thin teak trim strips were varnished and reinstalled after installation of the new basin and faucet. I plan to replace the original water tank overflow fitting with a new automatic air vent below the vanity, or some other means. The Admiral likes the end result.

Over the winter, I purchased a new faucet/integral shower head and a new polished stainless basin. I removed the old fittings and the very thin teak trim, and I filled all of the holes in the vanity top, except for the basin opening.

I purchased a (entire 4'x8'!) sheet of Formica in the matte almond finish to match the original and existing. To get the best possible fit, I got some thin "planks" of bass wood from my local hardware store and glued pieces together to match the exact shape of the Formica top.

When I was satisfied with the fit, I used sheet metal shears to cut the new Formica sheet to the exact dimensions needed. After sanding the old top lightly to get some tooth, I glued the new Formica to the original using a couple of foil packets of WEST epoxy. Usually, contact cement is used with Formica, but one wrong move would have spoiled a fair amount of work. I spread glue around all edges, and also where the new faucet would go, and I also spread some stripes, etc to make sure there would be good adhesion, without any inconvenient oozing.
The thin teak trim strips were varnished and reinstalled after installation of the new basin and faucet. I plan to replace the original water tank overflow fitting with a new automatic air vent below the vanity, or some other means. The Admiral likes the end result.

