Midship cleat or eye on Ericson 27

JPS27

Member III
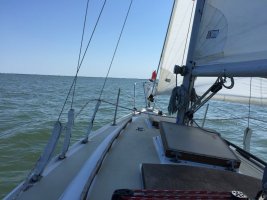
As I work on my skills for leaving my slip (biggest challenge) and entering my slip (minor challenge usually) there are times it would really help to have a midship cleat for controlling the boat with a spring line, warping etc. Also would be handy for docking other places. My genoa track comes up several feet short of midship. Otherwise I'd put a cleat on the track. In the picture there is an eye just aft of the aft lower shroud.

Questions: Would it be a bad idea find a slightly taller eye (with appropriate backing plate) that I could use snap on spring temporarily when docking? Or have any e27 owners put a cleat there? Doesn't seem like there's room. I suppose another question is what is purpose of that original eye? I use it to secure my main halyard when not in use.

The admiral and I are going to start trying to back into the slip to eliminate the forces working against us when back out of slip. So something at midship would help.

thanks,
Jay
attachment.php
 

Attachments

  • IMG_4661.jpg
    IMG_4661.jpg
    83.6 KB · Views: 528

toddster

Curator of Broken Parts
Blogs Author
Well, why not buy a pair of cleats at your local new/used chandlery and install them? I went with the cleat on a track, since my track goes right up to midship, but I did "look at" the project.

It seemed to me that there are two issues: no convenient scupper in the toe rail and the need for reinforcement of the deck. So the cleat would either have to be elevated to the level of the toe, or installed right on the toe. On my boat, the toe is filled with wadded up fiberglass mat under the Genoa track, but just empty forward of it. But maybe they also did this in the area of the chain plates? If the toe is open, I think I'd fill it then drill through. Or perhaps fit a long piece of hardwood into the hollow as a longitudinal backing plate.

My boat barely fits into its slip, so the spring lines help in keeping it parked just right. I haven't figured out a way to make tricky spring-line maneuvers, since I'm already using two hands and my toes to work the throttle, shifter, and tiller. I might try backing out and turning on a spring line some time, because the only other option is usually to back all the way out of the fairway - but it seems like the maneuver has excellent potential for wrapping the prop. So I usually just back in.
 
Last edited:

toddster

Curator of Broken Parts
Blogs Author
That eye definitely does not look like something to hold a docking line. Perhaps it held a bottom block for a small halyard to run a pennant up to the spreader? Or some spinnaker control line?
 

Christian Williams

E381 - Los Angeles
Senior Moderator
Blogs Author
Try a line around the base of the stay for the moment. Or even a stanchion base. The forces are temporary and should not be great.

You may eventually find a cleat unnecessary, since our techniques are always evolving.
 

Glyn Judson

Moderator
Moderator
Sail track cleats.

Jeff, I went a bit over the top with my sail track cleats by having them cast using as a pattern, the original aluminum, black vinyl clad ones that came with our boat. Cheers, Glyn
 

Attachments

  • Hull #55, Cleat, Dawn Treader.jpg
    Hull #55, Cleat, Dawn Treader.jpg
    65.8 KB · Views: 388

Tom Metzger

Sustaining Partner
Jeff, I went a bit over the top with my sail track cleats by having them cast using as a pattern, the original aluminum, black vinyl clad ones that came with our boat. Cheers, Glyn

Glyn - What is that bright silvery material in the pic? I suspect it's temporary.
 

Glyn Judson

Moderator
Moderator
Bright silvery thing.

Tom, That is all that's left of a pair of 1" Nautical Engineering cleats made of vinyl clad cast aluminum, original to the boat when we bought her in the summer of 1995. I had to go back to a 1996 West Marine catalog just now to find the name of it and as I suspected, the company has long since gone out of business. Our boat came from the factory with clear anodized 1" aluminum track and I allowed that she deserved better. I replaced it with two continuous 11 foot lengths of 1 1/4" bronze track and it was at that point where I called the factory to see if I could buy just the larger stainless steel bases that were a part of my plan. The woman on the phone said that this was the first time anyone had ever wanted just the bases but she and I agreed on a price and sent them to me. An aside: That's ABI track made off shore and was offered in 14 foot lengths up until a number of years before we bought our boat. Apparently if was far more efficient for them to be cut in half in order that a forklift could take a ton of them at a time into a shipping container. The long ones had to be hand carried by two or more guys. I wanted a single length of track on both sides of the boat, so I searched the country far and wide to find them. I finally located a pair in a warehouse in Portland ME. We had to fly to Boston anyhow so I rented a car with a ski rack (in the middle of a sweltering summer) and drove to Maine to get the track. Countrywide truckers wanted more to ship them than what the tracks cost and trust me, they weren't cheap. The 5/16" X 3" bronze screws, flat and split washers and nuts, 74 of them were out of this world costly but by this time I was a in way too far to back out! Back to the shipping, it turned out that DSL air freight only wanted $48.00 if I could get them myself at their Los Angeles warehouse, deal made but I also had to hand carry them (ski rack) myself to DSL in Portland. Anyhow I shipped them to home in a length of capped PVC pipe and drove back to Boston. At the time I had nothing more sophisticated than a hammer and a hand drill in our meager garage but I did have the entire resources of the gigantic Hughes Aircraft Company where I worked my entire career at my disposal. I took the un-drilled bronze cleats to a machinist I knew where he drilled and tapped the 1/4-20 mounting holes. So I really had no choice but to use the wider Nautical Engineering stainless steel bases if I wanted all this to work. About the cleats, I was just about to take one of the old aluminum ones to a local foundry to be used as a pattern in order to have them cast in bronze. I mentioned this to a fellow sailor and graphic artist friend at work who immediately took it from me and explained that he'd get them cast at his favorite foundry. What I didn't expect was that he carved the name into both wax patterns and then had them cast. It was a thrill when he gave them back. In a word I was stunned and ever so grateful. I still see him on the water from time to time in Marina del Rey sailing his classy, open cockpit lapstrake sailboat. Sorry, waaay more than you wanted to know but that's the whole story. It's all a great adventure, Glyn
 

Becca

Junior Member
Midship cleat jealousy plus extra hatch

I love the cleat ! How do you open the companionway hatch with the main salon hatch in front of the mast? I have just the one hatch (straddles the head, in front of the mast) but want to get the same double as your E27... My companionway hatch (original) slides toward bow to open and I have original drop boards...is there a modification can't see in your photo?
Best,
Becca
 

JPS27

Member III
I love the cleat ! How do you open the companionway hatch with the main salon hatch in front of the mast? I have just the one hatch (straddles the head, in front of the mast) but want to get the same double as your E27... My companionway hatch (original) slides toward bow to open and I have original drop boards...is there a modification can't see in your photo?
Best,
Becca

I'm not certain I understand your question, but after some thought ;) I think you are seeing the forward end of my companionway hatch that is in the open position. So it is probably as far forward as it can be in the picture. Plenty of room for two hatches. I've seen pics of models with one hatch and (at least where I live) I'm happy that I have two apertures!
 

G Kiba

Sustaining Member
The middle hatch was added after 1974'. My 73 also has a single hatch. Less wood to maintain! My question is why did they go so cheep on hatch construction? I have seen better boxes made in High School wood shop classes.
 

Becca

Junior Member
Back ballast hatch?

I agree about the hatch. But the Companionway hatch is super solid! Only the underside plywood rotted so I've dug it out and will hopefully be able to repair so it can last another 30 + years. It is very heavy however... Maybe that was a factor with the less sturdy forward hatch.
 
Top