hello Im new to the club and sailing been a power boater all my life, I used to spend a lot of time with my dad on his old 28' twin mast made by bay city boats, beautiful boat, but that was a long time ago any way I bought an 1982 e36RH that has been completely refitted top side, the surveyer said it had a 20K paint job with high dollar rigging but below decks was gutted except wire and plumbing, i could sure use any pictures of the interior and any information good or bad about the boat my plan is to sail from tx to fl where I will be moving but first I need to refit with electronics & auto pilot any suggestions on that would be very helpful thanks
You are using an out of date browser. It may not display this or other websites correctly.
You should upgrade or use an alternative browser.
You should upgrade or use an alternative browser.
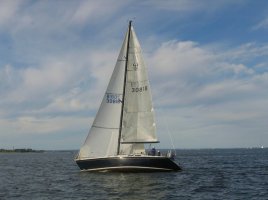
Information on 1982 e36RH
- Thread starter jason538
- Start date
markvone
Sustaining Member
Welcome to the site!
I bought E36RH hull #21 in 2011 and have collected a ton of info on the boat, systems and manuals. I have 3 full size drawings of the sail plan, electrical and plumbing systems that I have scanned as pdfs. Unfortuneately, I do not have the hull interior and deck layout drawing that would most help you with interior rebuilding. Maybe one of the other E36RH owners here on the site still has one. Some of the original advertising info has the layout shown, which will get you started. I will also say there is no reason you have to rebuild the interior exactly like the original, which is unique by today's standards. I like the original layout, but changing the layout to better meet your use of the boat is certainly an option.
You can see pictures of the original E36RH interior in the album page of my profile. I have lots of other pictures of details if you need something, as I have worked on almost everything over the past 3 years.
Let me know if you need anything specific.
Which E36RH did you buy?
Mark
e36RH information
Thanks mark for your reply not sure hull # but I believe its #27 when I find out Ill let you know the name is true love from Tx. your right I don't want to design the cabin like factory that's one reason I liked the boat because of so many up grades I can do but was looking for a ref. point the head & bulk heads are still intact but for the rest is going to be a job but a fun and exciting one and im sure a nerve breaking one at time also,
Thanks mark for your reply not sure hull # but I believe its #27 when I find out Ill let you know the name is true love from Tx. your right I don't want to design the cabin like factory that's one reason I liked the boat because of so many up grades I can do but was looking for a ref. point the head & bulk heads are still intact but for the rest is going to be a job but a fun and exciting one and im sure a nerve breaking one at time also,
markvone
Sustaining Member
I think you have Hull #26.
I think Tom Cooper (EY.o ID - tcooper) who has Hull #12 is doing a substantial "remodel" of his E36RH interior. There is one pic in his profile of the port side opened up. He may add some comments/ideas when he see's what you're up to.
Do you still have the Galley on port and the Nav Stn on stbd at the aft end of the cabin behind the low half bulkheads or is your interior totally open back to the companionway?
I have seen a lot of the 36RHs and many have serious water damage that might require a large amount of interior work. I know of one that had mold so bad the owner gutted the interior and left it empty.
Let me know if you need any info.
Mark
Im sure that's what happen to mine, the water came from the top, not sure where or what happen according to the previous owner, he bought the boat from the texas cattel club or something any way the boat was refitted and re done top side and haul according to survey,I haven't been down there to see the boat yet as im in pa working I do have pictures from owner and survey, hope to get down their next days off,going to make arrangements to have the boat pulled in the mean time, my plane is to get it to Fl, Im looking into that right now, really would like to sail it across the gulf but not knowing the boat yet I know its not a good idea, But I never claimed to be to smart also looked at icw but time frame from work it would be difficult, also trucking but so expensive, I have a friend or my boss who lives in lousiana has the truck said he would but have to find trailer to rent or something, trying to way out options,I have my hands full, when I told my landlubber wife I wanted to buy a boat I missed being on the water she told me if I do It would be our divorce so I told her I better buy one big enough to live on,I was kidding thought she was to, glad I bought one big enough I can live on, anyway I looked at ur pics nice boat looks clean any info you wouldn't mind sharing is very help full Il need all I can get with out being a pest,I will be sure to let u know how its going and hull num but you may be right, and the gally is or was on port nav station on starboard thanks for your help Jason
Jason, here are some periods if you need them ... .. ... . . . . . . . .. .. ... . . .. . . . . . . . . . .")
ail-say oat-bay
Member II
Jason, here are some periods if you need them ... .. ... . . . . . . . .. .. ... . . .. . . . . . . . . . .
that is just too funny !!!
Rick R.
Contributing Partner
Jason, here are some periods if you need them ... .. ... . . . . . . . .. .. ... . . .. . . . . . . . . . .
Runnin' on those sentences are I say.....
There's always remodeling to do on an older boat....
Jason,
I own the 1981 E36RH hull number 18 and I've done quite a lot of surgery on her in the fourteen years that I owned the boat. I've replaced headliners, plumbing, electrical and electronics and am currently doing a major rub rail fix (for the second, and I hope final time). Next biggie will be the cabin sole that's rapidly rotting out. If you need help with anything please don't hesitate to ask.
The 36 is an unusually solid boat that has a nice turn of speed.
Enjoy!
Steve
ER36RH
Glory Days
Attachments
-
 IMG_0110.jpg62.6 KB · Views: 194
Headliner/Rubrail Replacement on E36RH
Steve,
I've got hull #19 and I'm looking at replacing the headliner - would love to hear how you approached the project as well as any costs you are willing to share. Trying to decide whether to replace with a similar headliner or go with a panelled design.
I've also replaced the original wooden rubrail that the boat had when we bought her, but I'm looking at eventually replacing it again with an aluminum rubrail with a soft insert. What did you end up using on your boat?
Thanks!
Mark Green
"Sweet Grapes"
Ericson 36RH #19
Headliner, Rubrails and beyond...
Hi Mark,
Hull # 19! Wow, our boats were probably in production at the same time.
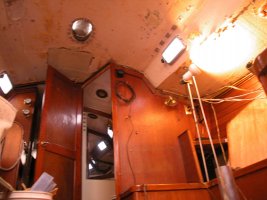
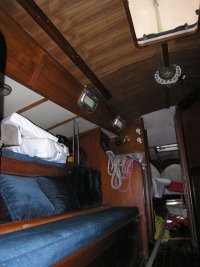
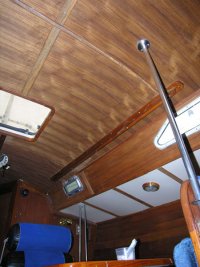
The headliner project was a bear when I started it. The previous owner of the boat had replaced the original 1981 vinyl headliner with a cloth backed foam headliner. He didn't do a great job and the stuff was stained from leaks and falling down all over the boat. It looked like crap. I decided to replace it with a 1/8" inch thick marine grade teak plywood. First I removed the disgusting cloth liner (I left the V berth alone because it wasn't as bad as the main cabin at the time). Then I tried to figure out how to attach the plywood. I figured I would need 2 4'x8' sheets of the stuff to cover the entire ceiling of the boat. I made a paper template of the shape of the ceiling that I was looking to end up with, and I made similar templates around the side port wall. Remember, because all of the interior surfaces are curved you cannot simply cut out a shape and attach it like a flat piece. I used tape to hold up big pieces of brown craft paper to the shape of the roof and then I carefully marked out all the cutouts for the mast, hatches and companionway, etc. I didn't, though now I wish I did, mark access door places for the cabin top winch bases, etc. I took the templates home and laid out the two 4x8 sheets of Marine ply on my patio in the positions they would be in on the boat. I placed my paper templates on the wood and traced out the shapes onto the wood leaving a bit of extra width and length to fudge with when you get it on board the vessel. When you do the tracing you need to remember that the teak side down ultimately face the floor. As the teak ply is a few hundred dollars a sheet I recommend that you measure everything twice before you cut. I had the original thought of doing all of this measuring and cutting on board, but there is no way to get a 4x8 sheet of wood into the cabin through the companionway. It needs to go down in pieces.
Then I sawed some pieces of 3/4" thick pieces of marine plywood to use as lath. I screwed them into the ceiling always being wary of drilling the pilot holes too deep into the cabin top and coming out the other side. I countersunk all of the screw tops into my lath. Then I attached the plywood that I had cut from my template and it started looking great. I put strips of teak over the seams. I wanted to have a different look under the decks so there I used formica. Formica is nice, but very hard to cut without snapping it. Once it place it is great and needs no maintenance at all. I've attached photos of before and after...
As for the rub rail question...I am currently in the process of doing that one using an amazing new (at least new in this county) Italian made rubrail product available at Jamestown Distributors in Rhode Island. It's called Tessilmare. This is a link to the product. http://www.jamestowndistributors.com/userportal/show_product.do?pid=56893 . I haven't attached it to the boat yet, but already I know this is a superior produce. Once I am done I think it will look awesome and be a strong addition to the boat. I bought the smallest size they make.
The only problem with the Tessilmare rub rail, as with most of the ones you will find commercially available from TACO and other places, is that then need to be attached to the boat on an almost flat surface. When Ericson made these boats they would leave a fiberglass lip around the deck and hull molds. When they attached one to the other they temporarily screwed them together and then glassed the two sides together inside the boat. When that was completed they would cut the lip down around the outside of the vessel to about 1/2" and cover it all with a "U" shaped rail. The remaining lip is not structural at all and it gets in the way of installing a new and lower profile rubrail. I am in the process of sanding it down (very carefully) with a belt sander and 50 grit sanding belts. It's not really that difficult to do, but it does make a lot of dust (you'll need a face mask, gloves, long sleeves and googles when you do this otherwise you'll be scratching from fiberglass for days afterward). I'm almost done with the sanding. After that I will fill any open cracks or separations with a good epoxy filler and then I'll screw on the Tessilmare rub rail. I think it will look really pretty when its done, and it may also stop some annoying small leaks that have developed over the years from previous rub rail fixes and screws that pierced the interior glass work around the boat.
Hope this all helps you with your projects.
I'd enjoy seeing some photos of your boat.
Steve
E36RH "Glory Days"
Steve,
I've got hull #19 and I'm looking at replacing the headliner - would love to hear how you approached the project as well as any costs you are willing to share. Trying to decide whether to replace with a similar headliner or go with a panelled design.
I've also replaced the original wooden rubrail that the boat had when we bought her, but I'm looking at eventually replacing it again with an aluminum rubrail with a soft insert. What did you end up using on your boat?
Thanks!
Mark Green
"Sweet Grapes"
Ericson 36RH #19
Hi Mark,
Hull # 19! Wow, our boats were probably in production at the same time.
The headliner project was a bear when I started it. The previous owner of the boat had replaced the original 1981 vinyl headliner with a cloth backed foam headliner. He didn't do a great job and the stuff was stained from leaks and falling down all over the boat. It looked like crap. I decided to replace it with a 1/8" inch thick marine grade teak plywood. First I removed the disgusting cloth liner (I left the V berth alone because it wasn't as bad as the main cabin at the time). Then I tried to figure out how to attach the plywood. I figured I would need 2 4'x8' sheets of the stuff to cover the entire ceiling of the boat. I made a paper template of the shape of the ceiling that I was looking to end up with, and I made similar templates around the side port wall. Remember, because all of the interior surfaces are curved you cannot simply cut out a shape and attach it like a flat piece. I used tape to hold up big pieces of brown craft paper to the shape of the roof and then I carefully marked out all the cutouts for the mast, hatches and companionway, etc. I didn't, though now I wish I did, mark access door places for the cabin top winch bases, etc. I took the templates home and laid out the two 4x8 sheets of Marine ply on my patio in the positions they would be in on the boat. I placed my paper templates on the wood and traced out the shapes onto the wood leaving a bit of extra width and length to fudge with when you get it on board the vessel. When you do the tracing you need to remember that the teak side down ultimately face the floor. As the teak ply is a few hundred dollars a sheet I recommend that you measure everything twice before you cut. I had the original thought of doing all of this measuring and cutting on board, but there is no way to get a 4x8 sheet of wood into the cabin through the companionway. It needs to go down in pieces.
Then I sawed some pieces of 3/4" thick pieces of marine plywood to use as lath. I screwed them into the ceiling always being wary of drilling the pilot holes too deep into the cabin top and coming out the other side. I countersunk all of the screw tops into my lath. Then I attached the plywood that I had cut from my template and it started looking great. I put strips of teak over the seams. I wanted to have a different look under the decks so there I used formica. Formica is nice, but very hard to cut without snapping it. Once it place it is great and needs no maintenance at all. I've attached photos of before and after...
As for the rub rail question...I am currently in the process of doing that one using an amazing new (at least new in this county) Italian made rubrail product available at Jamestown Distributors in Rhode Island. It's called Tessilmare. This is a link to the product. http://www.jamestowndistributors.com/userportal/show_product.do?pid=56893 . I haven't attached it to the boat yet, but already I know this is a superior produce. Once I am done I think it will look awesome and be a strong addition to the boat. I bought the smallest size they make.
The only problem with the Tessilmare rub rail, as with most of the ones you will find commercially available from TACO and other places, is that then need to be attached to the boat on an almost flat surface. When Ericson made these boats they would leave a fiberglass lip around the deck and hull molds. When they attached one to the other they temporarily screwed them together and then glassed the two sides together inside the boat. When that was completed they would cut the lip down around the outside of the vessel to about 1/2" and cover it all with a "U" shaped rail. The remaining lip is not structural at all and it gets in the way of installing a new and lower profile rubrail. I am in the process of sanding it down (very carefully) with a belt sander and 50 grit sanding belts. It's not really that difficult to do, but it does make a lot of dust (you'll need a face mask, gloves, long sleeves and googles when you do this otherwise you'll be scratching from fiberglass for days afterward). I'm almost done with the sanding. After that I will fill any open cracks or separations with a good epoxy filler and then I'll screw on the Tessilmare rub rail. I think it will look really pretty when its done, and it may also stop some annoying small leaks that have developed over the years from previous rub rail fixes and screws that pierced the interior glass work around the boat.
Hope this all helps you with your projects.
I'd enjoy seeing some photos of your boat.
Steve
E36RH "Glory Days"
Attachments
-
 BEFORE.jpg118.8 KB · Views: 67
 -
 PORT CABIN.jpg91.9 KB · Views: 76
 -
 INTERIOR CABIN.jpg97.6 KB · Views: 86