Hull to deck joint leak ?

Jeff Asbury

Principal Partner
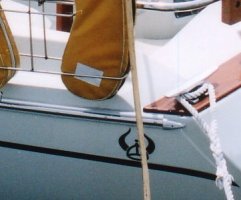
Seeing Mark's pictures of his E23 has raised a question in my mind: are rub rails really that necessary, or do they serve more as pieces of trim, sort of like transitional pieces of trim work on the exterior of a house? I must admit that Commotion's teak rubrails are very attractive, but it seems that they are more decorative than functional. Instead of paying hundreds of dollars for new rubs rails, Mark simply eliminated them completely. It seems that this has served him well and has not resulted in damage to his hull. Fenders have done all the mean and dirty work.

I ask all this because I have put off the replacement of my rub rails as long as possible, just because I have more pressing projects that deserve the $300+ bucks that this project would require.

Thanks,
Roscoe

Here are some more relevant pictures:

http://www.ericsonyachts.org/infoexchange/showthread.php?9365-E25-rub-rail-and-hull-to-deck-joint

The rub rails on my E-27 probably saved my boat from major damage this past Summer. I was on a mooring at Two Harbors, Catalina Island at the end of June and I was visiting a friend on another boat as I watched helplessly as a 30 foot Power Boat side slam my boat. The impact was right about mid ship, you could see where the black hull of the power boat hit my rub rail. The marks were easily "rubbed" out. If not for the beefy rub rails on my Ericson, there would have been fiberglass damage for sure.

I replace my rub rails nine years ago when Pacific Seacraft still supplied them. It was a bit expensive and not a easy job to do, but I'm glad I did. In hind sight I probably should have had a insurance survey done after that accident at Catalina. But I really could not see any significant damage to my boat inside or out. (just black marks on the rub rail).

IMHO, yes the Rub Rail serve a purpose.
 

Commotion

Member II
i agree that rub rails can save a boat from damage...

The rub rails on my E-27 probably saved my boat from major damage this past Summer. I was on a mooring at Two Harbors, Catalina Island at the end of June and I was visiting a friend on another boat as I watched helplessly as a 30 foot Power Boat side slam my boat. The impact was right about mid ship, you could see where the black hull of the power boat hit my rub rail. The marks were easily "rubbed" out. If not for the beefy rub rails on my Ericson, there would have been fiberglass damage for sure.I replace my rub rails nine years ago when Pacific Seacraft still supplied them. It was a bit expensive and not a easy job to do, but I'm glad I did. In hind sight I probably should have had a insurance survey done after that accident at Catalina. But I really could not see any significant damage to my boat inside or out. (just black marks on the rub rail).IMHO, yes the Rub Rail serve a purpose.
I went with a modest teak profile because of all of the faded & chalking vinyl stains on dark paint. And I personally like exterior teak accents in classic styled boats. I think what it comes down to is a function of personal preference. I look at it this way (tilt head 90 degrees to the right side). It's not a big deal for me to repair teak finish vs repairing awlgrip paint. I think it is easier to replace the teak than the extruded parts. I have seen the extrusions painted and they seem to me to be just as dellicate or as much maintenance as maintaining teak. You don't want to bump paint either... for what ever it's worth.
 

u079721

Contributing Partner
I would have to side with the camp that believes rub rails are a necessary part of the topsides. Though I will admit that the original Ericson aluminum extrusion, with its tendency to be crushed under a strong impact, did leave something to be desired. The PO of my boat had so thoroughly destroyed his rub rails that he paid the yard to replace them just before I bought the boat with a nice vinyl rail with a stainless steel top strip. It looked great, didn't crush under impact, saved the topsides, and didn't even scratch unless I tried to do battle with a concrete dock. Given my docking experience I can't imagine trying to keep a teak rub rail looking good.
 

Attachments

  • Rub Rail.jpg
    Rub Rail.jpg
    29.7 KB · Views: 227
Last edited:

Loren Beach

O34 - Portland, OR
Senior Moderator
Blogs Author
Steve, That's one nice looking rub rail assembly.
Goes very well with the look of the original hull, and the shiny ss really adds class.

Our particular model has no rail, but now I wish we did!

Happy holidays,
Loren
 
Last edited:

Commotion

Member II
I do like that SS rub rail!

Steve,

That does look quite nice! If this Teak becomes too much of a headache on Commotion, I think the SS rub rail that you have is a very good looking and functional solution. Do you recall the approximate cost and MFG? Also, did the yard plain the deck joint or fair the hull down before they installed it? It would be nice to see more photos, with possibly attachment and finish detail if not too much trouble. I am curious about the details of the bow. I am still working on how the teak will finish up on the bow.

Also, I will post more photos of the details of putting the teak "do not rub" rail on Commotion for those that may be interested. With regard to the "do not rub". I know I will be sad when it gets bumped because I will have to stay after it. My yacht carpenter, (a friend since 6th grade) is know as "Wood-Yoda". He suggested putting a band of SS on the top of the teak to help protect it, but, I just think it will break up the lines and what it the point of using teak if you're not going to show it off?!

Happy holidays,
Rick
(Commotion)
 

u079721

Contributing Partner
Sorry but that's the best I can do for photos right now, and since I no longer own the boat I won't be able to get any better. I also wasn't around when the yard did it, but I could see that they removed the old rail, filled the holes with epoxy, and then screwed the new rail in with topscrews. There is an underlying solid vinyl "C" shaped part, with the stainless steel standing proud in the center.

BUT, I bet that there is nothing special about the stainless rail. As your friend suggested, I bet you would be able to find narrow 3/16" of an inch or so stainless rail that you could add on top of (outboard of) your existing teak. That would give you the same protection as mine but leave your beautiful teak rail intact for the accent. I've seen that done on a number of teak-rich boats, and it usually looks very smart.
 
Last edited:

Matey

Member III
Interested

I'm following this rub rail and anything else you have going on with your 35 Rick. That's some beautiful work. Enjoy the pictures and progress. Regards, Greg
 

Commotion

Member II
A little more detail of the teak rub rail process on Commotion

  1. After removing the old plastic extruded rub rail, the deck joint was very un-even. It had areas that were almost flush with the hull and as high as 1/2".
  2. Taped off the painted surfaces with blue painters tape, Wide stuff like 2.5" to 3" on top and bottom
  3. To make the surface even, I plained the deck joint down to 1/8" higher than the hull surface.
  4. Cleaned the surface with a vacuum and acetone.
  5. Epoxied the holes and gaps with West Systems and a blend of 406/404 filler where needed.
  6. Rough sanded the epoxy
  7. Cleaned everything well with denatured alcohol.
  8. Pre-drilled the teak with holes on 8" centers, each side used four sections of teak three 10' one 5' used #10 ss self tapping screws
  9. Aligned and dry fit each section starting with the 5' section from the bow...
  10. Once it was all lined up, removed it all (tagged in order of location) and re-installed it with black 5200 and self tapping screws on the 8" center. When I came to the scarf joints, I used thickend G-5 to glue the joints. (note: Scarfs were at 45 degrees and they should have been at a much deeper angle for a better glue joint. It was difficult with a 45, but, so far, it still holds. As much angle as you can get on the scarf is desired. It would also then be better to glue all of the joints in a straight line on the ground and install the rail in one long length. You will need help, howver, I just used some lines to support it as I went along the deck.
  11. Teak Plugged the bung holes with waterproof wood glue
  12. Chiseled and sanded the bungs.
  13. Sanded the teak to a uniform shape with a small profile I made from firm foam so it would leave a uniform finish.
  14. Applied the finish. Bristol Amber Urethane... Not sure that is the best stuff yet... think I am starting to see issues with it. Combings and hatches and companion way boards are all Bristol too and I think the hatch boards and hatches are doing GREAT... Probably going to go with Awl-grip's wood finish system next time.
  15. I still need to add a few more coats of finish and caulk the top and bottom of the teak with Black TDS
Plained 001.jpg Plained 002.jpgPlained 004.jpgPlained 006.jpgPlained 007.jpg
 

PDX

Member III
This custom rubrail is teak and stainless combined

The boat, which is not mine, is a 1967 Ericson 30. Most of you are not familiar with the model. It was intended as a racer/cruiser. This particular boat is being refitted as a dedicated cruser/livaboard. The original boat had no rubrail. The rubrail you see was fitted primarily to cover nuts that secure the glassed in chainplates from the outside. The rubrail is milled from 1 1/4" Teak and protrudes 1" from the hull. It tapers to a 1" outer edge, to which has been added a 1" SS rub strike. I hope the resolution is good enough to see the detail. IMG_0536.jpg
 

Commotion

Member II
SS teak rub rail

I like the way this rub rail looks here. I also like the brow and main windows... Anyone know anything about the window setup. Is it practical?
 

PDX

Member III
Teak and SS rubrail

I know a little bit about the windows in the main cabin. The boat originally had the traditional Ericson windows, three small ones on each side in front and the split window set aft. The main windows in this particular boat are obviously not factory. The owner actually stretched the cabin back seven inches, removing and glassing over the original windows in process. After the cabin was stretched he cut in his own main windows--in the familialr Ericson shape. They are lexan, or similar, attached directly to a tabbing around the window circumference on the inside. I have attached a couple of pictures. The first shows the cabin extension. The second shows the tabbing (which I believe is glassed over 1/4 inch plywood. The headliner was removed from the cabin and mahogony veneered plywood has been glassed to the sides of the cabin trunk. I think this is the tabbing material.


boat pictures 117.jpgIMG_0471.jpg
 

p.gazibara

Member III
I'm happy to find this thread. Just discovered the first toerail leak in Cinderella. The PO glassed over the hull/deck joint from the inside everywhere he had access. He said the joint used to leak like a sieve.

His work lasted decades until... I discovered some rot in some interior cabinetry just aft of the main bulkhead. Since my chainplates are tierods, and I can see the 4 bolts holding the tie rod backing plates, its obvious they were not thee cause of the leak. Upon digging further I thought it was perhaps the glassed in stantion pockets the PO also did.

Turns out the leak was coming from a crack in the paint and further digging revealed its a rub strip bolt that let the water in and eventually delaminated some glass and got inside.

I have been contemplating removing the rub rail and glassing over it from the outside for a while, but really hesitate opening that can of worms. Especially now that we are on the hunt for a bigger boat. Anyone here done that job and have an approx hours invested?
 

Loren Beach

O34 - Portland, OR
Senior Moderator
Blogs Author
Probably no need to bring this up again, but my understanding is that EY would join the deck to the hull with heavy bands of roving inside. Then they would cut off the exposed outside flanges and push some filler or sealant into the joint edge and screw on the aluminum cover band. The covering was cosmetic, as the strength was provided by the inside glasswork that makes and hull and deck "one".
However..... sometimes someone got in a hurry and did not put enough resin into that coarse band of roving, and as years went by water would seep in around the screws and wick thru pin holes in the roving. Of course there was cabinetry and hull ceilings in place making adding more glass inside rather labor intensive.
That may be what is vexing (hexing?) you.
 

Mark F

Contributing Partner
Blogs Author
Wow this is a trip down Memory Lane. Pajo, to answer your how long question, twice as long ;-). There is/was an Ericson for sale somewhere on Yacht World with the rubrail removed and glassed over...
 
Top