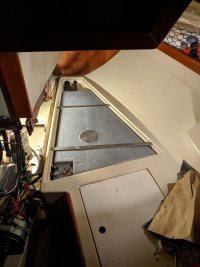
Fuel Tank Repair

daynardi

Member II
We have a 1985 E32-3.

Found oil in our bilge. It wasn't coming from the engine. Eliminated all sources except the portion of our fuel tank that is concealed from view under the boat's liner pan.

The tank was about half full, too heavy for me to lift out in order to inspect the bottom. Called Precision Fuel Solutions www.precisionfuelsolutions.com (a Seattle-area company that services fuel systems), to see if they could pump out the tank and store its contents while I looked underneath. Les Newell at PF offered to inspect below the tank using his borescope camera, and also told me that his company could epoxy-line the tank to stop leaks. “When we get done, it will be an aluminum-reinforced fiberglass tank”.

The borescope inspection revealed that the lowest corner of the tank was corroded through. We agreed that PF should proceed with the tank lining. To save cost, I disconnected the tank then called PF to pump out my fuel and remove the tank for repair at their shop. Two weeks later, they returned the tank together with a 10 gallon jerry-can containing my fuel. I reconnected everything, dumped in the fuel, and fired up the engine.

Now I'm dealing with the oil in the bilge, which is trapped in all of the concealed crevices of the liner grid. Sailing around with bilge-cleaner and about 10 gallons of water, then pumping into buckets and disposing on shore. Rinse and repeat.

PF coated the tank, inside and out, with epoxy. The outside skin is glass-fiber reinforced. Cost about $800. I didn't look into the cost to have a welding shop patch the aluminum tank, but suspect that it would have been similar and I'd still have needed to pump out and store my fuel. This way, I got what is effectively a new tank. Seemed like the way to go.

Below: Here is a photo of the corroded tank...
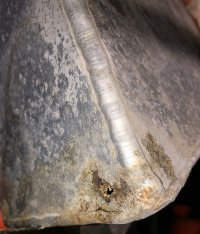
Tank corrrosion 2.jpg


Below: Tank as returned from PF. Fiberglass-reinforced epoxy coated.
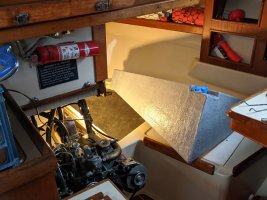
IMG_20200114_112738 LR.jpg

Below: All buttoned up!

IMG_20200114_194332 LR.jpg
 

Loren Beach

O34 - Portland, OR
Senior Moderator
Blogs Author
Glad you found a solution. :)
Several months ago I removed our tank to have a pin hole leak repaired where a drop of water must have sat on one place along a low corner. Condensation we presume, since the deck fill O-ring is in good shape.
I bought a cheap-o pump from Harbor Freight and pumped the old fuel out into several 5 gallon jugs. When done I decanted off the diesel and left a gallon or so of discolored diesel in the bottom of each -- this was poured into several plastic milk jugs and transported to the local County recycling center.
With the tank out and cleaned up, I hauled it to a local welder who patched the hole for $20. That tank already had clean out ports in it, so an additional expense to created one was avoided.
It is interesting and depressing just how many teaspoons of diesel can accumulate from (literally...) a pinhole.
 
Last edited:

daynardi

Member II
We think that our tank corroded from the outside in. That bottom corner sits in a pocket in the hull that can trap a few inches of water. Inside of the tank was clean, outside was what you see in the photo.
 

Christian Williams

E381 - Los Angeles
Senior Moderator
Blogs Author
Hmmm. Lots of threads here on tank repair that are worth study for the next guy.

An oil-change suction pump will empty a full 20-gallon diesel tank into five-gallon containers in an hour. Personally I would not put old diesel into a new tank.

But hey, problem solved!
 
Last edited:

Tin Kicker

Sustaining Member
Moderator
That glass should hold up well for as long as you own the boat.

I just had to have my 1985 32-3 tank repaired by welding. Below is the inside of that tank corner and you can see the water line. Fortunately mine had no corrosion holes. As for removing the fuel, it was far less expensive to take the old fuel to the county recycling place than to have a service pump it out. I simply disconnected the fuel line at the engine filter, put the hose into a fuel tank, and jumped the fuel pump to make it run. This is the amount of remaining fuel and the tank was easy to lift out after disconnecting the hoses and wires. (Sender was replaced.)
20200212_143037-X3.jpg


Toward the end of cleaning is below but not quite done. At this point I'd put in a gallon of acetone, sealed all the ports, rolled the tank around to wet the interior, put it outside on a trailer, left it for a few days, drained the acetone, water flushed, and started cleaning with Pine-Sol. The brown area is just cleaned with acetone. There are corrosion pits visible on the floor of the tank toward the camera but none turned out to have any depth. If it weren't for the leaks, I would have re-installed the tank with the new fuel quantity sender after this and not worried about the little left on the walls where it couldn't be reached.
20200216_180133-X3.jpg


My two leaks were along the baffle on the inboard wall and bottom. They'd previously been repaired by spot welds. Closer inspection after cleaning with a Scotch Brite pad found the cracks shown below coming from the center of the weld toward 2 o'clock and 10 o'clock. The baffle is vertical on the other side of where the weld is.
20200216_181723-4K.jpg


That spot is about halfway up this vertical weld. (Photo taken early in the cleaning process.)
20200216_180251-X3.jpg


Took the tank to a shop called Radiator House in Beltsville MD who also will repair diesel tanks and it turns out there were additional fatigue cracks like this along the welds. Turns out this problem is very much like what they have found in the big Volvo long haul truck fuel tanks and this repair has proven effective, so it's what they did for my tank. After chemical and steam cleaning inside the tank, they welded the cracks they could find, then 100% welded 2" straps. Cost (iirc) was $285.
20200303_173543-X3.jpg


Because I'd found old loose screws and other hardware (visible in the final photo) in the tank bay I was concerned for the future, in the potential for loose screws or other hard items to get between the tank and coarse fiberglass weave of the hull. To put the tank back in and not have it chafe on the fiberglass hull plus have space for any small items and some load distribution, I used Gorilla Tape to install a layer of plain white Corroplast. It's the corrugated polypropylene plastic used to make yard signs, very inexpensive at any Home Depot (or similar), and stable for occasional diesel spills. I also put a layer of Oatey rubber shower liner rubber below and above the tank to give it a bit (4 mil) more padding.
20200304_154146-X3.jpg


I found an alternator wire had been chafing forward of the tank (yellow below) as well as the sleeve for one of the battery cables. Don't have photos uploaded yet but while the tank was out, I also installed an additional clear PVC tube as a conduits for small wires to prevent them from rubbing against the tank in the future. The PVC is the same as used to sleeve the battery cables in the photo below, which were also replaced. The other benefit of having this extra tube is that it will be MUCH easier to run new wires in the future, because I left a piece of heavy sail thread through it to pull new wires. (Photo before cleaning and Corroplast layer was taped in.)
TAFG-X2.jpg


This is a long post but figured it might help somebody in the future.
 
Last edited:

nquigley

Sustaining Member
I had exactly the same low corner corrosion/leak. I did have the corner repaired by a welder. My report in this thread from earlier this year:
 
Top