E27 deck core replacement & painting

opfrei

Junior Member
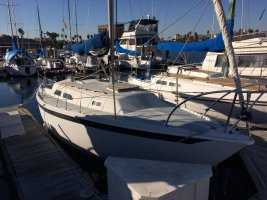
I present to you my recently acquired 1973 Ericson 27. As a first-time, totally misguided, and overly optimistic boat owner, I figured she just needed a little TLC to get her rollin'.

attachment.php


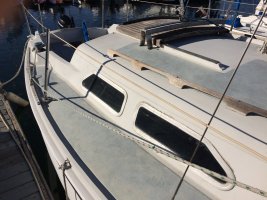
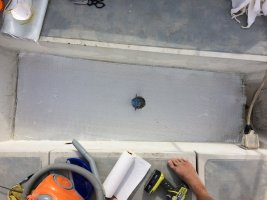
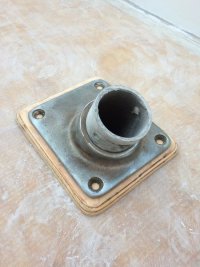
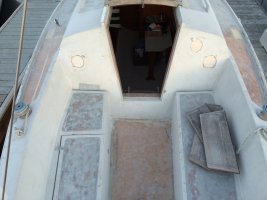
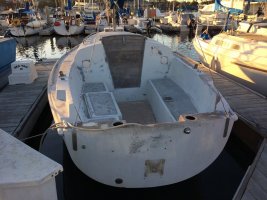
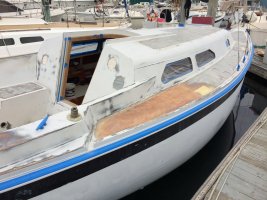
Apart from two frozen winches, a busted portlight, a steady leak at the prop shaft and the termite-ridden companionway hatch, I didn't really notice any serious issues... hah! Yeah well, the stanchions were a bit loose and the cockpit floor was slightly spongy, but those were going to be quick n' easy fixes, right?

And so goes this important rule of thumb, which I'm sure you've already heard around here: factor at least 10 times the amount of time you thought you were going to spend repairing your boat plus double the dinero. Also, just keep telling yourself it's a labor of love and make sure you search this forum for loads of invaluable advice on how to do it all!

attachment.php


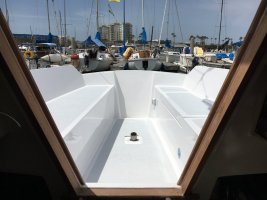
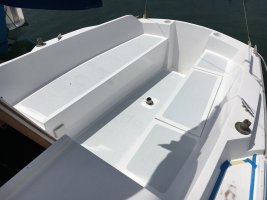
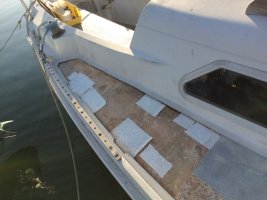
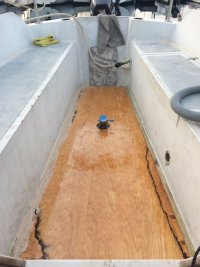
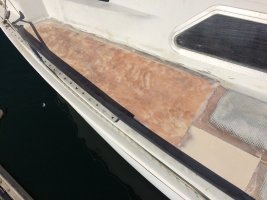
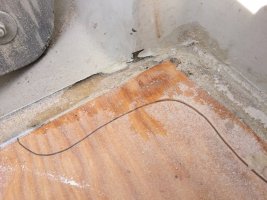
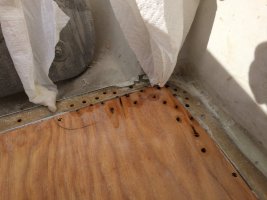
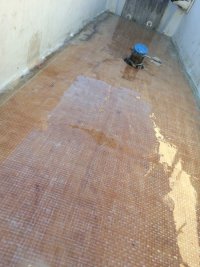
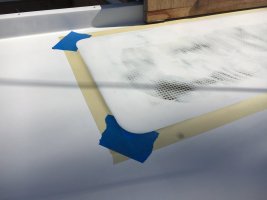
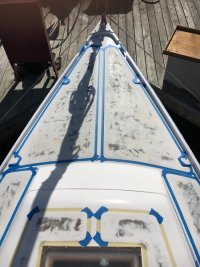
She looks alright at first sight, don't you think? Well, think again:

attachment.php


attachment.php


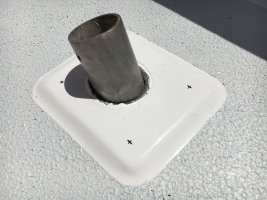
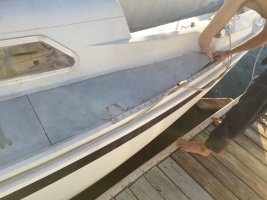
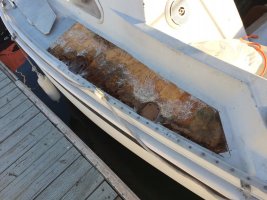
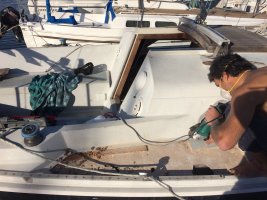
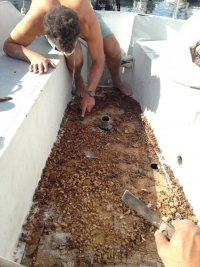
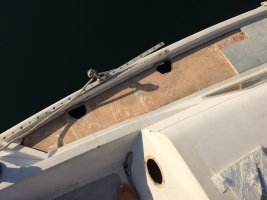
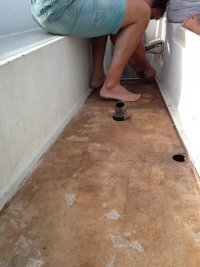
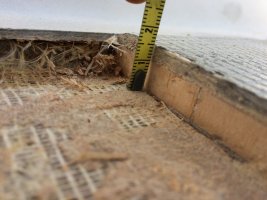
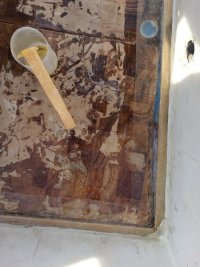
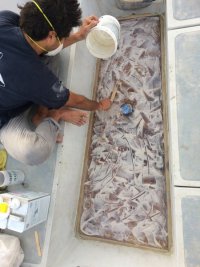
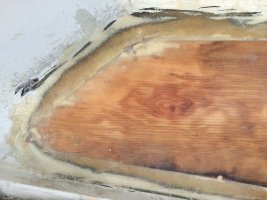
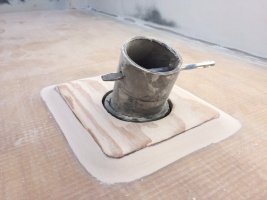
In essence, core rot (and sole delamination) happens when the impermeability of the outer fiberglass shell of your boat is compromised by an improperly sealed fixture for example, subsequently allowing water to percolate down into the underlying core (usually made of wood but sometimes foam) and then causing it to become soft. At this point, the core no longer provides any structural support (i.e. for a stanchion mount or your heavy auntie) and must thus be replaced.
 

Attachments

  • IMG_4353.jpg
    IMG_4353.jpg
    108.4 KB · Views: 1,062
  • IMG_4354.jpg
    IMG_4354.jpg
    110 KB · Views: 926
  • IMG_4360.jpg
    IMG_4360.jpg
    81.5 KB · Views: 798
  • IMG_4361.jpg
    IMG_4361.jpg
    98 KB · Views: 872
Last edited:

opfrei

Junior Member
To start, the overlying layer of fiberglass (top layer of the fiber-core-fiber sandwich) was removed in the areas where the core felt waterlogged using an angle grinder with a masonry cutoff disc. Once the core was exposed, the damage was obvious and significantly more important than imagined, so we progressively pulled up more sections of deck until we reached intact, dry core. Both deck sides as well as the entire cockpit floor were compromised!

attachment.php


attachment.php


The old core was composed of an array of small balsa wood tiles, which were glued down to the underlying layer of fiberglass. It was sopping wet in spots and its removal was a painstaking process, using scrapers, chisels and a lot of elbow grease.

attachment.php


attachment.php


Once the old, soaked core was fully removed, the underlying fiberglass shell was left to dry, roughly sanded down, and then cleaned.

attachment.php


Deck transect: 1-cm balsa core thickness & 5-mm of fiberglass overlay.
 

Attachments

  • IMG_4356.jpg
    IMG_4356.jpg
    102.5 KB · Views: 768
  • IMG_4971.jpg
    IMG_4971.jpg
    69.4 KB · Views: 838
  • IMG_4379.jpg
    IMG_4379.jpg
    69.2 KB · Views: 752
  • IMG_4970.jpg
    IMG_4970.jpg
    47.3 KB · Views: 725
  • IMG_4370.jpg
    IMG_4370.jpg
    73.2 KB · Views: 753
Last edited:

opfrei

Junior Member
Any holes and weak areas in the lower shell were patched with fiberglass cloth or CSM (chopped strand mat) and West System 105 Epoxy & 205 Hardener (I highly recommend using their pump dispensers for mixing accuracy and simplicity).

attachment.php


attachment.php


attachment.php
 

Attachments

  • IMG_4377.jpg
    IMG_4377.jpg
    73.6 KB · Views: 741
  • IMG_4389.jpg
    IMG_4389.jpg
    51.8 KB · Views: 654
  • IMG_4390.jpg
    IMG_4390.jpg
    59.8 KB · Views: 723
Last edited:

opfrei

Junior Member
The new core was installed using 3/8" marine-grade plywood, cut to size and then glued to the underlying fiberglass shell using the same epoxy mixed with West System 404 High-Density Adhesive Filler. It was clamped to the adjacent fiberglass lip with wood screws and weighed down with whatever heavy we had on hand.

Once the glue had dried, the plywood was sanded down flush with the surrounding lip, and any remaining gaps or imperfections were then filled with epoxy plus West System 407 Low-Density Fairing Filler. The plywood was also sealed with a surface coating of brushed-on epoxy.

attachment.php


attachment.php


attachment.php


Unfortunately, dew had collected under the lip and started to resurface after the plywood had already been glued down :headb:. As a result, I made Swiss cheese of my floor by drilling a bunch of holes in the wet zones, and with help from the sun, a blow dryer, and some paper towels, the moisture was obliterated. I then filled the holes back up with thickened epoxy through a syringe.

attachment.php


attachment.php
 

Attachments

  • IMG_4392.jpg
    IMG_4392.jpg
    57.6 KB · Views: 681
  • IMG_4393.jpg
    IMG_4393.jpg
    49.1 KB · Views: 716
  • IMG_4404.jpg
    IMG_4404.jpg
    76.8 KB · Views: 668
  • IMG_4398.jpg
    IMG_4398.jpg
    109.1 KB · Views: 700
  • IMG_4400.jpg
    IMG_4400.jpg
    77.2 KB · Views: 708

opfrei

Junior Member
Sheets of fiberglass were cut to overlap with the existing lip and then epoxied into place using a laminating roller. I used a combination of fiberglass mat and cloth for the deck sides, and heavy woven roving for the cockpit floor. I also used over 2 gallons of epoxy (including the catalyst) $!

Note: I could've never embarked on this project without BoatworksToday 's insanely helpful tutorial videos on Fiberglass Core Replacement. Thank you! https://www.youtube.com/watch?v=JAtjHjJhBV0

attachment.php


attachment.php


attachment.php


We also needed to fabricate a beveled riser for the rudder flange plate using 3/8" plywood, which we glassed directly onto the new cockpit sole.

attachment.php


attachment.php
 

Attachments

  • IMG_4401.jpg
    IMG_4401.jpg
    94.7 KB · Views: 691
  • IMG_4408.jpg
    IMG_4408.jpg
    98.4 KB · Views: 716
  • IMG_4415.jpg
    IMG_4415.jpg
    59.1 KB · Views: 694
  • IMG_4439.jpg
    IMG_4439.jpg
    50.9 KB · Views: 661
  • IMG_4460.jpg
    IMG_4460.jpg
    62.9 KB · Views: 723

Frank Langer

1984 Ericson 30+, Nanaimo, BC
Wow!! Well done! And a very useful description for other owners who need to tackle some or all of the repairs you've covered. I hope that all your work gets completed to your satisfaction and that you eventually get to sail! Ericsons are lovely boats, and worth putting in the time and effort.
Thanks for posting!
Frank
 

opfrei

Junior Member
Many hours of sanding, fairing, and despair ensued to arrive to this #naked state.

attachment.php


attachment.php


attachment.php


Masking the grip pads: take your time, draw your lines with pencil first, and use 3M's ScotchBlue Painter's Tape for Delicate Surfaces with Edge-Lock, NOT the 3M 218 Marine Fine Line Tape I was originally recommended (it lifted my paint)!

attachment.php


attachment.php
 

Attachments

  • IMG_4423.jpg
    IMG_4423.jpg
    72.5 KB · Views: 684
  • IMG_4441.jpg
    IMG_4441.jpg
    100.7 KB · Views: 677
  • IMG_4943.jpg
    IMG_4943.jpg
    102.7 KB · Views: 726
  • IMG_6229.jpg
    IMG_6229.jpg
    43.3 KB · Views: 684
  • IMG_6231.jpg
    IMG_6231.jpg
    62.9 KB · Views: 711

opfrei

Junior Member
After much debate over cost and quality, I bit the bullet and went with Awlgrip topside paint (color: Snow White) and although the learning curve was very steep, I'm immensely satisfied with the result: a strong surface with amazing gloss. I laid on 3 coats plus 1 initial coat of primer using the roll and tip application method, which is immaculately described by Thom here: http://www.thehulltruth.com/boating-forum/42912-roll-tip-paint.html#b

As for the grip, I decided to grind off the original molded crosshatch pattern and recoat those areas with KiwiGrip non-skid paint. I recommend it because it's easy to apply (you can modify the texture), it grips really well, seems durable, and looks great! Note: roll on a slightly less aggressive texture for those areas you'd expect bikini buns to rest on ;).

Ready for it? :egrin:

attachment.php


attachment.php


attachment.php


Anyhow, thanks for reading! I hope this motivated you to save a boat in need someday. Also, always remember to use protection :) Shakka.

attachment.php
 

Attachments

  • IMG_6235.jpg
    IMG_6235.jpg
    76.3 KB · Views: 735
  • IMG_6236.jpg
    IMG_6236.jpg
    58.9 KB · Views: 688
  • IMG_6237.jpg
    IMG_6237.jpg
    93.9 KB · Views: 721
  • IMG_4967.jpg
    IMG_4967.jpg
    100.2 KB · Views: 661

JPS27

Member III
Great work!

That's a ton of work and awesome outcome. Thanks for sharing. That's the kind of story and detail that should go in the blog. Very informative.
Jay
 
Last edited:

tenders

Innocent Bystander
Spectacular work, and wonderfully and clearly described. How many hours do you think you put into the core repair, and how many hours into the painting? I bet the painting took longer than the core.

I've done a bit of this myself (cockpit, starboard side deck, entire mast step in the cabin top) and have only the following thoughts to add:

(1) I like to cut the sections about 2.5" into the nonskid area, not at the edge of the nonskid as you did, so there's room to do the repair without crossing a color boundary. Of course, if you're repairing all the damage at once and painting the entire deck, this is less important...I only do a section at a time when the boat is hauled for the winter.

(2) rather than building up the new top skin with layers of fiberglass, I cut a sheet of 3/16" G10 to size. I taper its edge 2" back, all the way around the piece, and taper the adjoining old fiberglass on the boat 2" all the way around the cutout, leaving 1/2" for flubs so I don't have to deal with color boundaries. After the core is replaced, I epoxy a 4" strip of fiberglass tape all the way around the taper, then a 3" strip, then a 2" strip, then a 1" strip, and fair the result. I think this is sufficiently faster than your method to justify the extra cost of the G10. The G10 is super strong and stiff.

(3) I happen to use foam rather than plywood, except under the mast step where I used plywood. Foam is lighter and impervious to rot, though it does require some kind of reinforcement around crush fittings like stanchions. Ply is cheaper and heavier, doesn't need reinforcement, and is probably impervious ENOUGH to rot.
 

opfrei

Junior Member
tenders, I would say the entire deck core repair and painting (which also included removing most of the fixtures and windows, patching numerous other holes and cracks, and fairing everything) took me the equivalent of one month non-stop. In reality, I spaced it over about 4 months in order to keep my sanity :) Sanding was by far the most time consuming element of the whole project, as I had to knock down the entire deck about 5 times over. I never knew I could spend so much $ on sand paper alone!

I had to make my cuts at the edge of the non-skid areas in order to dig out any wet core that was wedged in the corners, yet left a ~1.5" lip all around to accommodate the new lamination. If I had used your technique to preserve the pattern however, I could have avoided having to grind down all of the molded grip on the rest of the boat (time consuming and dusty).

Since I used plywood (heavier than foam, yes, but I'm not trying to break any speed records here), I opted for a minimal fiberglass overlay of only 2 layers of heavy fabric+mat or 1 layer of heavy woven roving depending on the areas (I also wasn't trying to recreate a raised platform for the grip areas). I figured this would be sufficient given the innate structural rigidities of plywood and epoxy resin. I also pre-coated the plywood with epoxy in an effort to minimize the possibility of water intrusion. It's holding up great so far! Though your suggestion to use G10 sounds awesome and very convenient!
 

Loren Beach

O34 - Portland, OR
Senior Moderator
Blogs Author
SO well done!
If I could rate this thread: "better than just excellent" I would vote to do so.
:)

Loren
 

Christian Williams

E381 - Los Angeles
Senior Moderator
Blogs Author
Very brave, doing your own Awlgrip. Looks like it came out really well.

Do you recommend the rest of us try it? Any more to say about the learning curve?
 

opfrei

Junior Member
Christian, though it wasn't a walk in the park, I highly recommend using Awlgrip for the topcoat. I did consider giving up and having it sprayed after my first 2 coats cured wrong, but it was worth the headaches and perseverance in the end: the finish now looks like a factory spray job, with a mirror-like gloss and excellent durability (I regularly rub my anchor chain on the lazarette with no scratching or chipping yet!). Single part paints wouldn't even be close contenders. There are plenty of informative posts on how to apply Awlgrip out there, but here are the main points summarized: pay extra special attention to the mixing ratios, start early in the day (to have time for coat to cure before dew sets in), and have your roll & tip method down (link above). Also, get yourself a high quality paint brush, mini foam rollers, and tack cloths. Protect yourself from head to toe and use a respirator for the (seriously noxious) fumes. Let your paint mixture set for 10 minutes before laying it on. I was surprised at first by how thin the paint consistency was (like milk), which is why you should use primer first to cover any underlying dark spots. You want to lay on multiple coats (3 or more), each as thin as possible to prevent drips. Thin the paint down more if the ambient temperature rises and/or when you notice it becoming thicker. Use a few drops of curing accelerator if necessary, and lightly scuff the surface in between coats. Finally, work methodically and with *patience*. Best of luck!
 

CaptainBrad

Junior Member
I like your filleting job around the rudder post! It's little details like that that make it look professional! Bad DIY repairs will always turn heads in the marina. Good ones should only turn the heads of those that know what is required to achieve those results. Nice job!
 

Capt.Rick

New Member
In one of of the pictures I could see my Ericson 27 in the corner! Every time i walked down the dock I got the see the progress first hand. It was impressive work. Much more then I would had the guts to take on. Final results looked really good. Like a new boat. Great Job!
 

Hawaii Sailor

E27, Kaneohe, Hawaii
I'm curious what you did with your raised stanchion bases. Did you salvage that part of the topdeck from the original mold?
 

Christian Williams

E381 - Los Angeles
Senior Moderator
Blogs Author
start early in the day

That's an encouraging report. My freelance painter (transom only) had his early coats ruined by dew, and had to start over.
 
Top