Gline
Member I
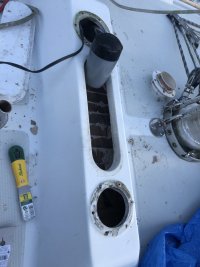
I just finished up a 2 week long project and wanted to thank Christian Williams and Footrope for their detailed posts! I've attached a pics of the finished job (in hindsight I should have taken pics of the damage and the repair process).
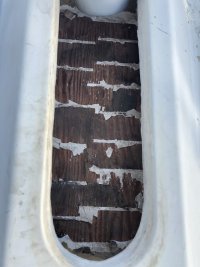
The 2 forward dorade boxes on my 1984 e38 were in bad shape. Years of water and termites had damaged the plywood flooring (I can't believe Ericson left exposed plywood). The previous owner had sealed up the cowl vent covers and the small drain hole with silicone, but as a live aboard he usually had hatches or port lights open for ventilation. I don't live aboard and I badly wanted some passive airflow, so it was time to get dirty. I know I could have used solar vents or something else modern, but I like the idea of keeping things original.
Note: I've only owned sail boats for about 8 years, so my repair skills and knowledge are basic DIY. Hopefully I didn't make too many mistakes!
Dorade Box Fix
Step 1: Remove the Cowl vent base. This allowed me to fit my hands more easily into the boxes.
Step 2: Strip old paint on floor of the dorade box (a PO had attempted to fix this leak years ago with paint). Wipe with acetone after paint striper.
Step 3: Dig out rotten plywood. Some came out easy. Some wood had a rock hard surface (maybe a previous layer of epoxy from PO) but was soft underneath likely from termites, so in those areas I drilled small holes.
Step 4: Prep 12 ounces of West System unthickened epoxy per dorade box. Footrope was spot on with the 12 ounces (one box soaked up all 12 and the other 10 ounces). Inject epoxy into the drilled holes. Pour epoxy onto the floor of the dorade box and brush around so that it covers all the surfaces and fills the voids left behind by the rotten wood. Gravity pulled the epoxy toward the drain hole, so I did my best to brush away from that low spot to minimize future drilling out of that hole. Christian recommend using something like a rubber tube to keep that hole clear (I wish I would have done that, oops).
Step 5: (Could maybe skip this step) Fair the uneven spots with 407 thickened epoxy. I then put a small amount of unthickened epoxy over those areas to seal up any small holes in the fairing epoxy (recommend by West System tech support, but probably overkill).
Step 6: Drill out the drain holes. I was able to keep one free during the epoxy step, but the other needed drilling. This step could be avoided with some better foresight.
Step 7: Wet sand to remove amine blush.
Step 8: Create a UV protection for the epoxy, I know there is no direct sunlight on this but I don't want to do this repair ever again! I primed with 2 coats Interlux Primekot and then used 2 coats interlux brightside.
Step 9: Have a beer (maybe 2)
Cowl Vent
I went with the Vetus Jerry Style Stainless Cowl Vent. These vents are pretty slick and you can add a little screen on the inside (which I need to keep the termites away). The only issue (I was pretty annoyed at this point because I thought the epoxy work was done), is that the base for these is a male ring that is too small for the existing opening. I used some epoxy thickened with some 406 and chopped fiber glass to decrease the size of the opening. I then created UV protection for that epoxy (maybe overkill). I then drilled the new holes and bedded the fancy new vents with butyl tape.
I may be crazy as I love doing boat repair, but this job wasn't very fun. The biggest nuisance is the small awkward space and having to contiourt your hands. I could have finished this faster than 2 weeks, but work gets in the way plus somedays were sailing days and not work days.
Thanks again fellas for all your posts! I would not have been able to complete this job without all the info on these forums! Time to go sailing!!


") , I couldn’t use any penetrating products because if I remember correctly the temp range for curing wasn’t right .
, I couldn’t use any penetrating products because if I remember correctly the temp range for curing wasn’t right .