Tom Metzger
Sustaining Partner
A little cheaper than Loren's suggestion:
https://www.harborfreight.com/8-piece-right-angle-screwdriver-92630.html
https://www.harborfreight.com/8-piece-right-angle-screwdriver-92630.html


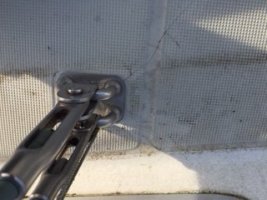
well after cleaning off some of the gunk I see what may be the beginning of a crack on the backside? I found an old post by Phil McFarlane that said on 35-2 there was an extra plate welded on the top of the chainplate, which is exactly what I have, so that seems correct. Phil's fix was to make new ones double thick the whole length, which sounds like the plan. I also wonder if the bend in the second pic is planned or if my chainplate bent under load? Unless someone can point me otherwise I will have them made with no bend?View attachment 24207View attachment 24208
well after cleaning off some of the gunk I see what may be the beginning of a crack on the backside? I found an old post by Phil McFarlane that said on 35-2 there was an extra plate welded on the top of the chainplate, which is exactly what I have, so that seems correct. Phil's fix was to make new ones double thick the whole length, which sounds like the plan. I also wonder if the bend in the second pic is planned or if my chainplate bent under load? Unless someone can point me otherwise I will have them made with no bend?View attachment 24207View attachment 24208

I have used a Stanley version of this little "offset" driver for tight spaces, for 20 years.
Very helpful when working back under the deck or under trims that were installed sequentially.
(and then, EY had put teak bungs over the screw heads as well... where no one was ever likely to see them. Oh my.)
https://www.whiteheadindustrial.com..._4wLbt7NRKIdu0fCMZOAtz1Iv4EbkgQaAn8EEALw_wcB#

Chapman 20 tooth rachet offset
I hope I'm not hijacking this thread - the heading seems appropriate to my situation too (checking chainplates for structural integrity)
- someone can move my post to a more appropriate thread if necessary.
I did a thorough inspection of my E32-3 standing rigging on the weekend. Apart from discovering one cotter pin missing and another about to slip out (not bent at all!) at the deck toggles, I noticed that the pair of deck rings for the upper and intermediate stays were both 'pulling up' on the deck a little on the stbd side. And, there were what looked like 'old' cracks in the gelcoat radiating out from these rings. It looked like the deck is raised about 3/8" above the level of the surrounding deck. The other side deck rings don't show this issue.
I went below to investigate the chainplates. There's a ss rod leading from under the pair of deck rings and threaded into horizontal rod of aluminum (~1+ " thick). The aluminum rod is inserted through the cabin shell and into a very heavily fiberglassed area. There's no evidence of damage in that area. There's a 'flat' in the ss rod, obviously to adjust the downward pull that it exerts on the pair of deck rings to which the side stays are attached.
My questions:
1) what exactly should I be looking for in the chainplate area (big thick mass of fiberglass) to assess possible structural problems?, and
2) how is the ss rod attached to the underside of the deck rings? - is it something like a flat 'head' that's free to rotate in a cup of some sort when the rod is tightened from below?
 The picture is rotated so the left side is actually the top, but you can clearly see the bulkhead in the slot, the chainplate needs to fit down there from above and there is no wiggle room.
garryh watch the thickness, i wanted to go thicker all the way too but the bulkhead fits into a slot on the cabin top, and the chainplated needs to slide down that same slot next to it. It is a tight fit. Maybe if you angle it like you contemplate it may work but be conscious of the space there.View attachment 24331 The picture is rotated so the left side is actually the top, but you can clearly see the bulkhead in the slot, the chainplate needs to fit down there from above and there is no wiggle room.
thanks for the head's up on that Hank... I will check this out. I cannot picture it without being there and may be a few weeks before I can get back to the boat. I am sure it will be quite soupy by then ; | I am wondering as I sit here if the groove thickness cannot be modified (as in 1\8" filed away?) for the few inches it takes to position the slightly wider chainplate..?
Also still wondering if that bend at the top of the chainplate is a design thing or a wear thing due an unfair loading. Strange that both of our chainplates have that bend.
good point kerry, but then both are mounted on the salon side of the bulkhead which makes sense? for accessibilty. From other threads here, it seems the salon side is the norm. But this mystery deepens here... I just pulled out my chainpate and noticed the the 'bend is in the opposite direction ie towards the stern. Hanktoo... yours is bent towards the bow it seems. How can two boats from the same moulds have this (quite large) difference in alignment of chain plates and mast\stays..? The process of checking this alignment is way beyond me... especially with mast down. This is a conundrum for sure.
I first came across the Chapman 20 tooth rachet offset tools when working at New York Naval Shipyard in the 50's. Bought their NO. 1316 set. Recently sheared an allen bit. Not too shabby for a60 year old tool.
https://chapmanmfg.com/
Another good one is the Eifel geared plier wrench. But, I haven't seen those for sale since Montgomery Ward went belly up.
New Alligator wrenches are also hard to come by.
But, so much for nostagia!<label for="rb_iconid_8"></label>