Carpentry question (Dremel solution)

Christian Williams

E381 - Los Angeles
Senior Moderator
Blogs Author
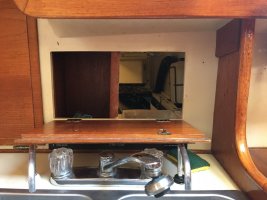
I want to enlarge the pass-through opening and fit it with a push-through door (rather than have the door open down, over the faucets).

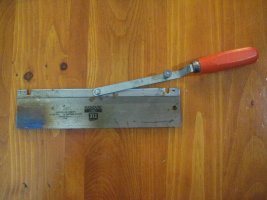
This requires a freehand saw cut which has to be neat and square. Power tools don't fit.

Best idea I have come up with is to tape a straight edge guide and hand saw with a flush cut pull saw.

It will be awkward. Any better ideas?

attachment.php


(On this model, the left part of the opening is a box for cleaning supplies. The right side accesses the lazarette trash bin, but it's too small. I can widen it three inches. The plan is two separate doors. The left door to open left, on left-side hinges; the right door to hinge on top for push-through.)
 

Attachments

  • IMG_1509.jpg
    IMG_1509.jpg
    71.2 KB · Views: 759
Last edited:

dt222

Member III
Have you thought of just switching it around so that the panel opens up instead of down? Secured with velcro/magnet/clasp?

Don
 

toddster

Curator of Broken Parts
Blogs Author
How about one of those oscillating multi-tools? Most of them have an offset blade, so you can reach awkward angles, and they make a nice neat cut in fiberglass.
(I recently bought the Home Depot/Milwaukee LiIon battery powered version, because I was impressed with the compact drill gun of that line. But it seems too weak for fiberglass cutting. Cheap Harbor Freight 110V unit works fine)
For the trash, I'd hinge a door at the top and on the back, so you can just push through when it's unlatched.
 

bolbmw

Member III
How about one of those oscillating multi-tools?

Seconded, I bought the dremel MM45 and have been quite happy with it. If you want to spring for top of the line you can get a Fein.. The cutting blades are a little challenging to use until you get the technique down to prevent jumping around (you may still want to put a straight edge as a guide.)

Beats hand tools.
 

mfield

Member III
The Fein saw is certainly a great tool for which you will find many other uses.
It certainly is a pain try to stick a large plate though the hole to empty off scraps. However, I would suggest a behavioral modification, scrape of food scraps etc into a small bag in the galley (sink) then toss the entire bag into the trash bin in the lazarette. Use extra large bags on the trash bin and put spares under the trash bin to raise its top up to the level of the opening.
 

Christian Williams

E381 - Los Angeles
Senior Moderator
Blogs Author
Thanks all. I guess I will try the wallboard saw on the dremel multi. My sawzall is like holding a scalded cat, would be hard to control.

The goal is push-through trash. I had it on 32-3 and can;t live without. I am constantly cleaning up, tossing away one potato chip or cut cable tie, and the current design means three steps: open door, toss, close door. With push-through it is one step, and one-handed. Behavior modification not possible in my case. Ask anybody.
 

GrandpaSteve

Sustaining Member
Thanks all. I guess I will try the wallboard saw on the dremel multi. My sawzall is like holding a scalded cat, would be hard to control.

The goal is push-through trash. I had it on 32-3 and can;t live without. I am constantly cleaning up, tossing away one potato chip or cut cable tie, and the current design means three steps: open door, toss, close door. With push-through it is one step, and one-handed. Behavior modification not possible in my case. Ask anybody.

Christian - did you find a bin that worked in the compartment in the 32-3, or did you just stick a bag in there?
 

Mark F

Contributing Partner
Blogs Author
Hi Christian,

I agree with the Fein Tool recommendations. It does take some practice to start your cut but once started you can get a nice straight cut with comparatively minimal dust. I think the trickiest part of your design is the right side of the trash opening. Are you thinking that will be fiberglass (wall) to wood (door) junction? I'm sure you have thought of this but make sure the door on the left clears the sink hardware when it swings out.
 

Christian Williams

E381 - Los Angeles
Senior Moderator
Blogs Author
Mark, it's just plywood, but fairly thick, about 1/2 inch. The current cutout only accesses about 2/3 of the trash bin top.

Steve, I positioned four hooks at the corners of the trash bin box. I have used sticky-back plstic hooks, also screwed down. Now I am using stainless roundhead screws, left sticking up about half an inch. This allows a compactor bag, thicker than a trash bag, to be stretched open to receive trash. The bags pull out easily if not too full, and are easy to reinstall.
 

Pat O'Connell

Member III
Compactor Bag

Hi Christian Ah.. I hope that compactor bag trick will work for us. It looks really good in the picture. Getting plastic bags our of our trash bin with out ripping has been a PIA for years. A plastic bag inside the compactor bag might work slick. I'll try it in the Spring when the cover comes off.
Pat O'Connell
1981 E28+ Chips Universal 5411
 

ofshore74

Member III
Would a small hand-held router with a longer bit work? Build it up around the parameter of the hole with 1/2" to accommodate that raised wood on the left. Add a guide. It would give you a nice clean edge too. Just a thought.

As I say this I realize the "raised wood" on the left is another door. Scratch that, just use a router!
 
Last edited:

GrandpaSteve

Sustaining Member
Mark, it's just plywood, but fairly thick, about 1/2 inch. The current cutout only accesses about 2/3 of the trash bin top.

Steve, I positioned four hooks at the corners of the trash bin box. I have used sticky-back plstic hooks, also screwed down. Now I am using stainless roundhead screws, left sticking up about half an inch. This allows a compactor bag, thicker than a trash bag, to be stretched open to receive trash. The bags pull out easily if not too full, and are easy to reinstall.

I will try that, I have been using the trash bin to store cleaning supplies, but I think it would be great to use it for trash. Right now I an using a sticky-back plastic hook on the side of the engine cover (at the entrance of the quarter-berth). That works fine when I am by myself, but people like to sleep in that cozy quarter, so the trash has to move.
 

toddster

Curator of Broken Parts
Blogs Author
Hmm... the analogous spot on my boat has volume behind for trash, but I'd have to move the 110V outlet. Not much surface area left anywhere on the bulkhead.
Also lots of volume behind the gimbaled range, but it might be tricky to access it... short of swinging the range out every time. But now I'm imagining some kind of Rube Goldberg device that compacts the trash as the stove gimbals. :rolleyes:

The stores in my area don't even carry compactor bags any more. I have to order them from Amazon. (I have one in the kitchen and one in the lab.) Regular kitchen bags will do, if you're careful. I actually keep the smallest size kitchen bags on the boat - it forces me to offload the trash frequently.

Years ago, I was a frequent guest on a larger boat that had a compactor in the lazarette. It was great for keeping trash contained, but you still had to collect trash from receptacles in the salon and carry it to the compactor. Search reveals a number of "manual" trash compactors, that look like pretty elaborate substitutes for a booted foot. Which reminds me of a sixth grade teacher who used to call boys up to stand in his trash can when it was full.
 

markvone

Sustaining Member
Hi Christian,

It looks like you could clamp a straight edge as a guide along the top and bottom (with the existing door and hinges removed for the bottom) to get clean cuts for the two horizontal cuts. Two c-clamps on the left side should hold the guide straight along the existing top and bottom edge. I have the Harbor Freight $39 oscillating tool but I would lean toward using the pull saw by hand for more control if it's only a 3 inch cut in 1/2 inch plywood.

I'm not sure how I would cut the vertical along the right side. I'm thinking you could make a wood guide the proper width and hold it against the existing teak vertical on the right while you plunge cut the right vertical edge with an oscillating tool. You might consider cutting the right edge a little short if you think the cut might be more ragged than clean so you can finish it by sanding smooth. Another thought, can you clamp (or screw) a guide on the back side and cut the vertical from the rear? Might work better for the two horizontals too?

Mark

Here's a little Sandvik trim saw I would use for the horizontal cuts. Only 2.5 inches wide and the handle flips to cut in both directions.
 

Attachments

  • IMG_2327.jpg
    IMG_2327.jpg
    92.6 KB · Views: 150

toddster

Curator of Broken Parts
Blogs Author
Another thought, if there is room, is to put the new doors inside a frame, which would conceal any imperfections in the bulkhead cut. The fancy way to do it is to over-cut the hole by an inch, or half an inch, and rabbet the frame to socket into the hole. Of course, this might be awkward if none of the other doors on your boat are framed. On my boat, the factory doors in bulkheads are set in frames.
Maybe "casing" is the right word?
 

Christian Williams

E381 - Los Angeles
Senior Moderator
Blogs Author
In the end, I just went at it with a Dremel multimaster drywall blade. Nothing else would fit in there. The result was about what you'd expect. I can clean up the vertical cut with 60 grit and a rasp, and then fill and paint. I did manage to preserve 90-degree corners, which are necessary for the swing-door plan.

Thanks for the ideas.

1-Ericson 38 passthrough enlarged2 .JPG

1-Ericson 38 pass-through enlarged1 -001.JPG

The finished project is here.
 
Last edited:
Top