Bending Wood

rgraham

Member II
If you have a need to bend some wood for different projects here is a method that is working for me. I have to create a framing structure to support a cabin ceiling. So I’m using 1 ½ inch by ¾ inch red oak (which if you’ve ever tried to bend is extremely strong and resistant to bending) and steaming it with an improvised steaming box and then bracing it into position and screwing it to the cabin fiberglass ceiling.

1) Borrow your wife’s clothes steamer (if she has one and isn’t looking) other wise an electric tea pot or a portable propane stove and a tea kettle would work.

2) Adapt a hose to connect it to a section of PVC pipe (I’m using 3 inch) that will accommodate your size of wood. Also the length can be adjusted so you can use different length pipe as well. Make sure and drill a small hole in the end cap at the opposite end of the pipe to cause the hot steam to travel the length of the tube and to prevent any pressure build up.

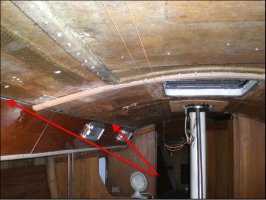
3) After steaming the wood (so far about an 45 minutes to an hour seems to be working for my lengths) brace it into position using lengths of scrap lumber.

4) It helps to have the high tech adjustable bracing base I’ve employed.

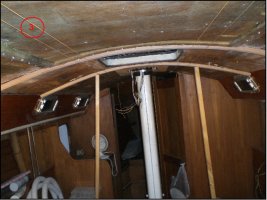
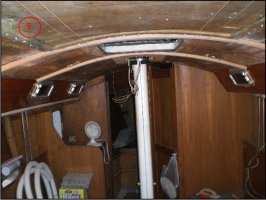
5) Screw it into place (making sure in my case not to go through the deck and only the inner layer) and then remove the bracing and you have a bent piece of wood.


Hope this helps someone in a similar position.
Robert
 

Attachments

  • Steamer.jpg
    Steamer.jpg
    48.5 KB · Views: 53
  • SteamTube.jpg
    SteamTube.jpg
    58.4 KB · Views: 65
  • Bracing.jpg
    Bracing.jpg
    63 KB · Views: 65
  • HighTech.jpg
    HighTech.jpg
    79.5 KB · Views: 52
  • Installed.jpg
    Installed.jpg
    65 KB · Views: 65

NateHanson

Sustaining Member
Nice work! :) As a furniture-maker who's done some steam-bending in the past, I hope you don't mind if I chime in.

If your wife doesn't have a steamer, you can use any metal teapot, pressure-cooker, metal jug, or anything that you can make a way to attach a hose to it, and place that over a camp stove, or your galley stove, or whatever. I attached a hose barb to the lid of a big pressure-cooker. I've used 4" PVC as a steambox, as you did, and it works, but support it well, because it will bend when heated by the steam. A long box made of exterior plywood works fine too.

Maybe it's different with a clothes steamer, but with the double-boiler I mentioned above, I've found that wood needs cooked about 10 minutes per inch of thickness for good pliability.

Steam-bending produces about a 10% spring-back, so you generally want to make your bending jig to a tighter curve than you want the finished piece. After you remove the clamps, a steam bent piece relaxes just a bit. Glue-laminate bending (where you clamp thinner strips of wood together in a curved shape) has basically zero spring-back, so for some applications it is more convenient. It requires more cleanup afterwards, however.

Red oak is easy to find (it's plentiful at big box building centers) but it's much less rot resistant than white oak, which is traditionally used in boat construction, and is often steam bent. If you find you need to do another one of these, you might want to use something that's more moisture tolerant, in case that area ever gets a leak. Just a thought.

Nice project though!
 

rgraham

Member II
Thanks for the info

How would you run the pieces of trim that will have to go against the side?
 

Attachments

  • trim.jpg
    trim.jpg
    69.5 KB · Views: 90

NateHanson

Sustaining Member
Well, I'll warn you that my expertise is in furniture making and not in yacht joinerwork.

What is this framework for? Is the headliner going under it? Over it?

On the side, are you wondering how to attach pieces of wood to the fiberglass there? Or how to attach wood to the pieces that you've bent? Something else?
 

treilley

Sustaining Partner
A wall paper steamer might also work well for this. It has a hose output that could easily be attached to the PVC tubing.

I have been thinking about this lately as next winter I would like to try my hand at building a wooden wheel. I would probably get a used SS wheel off ebay or some other source(read boatyard dumster!), cut off the outer wheel preserving the spokes and attaching a highly varnished wooden wheen. I will probably use thin strips of wood laminated tgether in a circular jig(I love making jigs) and then routing the shape(yet again with another jig)

For reasons of strength, I may take the wheel to a machine shop and have them just remove the outer 3/4 of the SS so then I preserve the structure and then attach the wooden wheel to that.
 

rgraham

Member II
Nate,
This is going to be the framing structure that I'll be attaching thin sections of fiberglass to and then adding teak trim strips to cover the seams between the sections. So I want to have as much of the portlight surface wood exposed. So I was thinking of runing the trim flat against the fiberglass pieces on this edge and bending it to fit the curve that runs along the lenght of the cabin top. Hopefully you can visualize what I mean from the photo.
Robert
 

Attachments

  • trim.jpg
    trim.jpg
    70.8 KB · Views: 85

NateHanson

Sustaining Member
So these pieces are just to provide something to screw the fiberglass headliner onto, right? (and to screw the teak trim onto also)

Since you won't need to remove these pieces to access anything, I'd attach them with 5200 or 4200 as well as screwing them. They'll be a pain to get off, but they won't pop screws the way I think they might if they are only held in by very shallow screws into the bottom laminate of the deck. When the boat is flexing a bit, I think the PU sealant will hold up better.

So are you wondering how to attach that side piece? Or how to shape it to fit? I'm not quite sure of the question. I'd think you can attach the side pieces the same as your curved pieces, with shallow screws (and I'd recommend using 4200/5200 as well). If there is a significant curve there (hard to tell from pictures) you could scribe that piece to fit the curve. Screw it in place as close as you can get to the finished position. Measure how far the edge is from the desired position, at it's farthest point (say it's 1" at the middle). Then scribe a line along the whole edge, exactly 1" away from where you want the finished edge to be (use a 1" spacer that slides along the coachroof side, and guides your pencil). Then saw to that line, and screw it in at the final position. Of course if this will be covered in the end by teak trim, then maybe it's not too important how closely the under-frame fits.

This is a nice project. Where are you getting the thin sheets of fiberglass to use for the headliner?
 

rwthomas1

Sustaining Partner
Nice project! My dream project is to do the same thing on my E38 but do beadboard instead of fiberglass panels. I hate the headliner. RT
 
Top