• Untitled Document

    Join us on March 29rd, 7pm EST

    for the CBEC Virtual Meeting

    All EYO members and followers are welcome to join the fun and get to know the guest speaker!

    See the link below for login credentials and join us!

    March Meeting Info

    (dismiss this notice by hitting 'X', upper right)

What ELSE can you do with the wine rack?

Geoff W.

Makes Up For It With Enthusiasm
Blogs Author
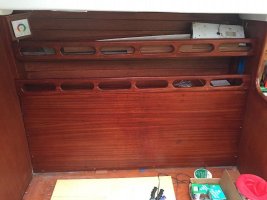
I think we're all familiar with the charming additional feature of a starboard wine rack in our Ericson salons. I, however, don't drink, and am planning to liveaboard - that nook space is worth its volume in gold.

Has anyone ever removed the wine rack part of that area and used it for something else, or does anyone have clever ideas on other ways that space could be used?
 

Kenneth K

1985 32-3, Puget Sound
Blogs Author
The wine rack might be a tough one to remove--looks built-in.

Other space-making ideas:

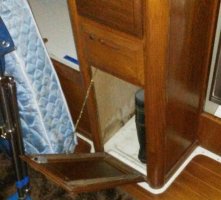
1) I removed the tilt-open drawer forward of the stove. The tilt-outs (there is one under the nav station, too) waste a lot of space. Once removed, the cabinet space can be easily modified with shelves to create multi-level storage.

20170122_180828.jpg

2) Also, Bruce Gary did a post a while back about removing the clothes rack from the hanging locker and installing shelves. His project came out great!

3) If you aren't using all your water tanks, removing the port or starboard tank adds a good deal of additional storage under a setee. It's easy to re-install the tank later if you're going to need it.
 
Last edited:

kapnkd

kapnkd
The wine rack might be a tough one to remove--looks built-in.

Other space-making ideas:

1) I removed the tilt-open drawer forward of the stove. The tilt-outs (there is one under the nav station, too) waste a lot of space. Once removed, the cabinet space can be easily modified with shelves to create multi-level storage.

View attachment 25335

2) Also, Bruce Gary did a post a while back about removing the clothes rack from the hanging locker and installing shelves. His project came out great!

3) If you aren't using all your water tanks, removing the port or starboard tank adds a good deal of additional storage under a setee. It's easy to re-install the tank later if you're going to need it.


...Not for a 38 but for those with an E32-II looking for more storage, here's a thought:

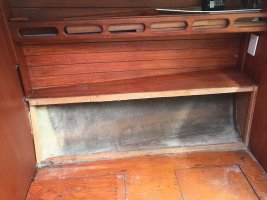
When we replaced the main and secondary bulkheads on our '73 E-32 we discovered a fairly spacious area underneath the starboard side settee's seat back shelf when removed. Never ever realized there was so much room under/behind there!

Stbd Settee3.jpg

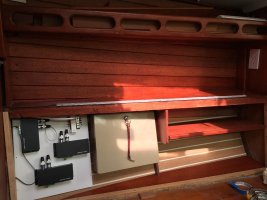
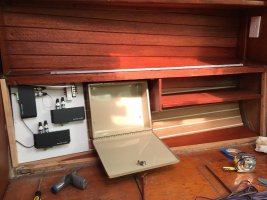
Given it is "hidden" behind the wood panel AND the seat back cushion, it also proves to be a great "secret" area for valuables you don't want NON invited visitors to find. Hence, we put in a thick steel lock box for extra security and of course more shelving - PLUS kept the area below open for storage of LONG items such as even a rifle or shotgun should we ever cruise the Bahamas again. to the far right (aft is a shelf). With the left of center mid section comes the lock box followed by an area to far left (forward) for the decoders and wiring for the LED floor, upper shelf lighting and even a wine rack we installed close by. You can see in the upper right corner of the one photo where we installed the controller for the LED system. (Separate article to later follow on all of the LED fun stuff. We're still in the process of wiring it all in.)

Stbd Settee1.jpgStbd Settee2.jpg Stbd Settee6.jpg
 

Geoff W.

Makes Up For It With Enthusiasm
Blogs Author
...Not for a 38 but for those with an E32-II looking for more storage, here's a thought:

When we replaced the main and secondary bulkheads on our '73 E-32 we discovered a fairly spacious area underneath the starboard side settee's seat back shelf when removed. Never ever realized there was so much room under/behind there!

View attachment 25342

Given it is "hidden" behind the wood panel AND the seat back cushion, it also proves to be a great "secret" area for valuables you don't want NON invited visitors to find. Hence, we put in a thick steel lock box for extra security and of course more shelving - PLUS kept the area below open for storage of LONG items such as even a rifle or shotgun should we ever cruise the Bahamas again. to the far right (aft is a shelf). With the left of center mid section comes the lock box followed by an area to far left (forward) for the decoders and wiring for the LED floor, upper shelf lighting and even a wine rack we installed close by. You can see in the upper right corner of the one photo where we installed the controller for the LED system. (Separate article to later follow on all of the LED fun stuff. We're still in the process of wiring it all in.)

View attachment 25343View attachment 25344 View attachment 25345

On my 1987 Ericson 32, that area of the salon is sectioned off by three of those plastic screw lids. That looks like it leads straight back to the space between the hull and the liner correct? Do you think that area is subject to extra condensation? Do you ever worry about things falling down into the bottom of the hull?
 

kapnkd

kapnkd
On my 1987 Ericson 32, that area of the salon is sectioned off by three of those plastic screw lids. That looks like it leads straight back to the space between the hull and the liner correct? Do you think that area is subject to extra condensation? Do you ever worry about things falling down into the bottom of the hull?

A photo of your ‘87 would be helpful. Sound like yours has the tri-axel grid which I’m not that familiar with.

Notice the pontoon boat 1/4” rubber backed flooring (Teak and Holly look) I glued it in place for looks and to help insulate the hull area. Moisture has not been an issue for me even in the past without the insulation. My seat area is solidly attached to the hull and there is no chance for items to fall below (see the 1st photo). Besides, below said areas are two easily accessible under seat storage areas anyway. (You can see the two panels in the photos.)
 

Kevin A Wright

Member III
I think we're all familiar with the charming additional feature of a starboard wine rack in our Ericson salons. I, however, don't drink, and am planning to liveaboard - that nook space is worth its volume in gold.

Has anyone ever removed the wine rack part of that area and used it for something else, or does anyone have clever ideas on other ways that space could be used?

I've been looking at that space for quite some time on my E35. We do drink but usually have bottles of harder beverages stored in that rack and many of them don't fit the wine holes. And those that do it's a real inefficient use of space. Plan eventually pull out the rack and just build a door for the space just like the one to the left of it (which now holds the cocktail shaker, vermouth, olives, and onions). Just hasn't risen to the top of the list yet.

Kevin Wright
E35 Hydro Therapy
 

Geoff W.

Makes Up For It With Enthusiasm
Blogs Author
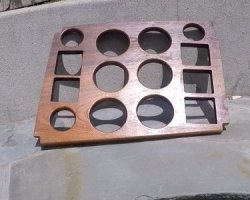
Anyone know how the wine rack wood pieces are attached to the rest of the cabinetry? Does it need to get jigsaw'd off or are there screws/pegs/etc inside the wood somewhere?
 

Kevin A Wright

Member III
I'm just going from memory but I think the interior rack pieces are just screwed together. However to reach them you first have to take off the outer molding around the frame. I believe that has countersunk and plugged screws.

Not hard to do, just get yourself a screw ( I use a #8) and cut off the head. Drill a small pilot hole in the plug (drill will stop when it hits the screw head underneath) then chuck up the headless screw in your drill and slowly run it into the pilot hole. When the screw hits the screw head it starts going in but the plug keeps getting pulled back by the screw threads as you drill. Just takes a minute then you can reuse the frame molding and just pop new plugs in when done.

Kevin Wright
E35 Hydro Therapy
 

kapnkd

kapnkd
WOW! ...Beyond just the wine rack, so many of us are always looking to increase or improve on our inevitable limited supply of storage space (regardless of which boat we have) - especially those of us that cruise. Seems we can always use more room.

Perhaps this could become a separate page/link on the EYO site dedicated to all the great and innovative ideas of maximizing how and where we put our “Schtuff”??

Maybe it could be simply listed under “MODIFICATIONS” to be more inclusive?? I’ve seen some neat additions over time and a more specific searchable ability would be AWESOME!!
 

Geoff W.

Makes Up For It With Enthusiasm
Blogs Author
So I pulled out the wine rack, as my blog posts detail:

http://www.ericsonyachts.org/infoex...board-Prep-1-Removal-of-Wine-Rack-(gasp)-pt-1
http://www.ericsonyachts.org/infoex...oval-of-Wine-Rack-pt-2-(and-v-berth-cushions)

It was easier than I thought.

Now what to do with the space.... I think it's about the perfect size either for a pantry, storage of larger utensils, or for a medium-sized kitchen appliance like instant pot / coffee maker / etc. Anything I put there needs to be secured while underway, so there needs to be a cover of sorts over the open space. Given that I'll be living on it more than sailing on it (as far as hours are concerned), the cover needs to be easily/quickly stowed out of the way. When deployed, it also needs to be securely fastened enough that it could take the weight of what's behind it while heeling , if need be.

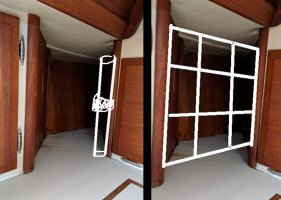
In my head, I could do something like white nylon webbing, fastened permanently at one side, able to be rolled up and clipped over w/ a snap of some sort. That would keep it shut and be easy enough to stow, though maybe not "low profile" enough to be truly out of the way.

When deployed, I'm not quite sure how it could attach to the left side of the space as shown here:

webbing.jpg

Maybe a vertical dowel along the left side of the webbing, both to add support and clip it into some kind of fastener on the left side. Or maybe some sort of sliding joinery, like those extendable movie theatre queue ropes. Or something simpler entirely.

You who are more handy than I - do you have any suggestions on either good ways to cover the space, or good fastening options for something like I drew?
 

Christian Williams

E381 - Los Angeles
Senior Moderator
Blogs Author
I would make a plywood/teak veneer door that is held in place by barrel bolts -- and usually not even there.

In harbor, any kind of swinging door gets in the way. For sailing, the door could be installed.

Anyhow, it's a point of view.
 

Geoff W.

Makes Up For It With Enthusiasm
Blogs Author
I would make a plywood/teak veneer door that is held in place by barrel bolts...

I considered this but I think the door would become another relatively high-volume (relative being the key word in a crowded boat) item to have stowed somewhere when not in use. And to my eye, that would be a lot of wood in that corner there. But this would be the classiest option, by far.

Perhaps thinking further 'out of the box'...

Actually I think this is even better than this mesh web thing I was considering. I think something like this in the Phifertex "sand" color might match pretty close to the off-white countertops as well.

In discussing fasteners / construction with my friend-with-a-sewing-machine, he proposed a number of points "have you considered shelves? how heavy will items be in there?" that made me consider that I haven't actually planned my galley out very well yet, and that might take some living-in to see how I need it to be. I guess I'm currently a "cut twice, measure once" kind of person, so his enthusiasm check was helpful. I'll just look to finish the corner and use the space some, and add the final details at a later time.

Speaking of finishing, I'm thinking this back corner will be my first foray into the world of varnishing and maybe CPES. I'm new to this, and now studying manuals and youtube channels. Not sure if it's too late to apply CPES if the wood is already mostly finished, but the aft side of the cabinet goes out straight into the lazarette. Seems like it could probably be protected against "outside conditions" better.

I think my order of operations will be:

1. Fill the screwholes in the countertop (using marine-tex putty? any better material for this?)
2. Fill the screwholes in the wood cabinetry (again, what material? epoxy putty or wood filler? Any recommended products?)
3. Potentially sand and CPES the wood?
4. Re-varnish the back corner, maybe with Interlux Goldspar Satin.
 

Loren Beach

O34 - Portland, OR
Senior Moderator
Blogs Author
Holes and Solutions

For "filling" abandoned screw holes in wood, I use wood plugs. Probably teak in your situation. I started doing this to clean up about 20 old holes in our bulkheads, a decade ago. It looks really nice when done, and unless someone knows where to look, the repair is pretty much invisible.
Little packages of plugs in various sizes are for sale at most chandlers.

Some trivia: use only a sharp drill bit and hold the drill firmly, when cleaning up the hole first. You do not need to have more than a quarter inch of depth for the plug. I use a bit of glue on each plug, but others use varnish or depend o friction to hold them.

For cutting down the proud part, I used to try to copy the experts and do it with a sharp (!) chisel. Too many times the plug ended up with one side below the surface. Nowadays I use a small "Japanese pull saw" (sold under a variety of names, many are inexpensive) and saw it off carefully, flush.
Or close enough to flush so that the power sander can finish it flat. Note: put a piece of blue tape on the side of the saw blade just above the little teeth. This spaces it our from the expensive surface veneer enough to avoid scoring the surface by accident.
(I just installed a new teak cleat yesterday and plugged 5 screw holes, inside of the nav table top compartment.)
 

Tin Kicker

Sustaining Member
Moderator
That corner is pretty dark, so how about a door of 1/4" acrylic (harder than Lexan) and put a small LED strip light in the cubby?
 

Christian Williams

E381 - Los Angeles
Senior Moderator
Blogs Author
I accept your offer of clear plastic. I will use it for the removable door which is usually stowed because it is so rarely needed. And because a swinging door will immediately interfere with anything on the counter in front of it, and turn out to be a horrible nearly fatal mistake only narrowly avoided by the wisdom of the forum.

Oh. Wait. It's not my boat....:)
 

Kenneth K

1985 32-3, Puget Sound
Blogs Author
Speaking of finishing, I'm thinking this back corner will be my first foray into the world of varnishing and maybe CPES. I'm new to this, and now studying manuals and youtube channels. Not sure if it's too late to apply CPES if the wood is already mostly finished, but the aft side of the cabinet goes out straight into the lazarette.

From what I know of CPES, it needs to go on bare wood. If it can't soak-in and penetrate the wood fibers, it's not worth the extra time and expense.

I've been cutting my teeth on interior varnishing as well this winter. One thing I learned (note: I like matte-finish varnish--I think the glossy stuff stands out too much from the rest of the more "muted" finish on my interior teak):

Had I read the instructions more carefully on the Epifanes Wood Finish Matte Varnish, I would have known that the matte finish goes on last. If you intend on building up several protective varnish layers, you start with a gloss varnish (which seems to be more transparent than the matte) to build up those layers, then finish off with one or two coats of matte to knock off the gloss. Building up too many layers of matte varnish tends to obscure some of the wood's natural features.

Live and learn......
 

Frank Langer

1984 Ericson 30+, Nanaimo, BC
Ken,
I also found the gloss and semi gloss too bright for the interior cabin and sole. But I have been pleased with the effect of a half and half mix of satin and semi gloss. It retains the muted look of satin but adds a polished look to it, and looks quite elegant. Three coats works well, but regular stirring is needed to keep the mix consistent.
Frank
 
Top