You are using an out of date browser. It may not display this or other websites correctly.
You should upgrade or use an alternative browser.
You should upgrade or use an alternative browser.
35-II rubrail
- Thread starter Dave N
- Start date
Salty Dawg
Sic Em WOOF WOOF WOOF WOOF
cut off the rub rail
I would recommend cutting off the entire rub rail and replacing it with fiberglass and epoxy. It will not only look much nicer, but it will strengthen the hull to deck joint. My rub rail was all oxidized and sagging and looking bad when I got the boat. Also there were a few voids in the wood sandwiched in between the two lips of the hull and deck molds. As i plan to do more cruising and anchoring than slip berthing, and i carry fenders and approach docks carefully, I thought the rub rail was not only ugly and unnecessary, but also a weak point in the hull integrity, and also possibly covering up voids or rot in the wooden ship between the halves.
I cut the whole thing off, ground the hull smooth, laminated two layers of FG cloth over the outside and two over the inside with West epoxy, faired it and painted it. The result is a much stronger deck to hull joint, not leaks or voids, and a much prettier looking sheer line.")
I would recommend cutting off the entire rub rail and replacing it with fiberglass and epoxy. It will not only look much nicer, but it will strengthen the hull to deck joint. My rub rail was all oxidized and sagging and looking bad when I got the boat. Also there were a few voids in the wood sandwiched in between the two lips of the hull and deck molds. As i plan to do more cruising and anchoring than slip berthing, and i carry fenders and approach docks carefully, I thought the rub rail was not only ugly and unnecessary, but also a weak point in the hull integrity, and also possibly covering up voids or rot in the wooden ship between the halves.
I cut the whole thing off, ground the hull smooth, laminated two layers of FG cloth over the outside and two over the inside with West epoxy, faired it and painted it. The result is a much stronger deck to hull joint, not leaks or voids, and a much prettier looking sheer line.
Dave N
Member III
Any photos?
Your approach sounds interesting. Do you have any photos of the finished effort? I do plan to have them replace the entire length. And you are right, the wood piece has totally disintegrated from moisture over the years. So it too needs to be replaced. An epoxy coating before install seems common sense.
Your approach sounds interesting. Do you have any photos of the finished effort? I do plan to have them replace the entire length. And you are right, the wood piece has totally disintegrated from moisture over the years. So it too needs to be replaced. An epoxy coating before install seems common sense.
Last edited:
Pic of sheer shear
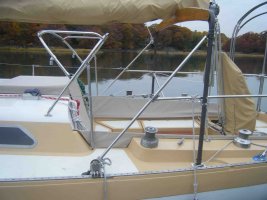
Here is a pic of how it looks now. We ground off the lips of both the deck and the hull, filled in where there were voids in the wood. That wood strip is all that keeps the deck attached to the hull. If yours is rotted out that needs to be structurally repaired. As near as I can tell the rubber rub rail just covers it and traps moisture inside to cause it to rot. Anyway we filled the voids and glassed over making a solid structural connection of FG and epoxy between the deck and hull both inside and out. Had to remove the ceiling strips and some cabinetry to get to the insides, but it was worth it. I think it actually looks much better, and I know for a fact it is much stronger. i am not just a fair weather sailor, I see strong winds and wave action sometimes. I am now secure in knowing that if the hull is getting slammed by huge waves in a storm, the deck and hull won't separate. The deck separating from the hull might tend to ruin your whole day. Hope that never happens to any of us.
Fair winds,
Sequoia
Attachments
-
 BracesSmall.jpg86.8 KB · Views: 666
Deck to hull joint
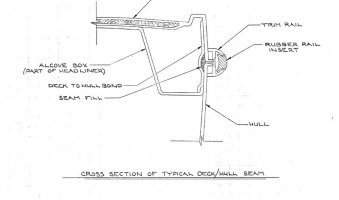
Interesting diagram. If the boat had actually been constructed that way, there might be no problem. Maybe some boats were actually constructed that way, but mine was not. On my boat (1973 E 35 II, not sure of hull #) there exists nothing at all such as that which is labeled “Deck to hull Bond” on the inside. In the diagram labeled “seam fill” one might think this would be some kind of resin putty, but it is not. What exists at that location is a piece of soft wood (looks like pine or fir on my boat). It was about 1.5” wide (tall) and maybe 1” thick (deep). The width of the hull at that point is about 1/2” and the folded over Lips of the deck and hull (which are shown in the diagram) stuck out about 1/2”. There was absolutely NOTHING attaching the deck section to the hull section except this piece of wood that was glued at the top and bottom to the deck and hull. On my boat in several places this piece of wood had voids in it. One could see daylight through the voids when the rub rail was removed. It was easiest to see in the chain locker forward, in the starboard side cockpit locker and in the lazarette locker. When I removed the rub rail I noticed the voids, so I inspected inside and made this discover. Noticing that this was a serious flaw and weakeness int he hull construction, I removed the interior of the boat, added layers of FG cloth and epoxy on hte inside, thus installing the “deck to hull bond” as show in the diagram that had previously bee absent, and cut off the lips of the hul on the outside and similarly added FG with epoxy, making the deck to hull joint integral and structural as well as much better looking. Maybe smoe, most or even all of you have hulls bonded to the deck as in the diagram, but I assure you mine was not. If mine was not then perhaps others were not also. Might be worth looking into. I would be curious what other E35 owners discover on closer inspection.
Interesting diagram. If the boat had actually been constructed that way, there might be no problem. Maybe some boats were actually constructed that way, but mine was not. On my boat (1973 E 35 II, not sure of hull #) there exists nothing at all such as that which is labeled “Deck to hull Bond” on the inside. In the diagram labeled “seam fill” one might think this would be some kind of resin putty, but it is not. What exists at that location is a piece of soft wood (looks like pine or fir on my boat). It was about 1.5” wide (tall) and maybe 1” thick (deep). The width of the hull at that point is about 1/2” and the folded over Lips of the deck and hull (which are shown in the diagram) stuck out about 1/2”. There was absolutely NOTHING attaching the deck section to the hull section except this piece of wood that was glued at the top and bottom to the deck and hull. On my boat in several places this piece of wood had voids in it. One could see daylight through the voids when the rub rail was removed. It was easiest to see in the chain locker forward, in the starboard side cockpit locker and in the lazarette locker. When I removed the rub rail I noticed the voids, so I inspected inside and made this discover. Noticing that this was a serious flaw and weakeness int he hull construction, I removed the interior of the boat, added layers of FG cloth and epoxy on hte inside, thus installing the “deck to hull bond” as show in the diagram that had previously bee absent, and cut off the lips of the hul on the outside and similarly added FG with epoxy, making the deck to hull joint integral and structural as well as much better looking. Maybe smoe, most or even all of you have hulls bonded to the deck as in the diagram, but I assure you mine was not. If mine was not then perhaps others were not also. Might be worth looking into. I would be curious what other E35 owners discover on closer inspection.
This about that
Here's a little tidbit of info about the E35-2. Hull number 1 "Aquarius" was built as shown in the above diagram. All subsequent hulls had the sheer raised via the wood shim in the hull/deck joint.
Apparently management wanted a little more headroom, and decided to raise the sheer on that model after the fact.
deck to hull shim
Thanks Martin, interesting tidbit of info and helps to explain the discrepency. I for one appreciate the extra 1.5" of headroom, but would suggest to other owners that they inspect this joint to make sure that the deck and hull were also well bonded to each other after insertion of the wood shim, as mine was not.
Thanks Martin, interesting tidbit of info and helps to explain the discrepency. I for one appreciate the extra 1.5" of headroom, but would suggest to other owners that they inspect this joint to make sure that the deck and hull were also well bonded to each other after insertion of the wood shim, as mine was not.
Salty Dawg
Sic Em WOOF WOOF WOOF WOOF
Wefco #'s
The Wefco track # is 0422-G and the insert # is 4107. Installation of the track was easy.....the insert was a bear. Had to use heat gun and rubber mallet.
The Wefco track # is 0422-G and the insert # is 4107. Installation of the track was easy.....the insert was a bear. Had to use heat gun and rubber mallet.
Heat gun Mallet?
I have done a couple of these on a warm day with some soap on the insert, and a rubber hammer just for lightly tapping.
The effort really wasn't bad. However I think that the temperature of the day has a significant amount to do with it.
Thanks,
Guy
I have done a couple of these on a warm day with some soap on the insert, and a rubber hammer just for lightly tapping.
The effort really wasn't bad. However I think that the temperature of the day has a significant amount to do with it.
Thanks,
Guy
C. Trembanis
Member III
rub rail
What about flexing....Seems perhaps too rigid perhaps?????
Interesting diagram. If the boat had actually been constructed that way, there might be no problem. Maybe some boats were actually constructed that way, but mine was not. On my boat (1973 E 35 II, not sure of hull #) there exists nothing at all such as that which is labeled “Deck to hull Bond” on the inside. In the diagram labeled “seam fill” one might think this would be some kind of resin putty, but it is not. What exists at that location is a piece of soft wood (looks like pine or fir on my boat). It was about 1.5” wide (tall) and maybe 1” thick (deep). The width of the hull at that point is about 1/2” and the folded over Lips of the deck and hull (which are shown in the diagram) stuck out about 1/2”. There was absolutely NOTHING attaching the deck section to the hull section except this piece of wood that was glued at the top and bottom to the deck and hull. On my boat in several places this piece of wood had voids in it. One could see daylight through the voids when the rub rail was removed. It was easiest to see in the chain locker forward, in the starboard side cockpit locker and in the lazarette locker. When I removed the rub rail I noticed the voids, so I inspected inside and made this discover. Noticing that this was a serious flaw and weakeness int he hull construction, I removed the interior of the boat, added layers of FG cloth and epoxy on hte inside, thus installing the “deck to hull bond” as show in the diagram that had previously bee absent, and cut off the lips of the hul on the outside and similarly added FG with epoxy, making the deck to hull joint integral and structural as well as much better looking. Maybe smoe, most or even all of you have hulls bonded to the deck as in the diagram, but I assure you mine was not. If mine was not then perhaps others were not also. Might be worth looking into. I would be curious what other E35 owners discover on closer inspection.
What about flexing....Seems perhaps too rigid perhaps?????
Flexing of deck to hull attachment
Interesting question. Perhaps some others or a naval architect or boat builder would be able to shed more light, but my opinion is that one does not want flexing AT the deck to hull joint, as this would cause working that would tend to contribute to separation. I think what ones does want is uniform flexing so that the hull and deck transfer and share the flexing. I think reinforcing the deck to hull joint will assist in this and not inhibit it. I think that ideally the deck to hull joint would have the same, or nearly the same, or slightly greater, strength and rigidity as the hull or deck material, thus there would not be a concentration of force at one point that could develop a weakness or failure due to stress or excessive flexing focused on one point (or line in the case of a joint running the length of the boat). I do know that in wooden boat construction there are added members at the deck to hull joint (the sheer clamp and shelf) that reinforce the connection between the deck and the hull. I think it would be an advantage to reinforce this connection, even in an FRP hull. That's my story and I'm stickin' to it ;-)
Interesting question. Perhaps some others or a naval architect or boat builder would be able to shed more light, but my opinion is that one does not want flexing AT the deck to hull joint, as this would cause working that would tend to contribute to separation. I think what ones does want is uniform flexing so that the hull and deck transfer and share the flexing. I think reinforcing the deck to hull joint will assist in this and not inhibit it. I think that ideally the deck to hull joint would have the same, or nearly the same, or slightly greater, strength and rigidity as the hull or deck material, thus there would not be a concentration of force at one point that could develop a weakness or failure due to stress or excessive flexing focused on one point (or line in the case of a joint running the length of the boat). I do know that in wooden boat construction there are added members at the deck to hull joint (the sheer clamp and shelf) that reinforce the connection between the deck and the hull. I think it would be an advantage to reinforce this connection, even in an FRP hull. That's my story and I'm stickin' to it ;-)
ralph roddam
Member I
rub rail joint
I have a 35-2 Ericson 1976 vintage.When I purchased it in 2004 I noticed it had no rub rail,just like the photUt of shear curiosity I have looked for the hull to deck joint and it is not like the diagram shown,it appears to be at the toe rail,although it is all epoxy. Does anyone know of a hull to deck joint failure in this model.I sure would like to know as I plan some more sailing?
I have a 35-2 Ericson 1976 vintage.When I purchased it in 2004 I noticed it had no rub rail,just like the phot
Ut of shear curiosity I have looked for the hull to deck joint and it is not like the diagram shown,it appears to be at the toe rail,although it is all epoxy. Does anyone know of a hull to deck joint failure in this model.I sure would like to know as I plan some more sailing?Dave N
Member III
Joint
My '79 #577, does look somewhat like the diagram. I have the zippered vinly overhead and so I do not have the hard overhead headliner shown. But the inside of the joint appears to have at least 3 layers of glass where visible. I have the full length wood piece on the outside which the stainless fasteners went into, the space is shown on the diagram but no reference is made to the wood placed in it. I'll get some photos this weekend of the fiberglassed joint from the inside.
My '79 #577, does look somewhat like the diagram. I have the zippered vinly overhead and so I do not have the hard overhead headliner shown. But the inside of the joint appears to have at least 3 layers of glass where visible. I have the full length wood piece on the outside which the stainless fasteners went into, the space is shown on the diagram but no reference is made to the wood placed in it. I'll get some photos this weekend of the fiberglassed joint from the inside.
deck joint
Hi Ralph,
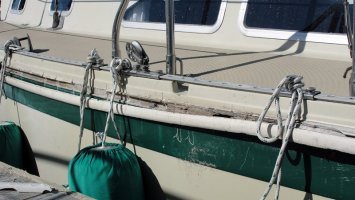
My rub rail was just below the toe rail. Which picture do you mean? the first one shows a bashed and battered rub rail, then the picture I posted with the tan/beige trim is how I solved the issue by fairing it off with epoxy and glass on the outside. It sounds like someone did the same thing I did to your boat. Count yourself lucky, it was a lot of work. I haven't heard of any failures, and I don't want to be the first. Not many E 35 2's have gone to sea in heavy weather i suspect. I plan to so that is one reason I wanted to make sure I never had an issue there.
Dave N and Ralph, both of your insides sound like they were done properly with a deck to hull connector laid up on the inside to secure the two together. That's a good thing. Mine is like that now, but was not before I did it.
Fair winds,
Sequoia on Nepenthe, 1973 E 35 II
Hi Ralph,
My rub rail was just below the toe rail. Which picture do you mean? the first one shows a bashed and battered rub rail, then the picture I posted with the tan/beige trim is how I solved the issue by fairing it off with epoxy and glass on the outside. It sounds like someone did the same thing I did to your boat. Count yourself lucky, it was a lot of work. I haven't heard of any failures, and I don't want to be the first. Not many E 35 2's have gone to sea in heavy weather i suspect. I plan to so that is one reason I wanted to make sure I never had an issue there.
Dave N and Ralph, both of your insides sound like they were done properly with a deck to hull connector laid up on the inside to secure the two together. That's a good thing. Mine is like that now, but was not before I did it.
Fair winds,
Sequoia on Nepenthe, 1973 E 35 II
robjpowell
Member II
I have been following this thread but have been a little baffled also. Our 35-2 (1976, #469) has a teak rub rail and not the rubber you are all discussing. Does anyone know if this was a factory option? Or, might I just the lucky recipient of one nice PO upgrade?
