Fuel Polishing ASAP

Glyn Judson

Moderator
Moderator
Cleaning up the cuttings.

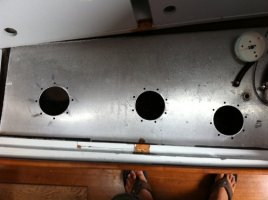
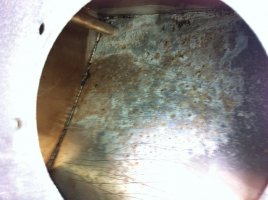
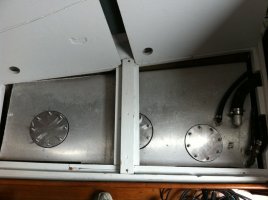
Mark, Depending upon whether or not your tank presently fuel in it, the following might be worth consideration. I too had to cut a hole in my diesel fuel tank. Actually I enlarged it fora larger cast aluminum alloy plate, which for our purposes, amounted to the same thing. I merrily cut the hole larger without regard for the cuttings falling into the fuel. As a matter of fact, I filled the tank so as to facilitate any of the chips being able to more readily migrate down the sloped side of the tank. When I was done, I bought an electric oil changing pump that I later used for just that. But in this instance I used it to pick up the chips until there were none more. Here's how it went. I also bought two lengths of reinforced vinyl hose that I clamped to both sides of the pump, one was to become a pick up, the other a return. I added a doubled up pair of women's peds (ankle Nylons) to the return end and between there and the pump body, inserted an ITT bilge screen housing, the clear plastic bowl type with fine monel screen. By design, I ended up using that too in my bilge pump line. OK, so I've cut the hole and installed the inspection plate and ring and now it's time to clean up the tank. By inserting both hoses into the diesel fuel, flipping on the pump and using the pick up end as one would a vacuum cleaner, proceeded to get every scrap of chips caught either in the ITT screen but for any that could pass without my ever knowing it, the peds did the trick. And there pieces of cuttings in the peds so I was glad I'd taken that extra precaution. I vacuumed for what seemed a life time until I couldn't get even one chip in either trap. And that's how I cleaned up my tank. I still have the pump (by the way, it's a Reverso and the ITT filter screen in service in their respective places doing their respective jobs. Go for it, Glyn Judson, E31 hull #55, Marina del Rey CA
 

MarkA

Please Contact Admin.
Thanks for the input, Glyn!

I received some private messages asking how I intend to install the plates without access to the inside of the tank once they're in place. I wish I could claim credit for the idea because now it seems so simple, but I borrowed the inspiration from elsewhere.

Before installation, I will arrange two semi-circular backing plates in a circle, and place the circular gasket on top of that. Then, I will insert the bolts up through the plates and gasket. The holes in the gaskets are tight enough to hold the bolts in place when inverted. Then I'll fold the whole contraption like a taco, insert it through the hole in the tank, and flatten it out up against the tank wall. I'll hold it in place with bolts protruding up through the tank wall, while using the other hand to lay the exterior gasket around the hole and over the bolts. Again, the gasket holes are tight enough to hold the backing plates from falling into the tank. Then I'll lay the circular plate over the hole and hand tighten the nuts. Since I won't have access to the bolt heads to keep them from turning, I'll snug two additional nuts together at the ends of the bolts, and I'll wrench the bottom of the double-nut to prevent the bolt from turning as I tighten the fastening nut. Make sense?
 

Flight Risk

Member II
Remember boat is the acronym for " bust out another thousand" and all will be well:egrin:....... I agree with many others on this thread. Clean the tank if you can. Replace any rubber fuel lines about every five years and NEVER run primary elements under 20 mikes..... The Racor will get the big stuff..... The engine mounted filter is likely 5 microns or less and will get the rest. Also watch out for bio fuel mixes like the B-5 we have here in Portland. It is guaranteed to dork up your filters if left sitting in the tank for any time.......
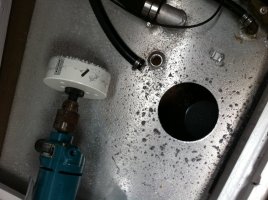


Chris
 

MarkA

Please Contact Admin.
So I drilled 3 5" holes, 24 21/64" holes, deburred the edges, and wiped out the tank. it needed a little scraping in a couple spots, but wiped out easily for the most part. I did find some pitting in the deepest portion, but I'm not too worried--should I be? The tank is 1/8" aluminum, and none of the interior pits were very deep. I don't know what kind of exterior pitting there may be on the bottom.

Any advice before I button her up?
 

Attachments

  • photo copy 2.jpg
    photo copy 2.jpg
    106.8 KB · Views: 55
  • photo copy.jpg
    photo copy.jpg
    66.9 KB · Views: 61
  • photo.jpg
    photo.jpg
    77.4 KB · Views: 69

mherrcat

Contributing Partner
I would be a little concerned about the pitting; especially that spot at the top on the weld above the black spot. It is caused by water collecting at the bottom of the tank. Because it is aluminum it is really hard to tell how deep the corrosion goes. When I refurbished my boom I was really surprised how deep what appeared to be minor corrosion actually went into the metal when I ground some of it out.

That is exactly how my previous tank started leaking - pinhole leaks from corrosion in the deepest part of the tank at the seam.

How old is your tank?
 

ralph roddam

Member I
corrosion

I do not wish to alarm anyone,however that corrosion on the inside ofthe tank looks bad.You cannot of course repair the corrosion other than remove,it may be deeper than you think and will contiue to progress if water gets in the tank. As well as a proud 35-2 owner I am the chief metallurgist for an aluminum company( should be aluminium)
 

MarkA

Please Contact Admin.
I do not wish to alarm anyone,however that corrosion on the inside ofthe tank looks bad.You cannot of course repair the corrosion other than remove,it may be deeper than you think and will contiue to progress if water gets in the tank. As well as a proud 35-2 owner I am the chief metallurgist for an aluminum company( should be aluminium)

Nah, it's not as bad in real life as it appears in the pics. There are some years left in that tank.
 

Jeff Asbury

Principal Partner
Jeff, I hate the idea of relying on filters to save your motor when your tank is known to be filthy. Get that crud outta there!

I don't know what kind of access you have to your tank, but mine is easy. It's a flat-topped aluminum tank that runs the full length of my starboard settee, so I have complete access to the top. There are two internal baffles running across it's width (according to my taps with the handle of a screw driver). I will cut three 5" holes using a hole saw and WD40 as lube. The holes will be over the deepest portions of the tank (it's contoured to the hull shape); one in each baffled chamber. The hole saw will cost $20, and I'll spend more time in the checkout line than it will take to cut the holes and de-burr the edges. You may only need one access hole.

Before I cut, I will use a hand pump and empty the tank into a jerry jug and dispose of it at the fuel dock. The vent fitting in the tank is large enough for me to insert the pump tube.

Then I will scrub. If necessary, I'll remove the tank and use a high pressure water sprayer--but I don't think that will be necessary.

To cover the holes, I am having covers and backing plates made (see attachment). I will use Buna-N for gasket material, and 5/16" bolts to fasten them. SeaBuilt makes similar covers, which they demonstrate here: http://www.seabuilt.com/demo.php

This seems much easier than stocking up on filters and worrying about crud getting into the motor.

Thanks Mark, Well I just got back from a week at Catalina. Motored all the way over there (4 hrs) and the last half hour or so the engine just did not sound right. So the next day I changed the primary racor filter. Then I disconnected the fuel line coming from the tank, blew on it and I did find some resistance, continued to blow until I heard bubbles. Hooked it back up, bleed the lines and I was able to motor back (3.45 hrs) with no problem. I did some looking around at all the possible access areas to my tank and I found a plywood cover just to the starboard side of the quarter berth and under it was the top of my tank. There is only about 9.5 inches height between the bottom of the cockpit deck and the top of my tank, but with the right tool I should be able to cut a access hole. Looking back at the original diagrams for my E-27, I don't think this was the original location of the tank.My boat had been re powered with a Yanmar 8hp some time in the early 1890's, and I think they must have installed this Carbon Steel tank at that time. The diagram I saw shows that on other E-27's the tank was to the aft of the port lazarette.

So I think this will be my next step, to add a access plate in that location. I think it may be a bit challenging because I only have about 9.5" of height to get a tool to cut the hole in there, and then being able to try and really see inside to dig out the gunk and vacuum it clean. Yup, gotta pump out about 7 gallons of fuel 1st. I will take photos of my challenge before I start and should be able to post them soon. I want my peace of mind back. I really wanted to sail around Catalina this time, but I was not comfortable to go to the remote back side and have the engine conk out on me.

Once again, my tank is right under the cockpit deck, so this is my challenge that is different from yours.

Had a very nice time at the Island though. http://www.ericsonyachts.org/infoex...omptu-Mini-Viking-Gathering&p=69894#post69894

Regards

Jeff
 
Last edited:

MarkA

Please Contact Admin.
Jeff, maybe you can rent an angle drill like this: http://www.makita.com/en-us/Modules/Tools/ToolDetails.aspx?ID=407 That should fit in your 9.5" space with a hole saw attached. You're welcome to borrow my 5" hole saw.

Here's a pic of my finished job. It took three hours to drill the holes, wipe out the tank, seal it up, thoroughly clean my Racor, replace primary and secondary filters, and bleed the lines. I was expecting it to be far more time consuming and frustrating than it actually was.
 

Attachments

  • photo copy 3.jpg
    photo copy 3.jpg
    70.4 KB · Views: 219

Jeff Asbury

Principal Partner
Jeff, maybe you can rent an angle drill like this: http://www.makita.com/en-us/Modules/Tools/ToolDetails.aspx?ID=407 That should fit in your 9.5" space with a hole saw attached. You're welcome to borrow my 5" hole saw.

Here's a pic of my finished job. It took three hours to drill the holes, wipe out the tank, seal it up, thoroughly clean my Racor, replace primary and secondary filters, and bleed the lines. I was expecting it to be far more time consuming and frustrating than it actually was.

Very impressive work Mark, Good Job. I just may take you up on your 5" hole saw. I am going top have my mechanic friend look at it first. He has made access holes / plates before. Yes I was thinking about the angle drills like the ones you suggest. Probably the only way. I see you have 3 access holes. You must have done that to get around two baffles right?

Did you have to tap holes for the bolts, or are they thru bolted? What gasket material did you use again? Gawd I wish I had such easy access to my tank.
 

MarkA

Please Contact Admin.
Very impressive work Mark, Good Job. I just may take you up on your 5" hole saw. I am going top have my mechanic friend look at it first. He has made access holes / plates before. Yes I was thinking about the angle drills like the ones you suggest. Probably the only way. I see you have 3 access holes. You must have done that to get around two baffles right?

Did you have to tap holes for the bolts, or are they thru bolted? What gasket material did you use again? Gawd I wish I had such easy access to my tank.

Yeah, I have two baffles, so three chambers in the tank. I can reach every corner of the tank through those access holes :)

The plates are through-bolted. One person suggested tapping the holes, but I don't trust 1/8" aluminum to hold. The plates and backing rings are 3/16" aluminum, and the gaskets are 3/32" buna-n. You can order it through Graingers online, or Amazon, as I did. I used 5/16" stainless bolts.
 

Glyn Judson

Moderator
Moderator
Cutting an access hole.

Jeff, As I see it, you have at least two options. 1. Cut an access hole for a large deck plate such as any of these: http://www.pompanette.com/pompweb.n...e50944406d8be2e3852567bc00053e45?OpenDocument in the cockpit sole so as to be able to work straight down with a hole saw, etc. 2. You're more than welcome to borrow my Makita DA4031, 1/2" right angle drill as seen here: http://www.makita.com/en-us/Modules/Tools/ToolDetails.aspx?ID=406. From the top of the head to the tip of the chuck with the top handle (easily) removed, it measures a bit less than 5". I added my 4" bi-metal Milwaukee hole saw with mandril to it and even that measured just a bit under 9", actually more like 8 3/4" including room for the pilot hole drill. All white painted, bi-metal Milwaukee hole saws have a depth of 1 3/4" so even if you were to want to drill a larger hole such as a 5" one, it would all still fit over your tank and under your cockpit sole. Cheers, Glyn H: 310.453.1892
 

Glyn Judson

Moderator
Moderator
The options are endless: Working from above.

Jeff, If you decide to work above from through the cockpit sole, you're also welcome to use my 1/2" Makita 6013BR drill as can be seen here: http://makitausa.com/en-us/Modules/Tools/ToolSupport.aspx?ID=354. Both this and my other drill are massively torquey, especially the angle drill and either one will more than do the job. You'd just be careful that neither one of them would wrap your arm up around them if they got stuck. ; - )

I've had personal experience using a small, 3/8" pneumatic angle drill (I have one): http://www.harborfreight.com/3-8-eighth-inch-reversible-air-angle-drill-67474.html as well as the smaller 3/8" Makita DA3010 (have that one too): http://www.makita.com/en-us/Modules/Tools/ToolDetails.aspx?ID=452 and can tell you that they would both be woefully inadequate to the task under consideration, especially when working from a disadvantaged orientation from the side of the proposed hole such as you describe. It's almost the case, if not the truth, that the sheer weight of my larger angle drill would be all you'd need to successfully cut a large hole in your tank. Maybe it's time to sell "The Pride" and start looking for an E31 so you can start all over again. ; - ) As an aside, the tanks in the E31 Independence are easily accessible and came from the factory with a large 8"(?) access plate already fitted. Cheers, Glyn
 

Loren Beach

O34 - Portland, OR
Senior Moderator
Blogs Author
Temptations.....

Maybe it's time to sell "The Pride" and start looking for an E31 so you can start all over again. ; - ) As an aside, the tanks in the E31 Independence are easily accessible and came from the factory with a large 8"(?) access plate already fitted. Cheers, Glyn

Ah yes... but the fuel tank is far easier to access in an Olson 34...
:egrin:


Cheers,
Loren
:rolleyes:
 

Jeff Asbury

Principal Partner
First off @ Glyn, all great ideas, but I want to take photos to show you all what access I have first. If I cut a hole it the deck, I would have to reach almost 20 inches to get to the bottom of the tank. :rolleyes_d::scared:

@ Loren, I'm not giving up on the "Pride" just yet. I do love the Independence 31, but I wouldn't mind finding something a little bigger like the 39B or 36C to retire on. I also hope there's a bag of money hidden in the bilge to help with the restoration or I might just win the next "Pimp My Boat" contest. :clap:
 
Last edited:

Glyn Judson

Moderator
Moderator
Not quite a bag of money, but....

Jeff, Our good friends Lloyd and Edith Roberts bought their E27 some years ago and Lloyd immediately jumped into repairs, restoration and improvements. He was accessing the raceway over the galley, you know, behind those great removable panels, when with his arm completely extended, grabbed a scrap of paper with his finger tips and handed it to Edith, it was a $100.00 bill! He returned to the task only to feel more "scrap paper" which turned out to be five $20.00 bills. As I recall he paid $8,000.00 for their boat and ever since we've referred to her as his $7,800.00 E27. Get in there and open up those panels because who knows how much "The Pride" is really worth? Glyn
 

Jeff Asbury

Principal Partner
Jeff, Our good friends Lloyd and Edith Roberts bought their E27 some years ago and Lloyd immediately jumped into repairs, restoration and improvements. He was accessing the raceway over the galley, you know, behind those great removable panels, when with his arm completely extended, grabbed a scrap of paper with his finger tips and handed it to Edith, it was a $100.00 bill! He returned to the task only to feel more "scrap paper" which turned out to be five $20.00 bills. As I recall he paid $8,000.00 for their boat and ever since we've referred to her as his $7,800.00 E27. Get in there and open up those panels because who knows how much "The Pride" is really worth? Glyn

Great story Glyn, I'll keep looking! Well I think I have opened every panel and looked in every crevice in the boat I could find in the last 9 years. I had just forgot about the access board to the top of the tank. I have found Craftsman wrench's in the bilge (fishing lures in there too), more wrenches inside the panel on the starboard side of the quarter berth (probably dropped when installing the winch). The best thing I found was a brand new Bosuns Chair when I first bought the boat. It was under a old sail bag under the port settee, brand new, never been used. Worth a couple bills I would say. I have used it quite a bit since.
 
Last edited:
Top