Yanmar 10GM won’t start

Hilary

Ericson 1984 E26-2
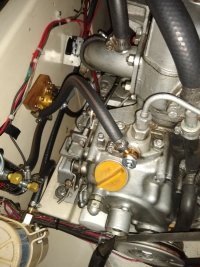
When I try to start the engine it cranks but doesn’t start. Worked fine until a few weeks ago and when I checked it I found a cracked fuel line.
Replaced fuel line connecting Racor to the engine. Racor is full of fresh fuel and has a new filter.

I can only get fuel to the second bleed about an inch beyond where the new line connects to the engine.

I also replaced the primary fuel filter and filled it with fresh fuel.

none of the other bleeds leak fuel when I open them up.

I know I have created a vacuum in the lines between bleeds but can’t get rid of it.
 

Kenneth K

1985 32-3, Puget Sound
Blogs Author
Does your Yanmar have an electric fuel pump? Is it located nearer the fuel tank or the engine? How many bleed fittings do you have? Where are they located in relation to the electric fuel pump (if you have one) and the engine?
 

Alan Gomes

Sustaining Partner
When I try to start the engine it cranks but doesn’t start. Worked fine until a few weeks ago and when I checked it I found a cracked fuel line.
Replaced fuel line connecting Racor to the engine. Racor is full of fresh fuel and has a new filter.

I can only get fuel to the second bleed about an inch beyond where the new line connects to the engine.

I also replaced the primary fuel filter and filled it with fresh fuel.

none of the other bleeds leak fuel when I open them up.

I know I have created a vacuum in the lines between bleeds but can’t get rid of it.
Hello, Hilary.

I have the identical boat with the identical engine. (It's a 1GM.) And I, too, have had past issues with bleeding the engine, and also with getting air in the lines.

I have replumbed my system and no longer have any issues with air in the lines. Plus, changing filters is now a breeze and done in minutes. While modifying your fuel system may not be what you had in mind as far as your immediate problem is concerned, I throw it out for your consideration, especially if you want to be done with this problem once and for all.

Partially inspired by Guy Stevens, a very knowledgeable poster to this list, I disconnected the mechanical lift pump and installed an electric fuel pump. As Guy has pointed out, if/when the diaphragm fails on the mechanical lift pump, its failure mode is to dump fuel into your crankcase. Not great. So ditching the mechanical pump is a good thing to do for that reason alone. But beyond that, the electric pump opens up new possibilities for revamping your fuel system to make filter changes trivial and bleeding your engine foolproof.

I've attached a diagram that details what I've got on my boat.

The so-called "priming switch" is located in the engine compartment. This allows me to energize the fuel pump from there without having to turn on the key and listening to the infernal oil pressure buzzer.

I have a Racor 500 water separating filter that is first in line from the tank. It is a massive filter for that engine, with huge filtering and water capturing capacity. Though its initial cost is more than the smaller ones, it's well worth the money because it's super easy to change without slopping fuel all over the place. (The filter installs from the top of the housing.) Also, the filter elements are much cheaper, so you'd recoup at least some of the costs over time. But a major selling point is that this filter is bomb proof. Some of the smaller Racors tend to develop cracks in the housing, which allow in air. These cracks are not always evident just looking at the filter.

In any case, the Racor 500 is not essential to the modification I'm discussing, but I'd recommend that if you are going to redo the plumbing anyway that you go with the 500 while you are at it.

Moving downstream from the Racor is the Facet pump. Note that it is on the output side of the filter so that it sucks rather than pushes the fuel through it.

Next is a fuel-rated Y-valve, hooked to the output side of the Facet pump. One side of the Y tees into the fuel return line that runs back to your fuel tank. (The return line comes off of the top of the injector and runs from there to the tank. You just tee into that line.) The other side of the Y--on my engine, at least--runs straight to the injector pump.

[Digression: I say "on my engine at least" because the 1GM also has a small on-engine filter, but I've bypassed it and run the line straight from the output of my Racor to the input of the injector pump. While I could have continued to use that on-engine filter and run the line to it, I chose not to because: (1) It is a known and common failure point on that engine. It can and does develop cracks. (2) The bleed screw washer also sometimes doesn't seal properly--another point where air commonly gets into the system. (3) It's completely unnecessary on my engine with the monster Racor. I run a 10 micron filter and the engine is happy as a clam with just it. (4) It's one less bleed point to have to mess with.

All that said, you can certainly keep the on-engine filter if you like. Just run the line from that side of the Y-valve to the input of the on-engine filter (instead of directly to the injector pump, as shown in the diagram) and you'll be golden.]

So, here's the procedure when it comes time for a filter change:

1. Insert a new filter in the Racor. Do not manually fill the Racor with fuel; just install it dry.

2. Set the Y-valve so it will direct the fuel to the fuel return line, i.e., straight back into the tank.

3. Energize the pump by turning on the switch in the engine bay.

4. The pump will fill the empty filter housing with fuel. Once the housing is full, you'll notice that the clicking sound the pump makes will slow down appreciably. This means it is full of fuel. You could wait another 30 seconds if you like for good measure. It doesn't hurt anything to let it continue to pump, since all it is doing is polishing your fuel as it sends it back to the tank. But really, once the pump slows down it is pretty much done.

Now, you should bleed the engine:

1. With the fuel pump still energized, switch the Y-valve so it sends the fuel to the engine.

2. With a rag handy, crack the bleed points on the engine and wait until you get a solid flow of fuel without bubbles. On my engine that's only one bleed point, since I'm going straight to the injector pump. If you choose to retain the on-engine filter then you'll need to open the bleed screw on the top of it, and wait for it to fill and then emit a solid flow of fuel. Once you are seeing solid fuel, and with the fuel pump still energized, tighten the bleed screw. Then, move on to the next bleed point (if there is one).

When you are done, shut off the switch that energizes the fuel pump. You'll be good to go.

There will be some plumbing bits that you'll need to source, including a banjo fitting that allows you to connect the fuel line to the engine. (The fitting has a banjo connection on one end, which the Yanmar requires, and a hose barb on the other end for connecting to the fuel line.) I should be able to dig up that information if you want it, and will do so if you have an interest in going this route.

I can tell you that this is one of the best mods I've done to that engine--that, and converting it to fresh water cooling. (Though that's another discussion.) I actually enjoy doing filter changes now! (But I have to do them only rarely because I can never seem to get that Racor 500 even close to dirty!)

Anyway, if you make the mod let me know how you like it! And if I can add any more details that you might find helpful just let me know.
 

Attachments

  • Fuel Polishing System with electric fuel pump for Yanmar.pdf
    50.4 KB · Views: 10

Hilary

Ericson 1984 E26-2
Hello, Hilary.

I have the identical boat with the identical engine. (It's a 1GM.) And I, too, have had past issues with bleeding the engine, and also with getting air in the lines.

I have replumbed my system and no longer have any issues with air in the lines. Plus, changing filters is now a breeze and done in minutes. While modifying your fuel system may not be what you had in mind as far as your immediate problem is concerned, I throw it out for your consideration, especially if you want to be done with this problem once and for all.

Partially inspired by Guy Stevens, a very knowledgeable poster to this list, I disconnected the mechanical lift pump and installed an electric fuel pump. As Guy has pointed out, if/when the diaphragm fails on the mechanical lift pump, its failure mode is to dump fuel into your crankcase. Not great. So ditching the mechanical pump is a good thing to do for that reason alone. But beyond that, the electric pump opens up new possibilities for revamping your fuel system to make filter changes trivial and bleeding your engine foolproof.

I've attached a diagram that details what I've got on my boat.

The so-called "priming switch" is located in the engine compartment. This allows me to energize the fuel pump from there without having to turn on the key and listening to the infernal oil pressure buzzer.

I have a Racor 500 water separating filter that is first in line from the tank. It is a massive filter for that engine, with huge filtering and water capturing capacity. Though its initial cost is more than the smaller ones, it's well worth the money because it's super easy to change without slopping fuel all over the place. (The filter installs from the top of the housing.) Also, the filter elements are much cheaper, so you'd recoup at least some of the costs over time. But a major selling point is that this filter is bomb proof. Some of the smaller Racors tend to develop cracks in the housing, which allow in air. These cracks are not always evident just looking at the filter.

In any case, the Racor 500 is not essential to the modification I'm discussing, but I'd recommend that if you are going to redo the plumbing anyway that you go with the 500 while you are at it.

Moving downstream from the Racor is the Facet pump. Note that it is on the output side of the filter so that it sucks rather than pushes the fuel through it.

Next is a fuel-rated Y-valve, hooked to the output side of the Facet pump. One side of the Y tees into the fuel return line that runs back to your fuel tank. (The return line comes off of the top of the injector and runs from there to the tank. You just tee into that line.) The other side of the Y--on my engine, at least--runs straight to the injector pump.

[Digression: I say "on my engine at least" because the 1GM also has a small on-engine filter, but I've bypassed it and run the line straight from the output of my Racor to the input of the injector pump. While I could have continued to use that on-engine filter and run the line to it, I chose not to because: (1) It is a known and common failure point on that engine. It can and does develop cracks. (2) The bleed screw washer also sometimes doesn't seal properly--another point where air commonly gets into the system. (3) It's completely unnecessary on my engine with the monster Racor. I run a 10 micron filter and the engine is happy as a clam with just it. (4) It's one less bleed point to have to mess with.

All that said, you can certainly keep the on-engine filter if you like. Just run the line from that side of the Y-valve to the input of the on-engine filter (instead of directly to the injector pump, as shown in the diagram) and you'll be golden.]

So, here's the procedure when it comes time for a filter change:

1. Insert a new filter in the Racor. Do not manually fill the Racor with fuel; just install it dry.

2. Set the Y-valve so it will direct the fuel to the fuel return line, i.e., straight back into the tank.

3. Energize the pump by turning on the switch in the engine bay.

4. The pump will fill the empty filter housing with fuel. Once the housing is full, you'll notice that the clicking sound the pump makes will slow down appreciably. This means it is full of fuel. You could wait another 30 seconds if you like for good measure. It doesn't hurt anything to let it continue to pump, since all it is doing is polishing your fuel as it sends it back to the tank. But really, once the pump slows down it is pretty much done.

Now, you should bleed the engine:

1. With the fuel pump still energized, switch the Y-valve so it sends the fuel to the engine.

2. With a rag handy, crack the bleed points on the engine and wait until you get a solid flow of fuel without bubbles. On my engine that's only one bleed point, since I'm going straight to the injector pump. If you choose to retain the on-engine filter then you'll need to open the bleed screw on the top of it, and wait for it to fill and then emit a solid flow of fuel. Once you are seeing solid fuel, and with the fuel pump still energized, tighten the bleed screw. Then, move on to the next bleed point (if there is one).

When you are done, shut off the switch that energizes the fuel pump. You'll be good to go.

There will be some plumbing bits that you'll need to source, including a banjo fitting that allows you to connect the fuel line to the engine. (The fitting has a banjo connection on one end, which the Yanmar requires, and a hose barb on the other end for connecting to the fuel line.) I should be able to dig up that information if you want it, and will do so if you have an interest in going this route.

I can tell you that this is one of the best mods I've done to that engine--that, and converting it to fresh water cooling. (Though that's another discussion.) I actually enjoy doing filter changes now! (But I have to do them only rarely because I can never seem to get that Racor 500 even close to dirty!)

Anyway, if you make the mod let me know how you like it! And if I can add any more details that you might find helpful just let me know.
Wow, thanks @Alan Gomes for your extensive reply. I’ve forwarded it to the captain (@Kevin 1984 E-26) for his use.
 

Alan Gomes

Sustaining Partner
Wow, thanks @Alan Gomes for your extensive reply. I’ve forwarded it to the captain (@Kevin 1984 E-26) for his use.
You are very welcome.

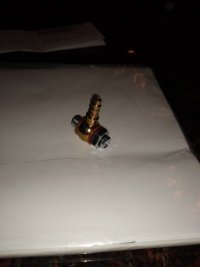
If you decide to go this route, here's where you can get the banjo fitting(s): https://www.fittings.space/. Unfortunately, I did not write down the size of the fitting and don't recall it for certain just now. But you can simply remove the existing banjo bolt from the engine to confirm the size. (I'm thinking it's 10mm, like many other bolts on that engine. If so, it's probably this one.) The banjo fitting in question looks like this:

IMG_20191118_214920526.jpg

The fuel pump, as I said, is a Fuel Pump: Facet Fep60sv Gold-Flo. 32 GPH. 2.75-4 PSI. Other pumps could work as well, but this is what I bought.

I did not write down where I bought the diverter valve.

The rest is just hoses, hose clamps, and various barbs that may vary with your particular installation. Oh, and wire for the switch. I did write down that the various fuel lines were 1/4" ID.

Here's a picture that shows more or less what it looks like. You can see part of the Racor in the lower-left foreground. You can also prominently see the line running from one side of the valve direct to the injection pump. The energizing switch with the black safety cover is mounted on an L-bracket that I picked up at Home Depot.

IMG_20191123_163459292.jpg

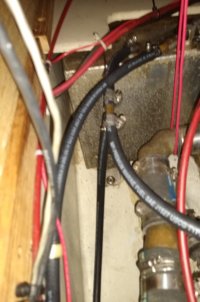
And in the following picture you can see the line that comes from the other side of the Y-valve that tees into the fuel return line. It's the bottom fuel line and clearly shows the tee:

IMG_20191123_163447542.jpg

The biggest part of the job is collecting all the fiddly little bits that you need to do it! It's really pretty simple. And trust me: you'll love the result!
 
Top