LeifThor
Member III
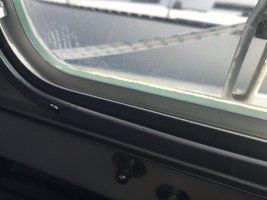
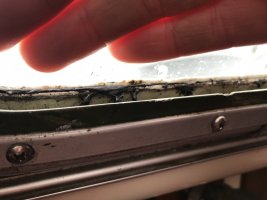
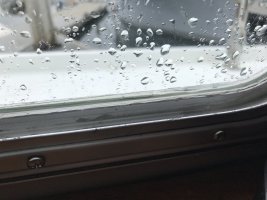
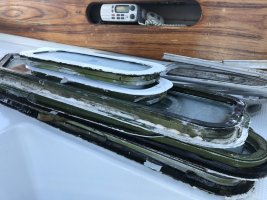
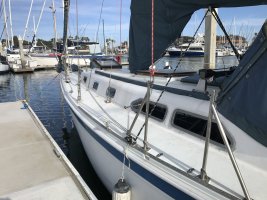
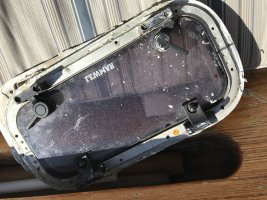
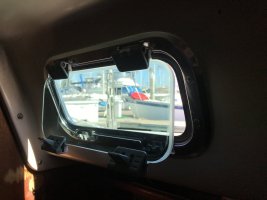
On my 1972 35-2 the portlights were leaking, and faced with the choice of seeking out the leak or pulling the portlights (boat windows) and repairing, or buying new portlights, I chose to pull and repair the portlights. To replace was gonna be around $3,200, while reseating and repairing under $1,000. A prior owner had used a black caulking material (see attached photos) and it had been many years if not decades since the portlights had been taken apart and serviced well.
It was visibly clear many attempts were made to patch the windows all failing. All the frames were also coated with at least 2 heavy coats of deck paint, another attempt to seal them which failed while the black caulk-like material bled through.
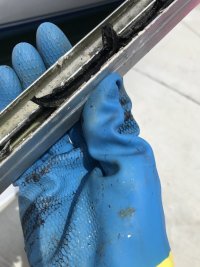
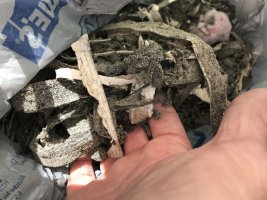
I did one window first, to learn the time, effort, and money it would take times 8 more to scope the size of the project. The head portlight had been replaced already. The first window took 4 days. This was primarily because removing the black caulking turned out to be an incredibly had task. No one seemed to know what it was, but I did hear of a product after I removed it called “release agent” that melts it. The difficulty with it was it wasn’t dry. So when I’d pull the frame apart this tar-like material just spidered out and would attach itself to anything it touched. And once it did, scrubbing with a lot of acetone would sort of remove it. I looked everywhere online, and some people knew of this product not by name but for its difficulty to remove it.
I looked into sand blasting the frame, and they said it wouldn’t work, but if I used a really tough solvent like gasoline it might do the trick. I tried the gasoline solution and it worked but was super time consuming and a toxic nightmare.
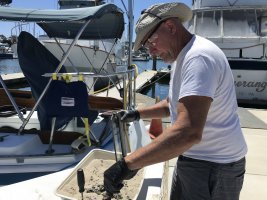
I was about to give up and buy new portlights with money I didn’t have, when it dawned on me if the material sticks to everything give it limitless material to stick to and that might work.
So I went and got a bucket of sand from the beach and began scraping the frame with a scraper or screwdriver and it removed 95% of the material. It was more than happy to attach itself to the sand instead of my clothes, tools and anything else it touched.
After the sand bucket, then scrubbing with gasoline was quick and removed the last 5%.
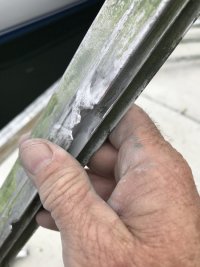
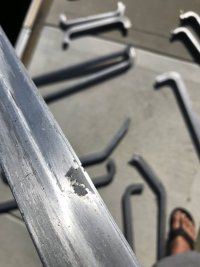
Using paint remover I removed the many layer of boat paint leaving me the frame in naked aluminum only to discover...corrosion. On the first portlight the corrosion wasn’t bad,
I used butyl tape for gasket and butyl tape to seal the portlight to the boat. It looked 1,000 times better and was waterproof 100%.
I then removed the remaining 8 portlights, and once I got the tar material off along with numerous other sealants and removed the paint, i learned the one I’d repaired had the least corrosion damage.
I used Metalset A4, am aluminum epoxy that the military uses (when working with aluminum) and I swear by the stuff, tough as nails literally.
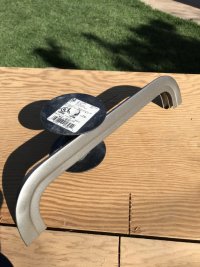
I built up the missing areas, and then sanded them till they looked like new.
Unfortunately A4 doesn’t look like shiny aluminum so I needed to paint them. I looked at powder coating them but was told it wouldn’t attach to the A4 repaired parts, so paint it was.
I went with KBS Topcoat Aerosol stainless color, and also used a clearcoat on the outside rim/flange. Great paint but takes 7 days to fully cure so heads up for that.
While they were curing, I epoxied the gaps between the hull and cabin shell in the openings. In short you could have a leak that runs to the portlight from above, and exit through the portlight giving the illusion your portlight is leaking when it’s not, the opening is. Also the way the portlights are designed, once you install the portlight, that gap remains open to the interior with smell as well as water leakage. Close that gap, and any leaks should run to the bilge area.
I assembled the portlights back together using butyl tape, and used butyl tape to seal to the hull.
It took 2 1/2 weeks during our covidcation (so I had the time more than the money), and cost $300 in butyl tape, paint, brushes, paint remover, good vapor mask, sandpapers, one safety glass replacement, gloves, rags etc.
They went back in yesterday and they’re solid and look great too.
Hope this helps anyone wondering if they should replace or repair their portlights / windows. It’s time consuming but saves a lot of money. And there’s a hundred ways one could have solved the task differently.
I would completely trust these portlights on a Hawaii passage any day now. And for the cost of one new portlight I got 9 instead.
It was visibly clear many attempts were made to patch the windows all failing. All the frames were also coated with at least 2 heavy coats of deck paint, another attempt to seal them which failed while the black caulk-like material bled through.
I did one window first, to learn the time, effort, and money it would take times 8 more to scope the size of the project. The head portlight had been replaced already. The first window took 4 days. This was primarily because removing the black caulking turned out to be an incredibly had task. No one seemed to know what it was, but I did hear of a product after I removed it called “release agent” that melts it. The difficulty with it was it wasn’t dry. So when I’d pull the frame apart this tar-like material just spidered out and would attach itself to anything it touched. And once it did, scrubbing with a lot of acetone would sort of remove it. I looked everywhere online, and some people knew of this product not by name but for its difficulty to remove it.
I looked into sand blasting the frame, and they said it wouldn’t work, but if I used a really tough solvent like gasoline it might do the trick. I tried the gasoline solution and it worked but was super time consuming and a toxic nightmare.
I was about to give up and buy new portlights with money I didn’t have, when it dawned on me if the material sticks to everything give it limitless material to stick to and that might work.
So I went and got a bucket of sand from the beach and began scraping the frame with a scraper or screwdriver and it removed 95% of the material. It was more than happy to attach itself to the sand instead of my clothes, tools and anything else it touched.
After the sand bucket, then scrubbing with gasoline was quick and removed the last 5%.
Using paint remover I removed the many layer of boat paint leaving me the frame in naked aluminum only to discover...corrosion. On the first portlight the corrosion wasn’t bad,
I used butyl tape for gasket and butyl tape to seal the portlight to the boat. It looked 1,000 times better and was waterproof 100%.
I then removed the remaining 8 portlights, and once I got the tar material off along with numerous other sealants and removed the paint, i learned the one I’d repaired had the least corrosion damage.
I used Metalset A4, am aluminum epoxy that the military uses (when working with aluminum) and I swear by the stuff, tough as nails literally.
I built up the missing areas, and then sanded them till they looked like new.
Unfortunately A4 doesn’t look like shiny aluminum so I needed to paint them. I looked at powder coating them but was told it wouldn’t attach to the A4 repaired parts, so paint it was.
I went with KBS Topcoat Aerosol stainless color, and also used a clearcoat on the outside rim/flange. Great paint but takes 7 days to fully cure so heads up for that.
While they were curing, I epoxied the gaps between the hull and cabin shell in the openings. In short you could have a leak that runs to the portlight from above, and exit through the portlight giving the illusion your portlight is leaking when it’s not, the opening is. Also the way the portlights are designed, once you install the portlight, that gap remains open to the interior with smell as well as water leakage. Close that gap, and any leaks should run to the bilge area.
I assembled the portlights back together using butyl tape, and used butyl tape to seal to the hull.
It took 2 1/2 weeks during our covidcation (so I had the time more than the money), and cost $300 in butyl tape, paint, brushes, paint remover, good vapor mask, sandpapers, one safety glass replacement, gloves, rags etc.
They went back in yesterday and they’re solid and look great too.
Hope this helps anyone wondering if they should replace or repair their portlights / windows. It’s time consuming but saves a lot of money. And there’s a hundred ways one could have solved the task differently.
I would completely trust these portlights on a Hawaii passage any day now. And for the cost of one new portlight I got 9 instead.
Attachments
-
 D6156F50-6DF8-46AA-BB95-012C43B82FD9.jpeg139.1 KB · Views: 143
 -
 9BE8EE6E-53B3-4E90-95E9-0B5A1A55A49B.jpeg169.1 KB · Views: 131
 -
 091C33A3-8132-4373-8CD8-DF81C20DD723.jpeg127.3 KB · Views: 133
 -
 EE9B49D6-20E6-4915-A605-7C46A26B3272.jpeg235.6 KB · Views: 136
 -
 27917C82-A8FC-41FC-9E1B-D7179F478326.jpeg246.1 KB · Views: 132
 -
 EB24E048-FE35-403F-9C41-D785E397A89B.jpeg270.6 KB · Views: 134
 -
 045FAC51-A9B8-4001-AE4C-48D8F32ECA9D.jpeg106.6 KB · Views: 130
 -
 F7B79AC7-5349-4BA3-9935-44097E38A563.jpeg102.4 KB · Views: 134
 -
 51C52CE6-8B71-4AF4-BA1F-2EC9211C09D5.jpeg154.5 KB · Views: 141
 -
 C7CE82B8-D4E2-4DAC-B97B-84171C19DA3A.jpeg258.2 KB · Views: 142

")