What's the most useful modification you've made....

Frank Langer

1984 Ericson 30+, Nanaimo, BC
Greg, I am puzzled about the clear hatch you installed in the cockpit sole--can you explain why you did this, and perhaps post a picture? I have never heard of, or seen, a clear hatch in the cockpit sole--it sounds intriguing.
thanks,
Frank.
 

Greg Ross

Not the newest member
Cockpit Deck Hatch

Frank,
Sorry for the confusion,
The Hatch for the Cockpit Sole on my "To Do" List is one of the cast aluminum oval hatches. Useable both as a deck or bulkhead hatch these units have a center "T" bar handle that opens and closes 4 dogs to secure and make the seal. They have no glazing, just solid cast aluminum-I'll edit this tonight from home and insert an image. This hatch will give access to the transmission and all the thruhulls, scupper plumbing etc aft of the engine space.
The "Other" Bomar hatch I've got on the go, rebuilt with new lens etc., etc. is destined to replace the existing wood framed fwd. hatch.
This change was motivated by wanting a larger escape opening in the forward part of the boat. That existing opening is 16" Sq. and I am quite sure that with motivation I could get thru it. Concern was for my wife, if she happened to be alone she might have difficulty getting out without assistance.
Don't know about the other Ericson models but my I 31 has a frame and lip moulded into the cabin top for the fwd. wood framed hatch. I'll be cutting most of that away to get to an 18" Sq. opening to suit the "New-to-me" Bomar Ocean Series. To blend this assembly in I'll paint the anodized aluminum extruded frame and flange to match the boat/ same color as my Sea Hood and Non-skid.
Bomar also have an interior accessory ABS plastic frame that holds a framed screen. These components came with my my "experienced" acquisition and will be incorporated into the finishing off inside. The really nifty new accessory I purchased from Bomar was the slatted shade that sandwiches between the lens and the seal rubber. Two pieces of clear ridgid plastic with white slat strips on them, one panel is fixed and the other slides to open and close the shutter/ shade.
Last improvement for that new Hatch will be addition of a second telescoping support strut. This model Hatch came with one only strut and when going thru their online catalog I'd noted they had replacement parts for another slightly larger model (sold with two struts) When ordering the replacement lens that had to be done via phone, the individual I talked to didn't know enough about the adaptability of spare parts so I gave up on her and just ordered them off their On-Line Catalog. May have to trim the length/ drill one hole otherwize all the same moulded parts used on all their hatches. Just waiting on delivery of the strut and handle parts now.
Will post a picture of this critter as well as the Bomar deck hatch, as always, a picture is worth a thousand words!
Does that all make a bit more sense?

Frank,
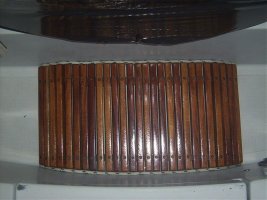
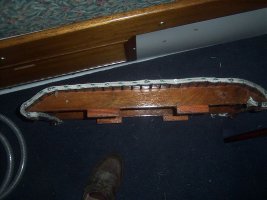
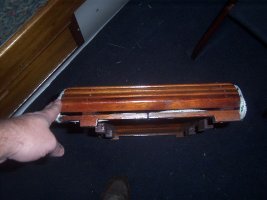
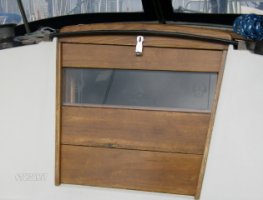
Here are two images of the Bomar Hatch that will be installed next Spring. First Pic is as purchased, and the second with the pockets modified/ closed in so as to not be a tripping/ foot trap.

<a href='http://img.villagephotos.com/p/2006-1/1138028/Bomarhatch1web.JPG'><img src='http://thumbs.villagephotos.com/18756850.jpg'></a>
<a href='http://img.villagephotos.com/p/2006-1/1138028/Bomarhatch2web.JPG'><img src='http://thumbs.villagephotos.com/18756851.jpg'></a>

Photos don't show yout the depth, the perimeter flange is sloped and the total height is roughly 1/2".
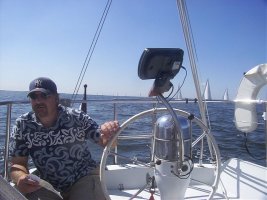
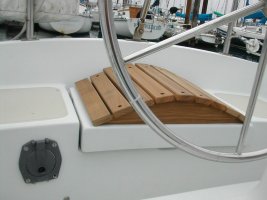
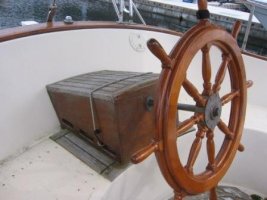
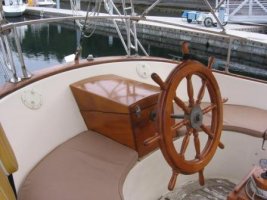
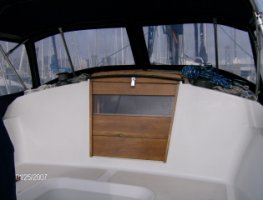
I saw this hatch for the first time as installed in Glyn Judsons' Sister Ship. If you can stop drooling over this drop dead gorgious wheel long enough to look beyond it you can see the painted Bomar Hatch on the cockpit sole of Glyns' I 31. (Printed without permission of the Owner!Ho Ho Ho)
<a href='http://img.villagephotos.com/p/2006-1/1138028/GlynsWheelweb.JPG'><img src='http://thumbs.villagephotos.com/18756944.jpg'></a>
 
Last edited:

Frank Langer

1984 Ericson 30+, Nanaimo, BC
Greg, thanks for the clarification. It would still be helpful if you could eventually post a picture of the cockpit sole when you have the hatch opening installed.

It sounds as if you have done alot of work on your boat--you must be quite handy! :egrin:

The various responses on this thread have given us all many ideas of projects to upgrade our boats over time.

Thanks for your reply.

Frank.
 

mohawkelly

Junior Member
Stern rail seats

Ted, I love those seats. Did the welder come to the boat or did you bring the stern rail to him? Was there any bending involved?
Larry
 

Tadzik

Member I
Stern rail seats

Hi Larry,

I remowed stern rail and took it to the weld shop. Also i brought with me two bow pulpits as you see on previous photos. I asked him to bend piece of tubing with the same radius as original one. First I had an idea of cutting bent tubing at junction point and reuse it @ 1 foot height, but I changed my mind.
 

corkhead

Julian Ashton
Companionway hatch mod

Whenever I spend the night aboard Molly I like to be able to look outside, sometimes the weather is not that great so this mod created a "window".
I only use it when spending the night or lottsa time down below. Note the ericson logo!! I have a talented friend who is a model maker.
 

Attachments

  • HPIM0138.JPG
    HPIM0138.JPG
    46.7 KB · Views: 181
  • HPIM0139.JPG
    HPIM0139.JPG
    46.3 KB · Views: 228
  • HPIM0137.JPG
    HPIM0137.JPG
    42 KB · Views: 178

BrianSokol

Junior Member
Greg, thanks for the clarification. It would still be helpful if you could eventually post a picture of the cockpit sole when you have the hatch opening installed.

I've installed the very same Bomar hatch in the cockpit sole. It was Glyn Judson's idea and a fantastic one at that.

Here's the walkthrough of the project with some pictures:

http://www.showmyboat.com/viewProject.aspx?ProjectID=2

I'd have to say it's probably the single most useful project I've done, aside from the necessary repairing of core delamination in the cabin top. :)
 

Greg Ross

Not the newest member
Camalots' Cockpit Floor Hatch

Brian,
Excellent Installation Procedure you're produced.
I took Glyns' recommendation on this as well and got one of these Bomar deck hatches from Hamilton Marine. They had it on "special" and if memory serves it was between 3 and $400.
It's not quite aircraft grade aluminum but a corrosion resistant Aluminum alloy. I know this because I had a modification done on mine, that was to have aluminum plate pieces welded in to somewhat close in the hand pockets, the welder had a terrible time with the weldments. Clean aluminum when properly cleaned of oxide does weld very successfully. What ever alloying elements or contaminents are in this casting caused it to weld pooly/ produce a lot of black dirt. He got it eventually! Pic attached
http://img.villagephotos.com/p/2006-1/1138028/Bomarhatch2web.JPG
Since it's in the traffic zone I thought there'd be less chance of catching toes/ tripping so to speak.
I've also got the idea I'll build a teak grill for the cockpit and cover it over eventually.
I have a small leak somewhere around the water lock muffler when the engine is running so this hatch is a priority for this year.
Thanks so much for posting your experience.
 
Last edited:

Mike Thomas

Member II
Most useful modification? - Moved chart plotter to the helm

I think the most useful modification that I’ve made was to move the S-H CP160 chart plotter to the pedestal. I made a custom mount that has worked out great. It swivels port/starboard, swings fore/aft and tilts to heaven or keel. All of this makes it easily visible from anywhere in the cockpit by both a short pilot or a taller one. This works out well because the wife is 5’3” and I’m 5’11”. We can literally adjust it to the best viewing angle on either port or starboard tack. You can see it swiveled to starboard in the picture of “Mr. Railmeat” himself at the helm. I mounted the OEM cradle on a block of mahogany, the block onto a piece of old SS bow rail tubing that I had lying around. I added an end cap with a tang to the other end of the tube. It's the kind of end cap that is used for mounting a dodger and then mounted the dodger mounting bracket to the front of the pedestal. I ran the antenna cable, nema wires and power wire up the pedestal, up the tube and out to the back of the cradle. The unit is fully integrated into the instrument set so everything is at my fingertips. Because I used the OEM cradle, I can remove the CP160 from the cockpit when it's not in use and cover the cradle. This is without a doubt the most useful modification that I made. See picture below. The PO had it mounted on a swing arm in the companion way but I could not see it that good from the helm and forget about having to press a button on it (like the MOB button).

The wife thinks the most useful modification was the cockpit step that I made for her so that she can see over the dodger when she’s at the helm. Did I mention that she’s 5’ 3”. Photos below.

Mike T
E-29 Babylon NY
 

Attachments

  • dcp_0768.jpg
    dcp_0768.jpg
    79.3 KB · Views: 160
  • dcp_0769.jpg
    dcp_0769.jpg
    81.7 KB · Views: 163
  • dcp_0781.jpg
    dcp_0781.jpg
    79.7 KB · Views: 162
  • dcp_0783.jpg
    dcp_0783.jpg
    72.6 KB · Views: 145
  • dcp_0786.jpg
    dcp_0786.jpg
    63.4 KB · Views: 137

Mark F

Contributing Partner
Blogs Author
Thought I'd rejuvenate this thread. I already posted this but it really does work well and was relatively easy to build.

Teak aft lazarette hump (helm seat) on 1976 E27;
 

Attachments

  • helm seat3.jpg
    helm seat3.jpg
    73.3 KB · Views: 78
  • helmseat7.jpg
    helmseat7.jpg
    173.5 KB · Views: 92
  • helmseat6.jpg
    helmseat6.jpg
    68.6 KB · Views: 109

Brass Dragon

Member II
Helm Seat to accommodate propane tanks on 36C

The helm seat on 36C slopes backward so is uncomfortable for me to sit on for any length of time. Also the low height off the side decks puts too much bend in my knees and cuts off circulation.

Ive also been looking for a better place for the propane tanks and while getting to refinishing the helm seat, I ran into Don and Linda Burnett on Dreamseeker, another of the few 36Cs Ive seen around. They modified the seat to make it level for comfort. While I considered that, I happened to notice that the two small propane bottles I currently use, fitted nicely side by side except for the height. I only had to raise the height of the seat 2-1/2 inches to easily fit the bottles. The locker vents naturally out through the opening for the rudder. The extra height makes such a difference on my back and legs, and the few inches in height make a world of difference in my visibility forward.
 

Attachments

  • OldHelmSeatt.JPG
    OldHelmSeatt.JPG
    24.8 KB · Views: 85
  • newHelmSeat.JPG
    newHelmSeat.JPG
    28.2 KB · Views: 82

selous

Inactive Member
My new head sink.I had old rust stained formica and the cabinet face was all beat up.I had some onyx tile lying around so I made a template and cut it to fit,the tile was individual sheets,I put six together laid the template on top and marked it off.cutting was a bear but worth every minute.New tap as well.
 

Attachments

  • sinkcr.jpg
    sinkcr.jpg
    95.1 KB · Views: 880

Jeff Asbury

Principal Partner
Fresh water engine flush.

Fabricated a in line fresh water engine flush so I could flush my little raw water cooled 8hp Yanmar with fresh water. It has a quick connect garden hose attachment. For a while there I was hooking up a hose directly with a water pressure regulator set at 10 psi, but it was still too much pressure for the engine's little water pump. I now just fill a 5 gal bucket in the galley with a short length of hose attached to the quick connect. I close the engine sea cock, open the in-line valve with the yellow lever and run the engine with fresh water. I also add salt away from time to time.

I do this after every time I take the boat out. Even after day sails. It gives me a lot of peace of mind that my engine is not being eaten from the inside out. It has also noticeably slowed down the need to replace the engine pencil zincs.
 

Attachments

  • Flush1.jpg
    Flush1.jpg
    85 KB · Views: 102
  • Flush2.jpg
    Flush2.jpg
    59.6 KB · Views: 96
  • Flush3.jpg
    Flush3.jpg
    113.6 KB · Views: 95

fidji

Eric
usefuls modifications

I really love that thread, I want to participate by showing my modifications done in the interior of my Ericson 35 mkIII
 

Attachments

  • photos rénovations 082.jpg
    photos rénovations 082.jpg
    82.7 KB · Views: 92
  • photos rénovations 087.jpg
    photos rénovations 087.jpg
    75.3 KB · Views: 97
  • photos rénovations 084.jpg
    photos rénovations 084.jpg
    65.3 KB · Views: 90
  • photos rénovations 085.jpg
    photos rénovations 085.jpg
    76.4 KB · Views: 94

Frank Langer

1984 Ericson 30+, Nanaimo, BC
Fidji,

That looks very interesting. Space is always short on a boat, and you've found a way to create more storage. I'll have to think about how that might work on our boat. Thanks for posting!

Frank
 

fidji

Eric
I always found shelves very interesting for storing large objects; that's why I did not put cabinets all the way. I made a compromise. In a near future, I will put on the photos of the varnished cabinets, but that is not the most useful modification I made. I have added a retractable step to the swimming ladder. My wife is 5 feet talll and had difficulty to climb aboard after a swim so I made something that respected my criteria of beauty and functionality and the result is very good. I am sure that every owner of a Ericson 32-34-35-38 will copy my idea and it's ok because I don’t have royalty for that concept, and Frank you can call me Eric
Eric
Decision
Ericson35 mkIII nu.112
 
Last edited:

Frank Langer

1984 Ericson 30+, Nanaimo, BC
Eric, can you post a picture of your retractable swim ladder--it sounds like a very useful idea, as my wife is a bit short too.

Frank
 

fidji

Eric
--------------------------------------------------------------------------------


Hi Frank, I found the Cannon interface wire of my camera, so now I can send the varnished cabinets photos. I have to go to the boat this week to take pictures of the retractable ladder but today it's too cold outside, minus 20 degrees. On the weather forecast, we expect 0 degrees on Friday so I will go to check my boat this Friday and take pictures at the same time.

Eric
 

Attachments

  • Photo reno terminées 001.jpg
    Photo reno terminées 001.jpg
    69.8 KB · Views: 82
  • Photo reno terminées 002.jpg
    Photo reno terminées 002.jpg
    74 KB · Views: 93
  • Photo reno terminées 003.jpg
    Photo reno terminées 003.jpg
    82.7 KB · Views: 78
  • Photo reno terminées 006.jpg
    Photo reno terminées 006.jpg
    93.4 KB · Views: 71
  • Photo reno terminées 007.jpg
    Photo reno terminées 007.jpg
    88.2 KB · Views: 75
Last edited:
Top