SOS - Help! is my skeg falling off?

Hi everyone,
I have an 1973 Ericsson 32-2 which I love and I want to keep running forever...
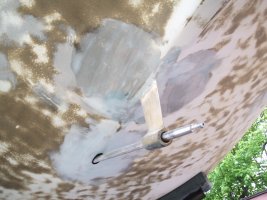
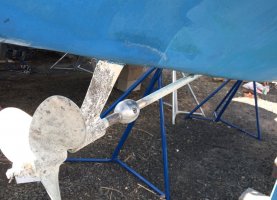
So last wekend I was doing my bottom and before I painted the tiny skeg i saw this potential problem.

It is a tiny crack that you can see through the previous bottom paint. I tried to jerk around the fitting that holds the cutlass bearing and it seemed pretty sturdy - no movement on the fitting itself. The prop shaft inside the bearing - there was a tiny bit of play (about 1 mm) so that may have caused the problem (the vibrations).

My original plan was to buy one of those strut pro to change my cutlass bearing, but now I am more worried - looking at the pictures - the cracks in the hull are tiny, and they were mostly in the paint, but they were symmetrical on both sides, which worries me....

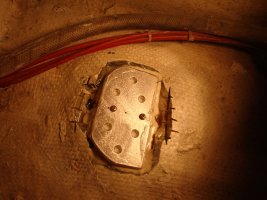
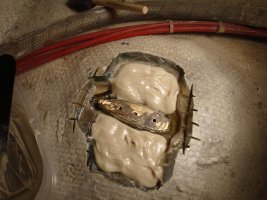
Those with first hand knowledge of how these boats were built - what say you? My knowledgeable friend from whom I bought the boat suggested I start grinding away and reset the fitting that holds the cutlass to the fiberglass (first with 5200 and then glass over it etc.) I would appreciate any help before doing major surgery and not knowing what is inside etc, or before asking the yard to fix this issue and potentially cause several others (alignment issues if the cutlass bearing is not straight, having to drop the rudder maybe, and all the issues that can come up with that etc.) So I am asking for some info or advice from other knowledgeable Ericsson people about what this may entail and whether I should stress out a lot, or a little..

I am aware of the potential issues like losing my transmission if things go south - or worse, if the skeg breaks in more spectacular a fashion, then having a huge hole in the boat that would sink the whole thing quickly...

Am I paranoid? Should I just let it be?

Many thanks for your help.
 

Attachments

  • skeg port.jpg
    skeg port.jpg
    130.1 KB · Views: 76
  • skeg starboard.jpg
    skeg starboard.jpg
    124.5 KB · Views: 75

toddster

Curator of Broken Parts
Blogs Author
I would guess that someone previously changed out the strut and didn't restore the bottom to perfection afterwards. To do so, you have to cut it out of the fiberglass, then re-glass it in. (I had a lot of naive questions about this on both my boat and the previous boat that I looked seriously at. Many in-depth conversations with guys who assured me that they know it all... :rolleyes: 
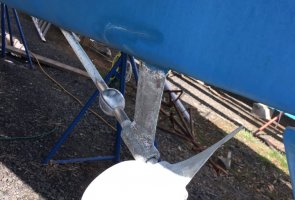
) I guess (assuming that I'm correct) the question is whether they ground the hole back to the proper angle before re-glassing. At this point, there is probably nothing you can do about it. Or need to do about it, if the alignment is correct. You could fair out the seam a little better, but it would be purely cosmetic.
 
Last edited:
Thanks so much. I talked to the marina owner who is knowledgeable and he also reckons it's sturdily set in place - the vibration from the cutlass bearing probably caused the little cracks but he does not think it's structural as the outside part is apparently mostly filler and likely to crack from vibrations - he said he sees that often in the same spot on other boats... So hopefully we'll be ok - I told him to put the boating the water.
 

Tom Metzger

Sustaining Partner
I've seen a couple of 80s vintage E-boats which had loose struts, including my own, that you would want to fix. On those boats the cracks were where the strut came through the fiberglass and you could see movement. I had the previous owner's yard fix mine as a condition of the sale.

If your strut is solid the cracks are just cosmetic.
 

Mort Fligelman

Member III
Just checked a photo of my 35-3 strut after the hull was soda blasted.......there is a filler that fairs the strut to the skeg......there are no signs showing through since it was epoxied, interprotected and painted five years ago.....dont worry..... Quote Chicken Little " the skeg is not falling"

Just keep sailing
 
Shaft seems Ok - Boat is going in the water end of this week - I will get a new cutlass bearing next year. Hopefully everything will be ok. Thanks so much everyone - I think I can sleep better now..
 

Mike Davis

Member I
Loose strut

I've seen a couple of 80s vintage E-boats which had loose struts, including my own, that you would want to fix. On those boats the cracks were where the strut came through the fiberglass and you could see movement. I had the previous owner's yard fix mine as a condition of the sale.

If your strut is solid the cracks are just cosmetic.
Hi Tom
My E-28+ has a loose strut. How did the yard fix yours? I'm thinking to drill a couple of holes and filling the void with epoxy or a couple of carriage bolts.Anybody with a 3rd, 4th or 5th idea?
Mike
E-28+ RUCKUS
 

toddster

Curator of Broken Parts
Blogs Author
If you have the manual for your boat, there should be a diagram. The struts are typically bolted on through the hull. Then fairing compound is plastered up around the outside. If it's wobbling, you should be able to tighten down the bolts from the inside. On my boat, I need to pull out the battery box then reach back behind it to find these bolts. The thick layer of external fairing compound has no structural role, so dicking around with it won't solve the problem.

If for some reason, the bolts can't be tightened, the solution is to knock out the fairing compound to reveal the strut base and replace the bolts. Then re-plaster and paint.

I have not actually yet done this. A previous owner of my boat apparently abandoned the original strut and replaced it with a fully external one. It looks a little dodgy, but seems solid.
 
Last edited:

Mike Davis

Member I
loose strut

If you have the manual for your boat, there should be a diagram. The struts are typically bolted on through the hull. Then fairing compound is plastered up around the outside. If it's wobbling, you should be able to tighten down the bolts from the inside. On my boat, I need to pull out the battery box then reach back behind it to find these bolts. The thick layer of external fairing compound has no structural role, so dicking around with it won't solve the problem.

If for some reason, the bolts can't be tightened, the solution is to knock out the fairing compound to reveal the strut base and replace the bolts. Then re-plaster and paint.

I have not actually yet done this. A previous owner of my boat apparently abandoned the original strut and replaced it with a fully external one. It looks a little dodgy, but seems solid.
Thanks Toddster
It looks to me that the strut on the 28+ is just glassed in. At least there is a large area of raised or thickened glass in the area I think the strut should be. I'll check more closely tomorrow. I hope you're right as that would be an easy fix.
Mike
 

Tom Metzger

Sustaining Partner
My E-28+ has a loose strut. How did the yard fix yours? I'm thinking to drill a couple of holes and filling the void with epoxy or a couple of carriage bolts.Anybody with a 3rd, 4th or 5th idea?

Mike - That was twenty years ago and I don't remember any details if I ever knew them. The yard was doing the work for the previous owner. There is no external evidence of what was done.
 

Mike Davis

Member I
loose strut

Mike - That was twenty years ago and I don't remember any details if I ever knew them. The yard was doing the work for the previous owner. There is no external evidence of what was done.
Thanks Tom
Still looking for an answer. Toddster has me going for a second look to see if I missed some bolts. ( he has them on his E-29 )
 

toddster

Curator of Broken Parts
Blogs Author
I'm sure there are bolts - they needed to make fine adjustments to align the strut with the shaft log before glassing or fairing it in. I seem to recall a diagram showing a wedge of fiberglass being built up over the heads of the bolts on the inside, but that was not done on my boat. The Catalina manual shows the same thing. Possibly whether they glassed-in the bolts depends on the thickness of the hull at that spot on a particular boat?

Can't seem to paste pictures from this tablet. Google "sailboat strut installation" or "Ericson strut installation" and click the "images" tab.
 

Afrakes

Sustaining Member
Strut

When doing a complete strip and redo of the bottom paint on my 87' 28 I also found a slight, 1/64", lateral movement at the bottom of the strut. I drilled a series of holes above where the strut meets the hull and injected epoxy. There obviously was a void in the original bond as epoxy ran out of a couple of adjacent holes. No movement of the strut at all after that.
 

Mike Davis

Member I
Loose strut

When doing a complete strip and redo of the bottom paint on my 87' 28 I also found a slight, 1/64", lateral movement at the bottom of the strut. I drilled a series of holes above where the strut meets the hull and injected epoxy. There obviously was a void in the original bond as epoxy ran out of a couple of adjacent holes. No movement of the strut at all after that.
Thanks Afrakes
I think I'll try your remedy. I found no sign of the bolts that Toddster mentions and I found a sight that says the 28's are "bonded" to the skin on the inside. Either way if you fill the void it'll tighten things up. Did you do yours from inside or outside? What did you use to inject the epoxy?
Mike
 

Afrakes

Sustaining Member
Strut tightening

Mike: I did my repair from outside. I had no cracks visible just a slight lateral movement. I used West System epoxy. After drilling a series of 1/8" holes about 1" away from the strut and at an angle through the FRP I injected non thickened epoxy with a syringe into the holes. Once I found evidence of a void I immediately followed up by injecting thickened epoxy until I had it running out of the adjacent holes. I kept injecting thickened epoxy until it started setting up. Once it setup I tried flexing the strut side to side to ensure that I fixed the problem. I then faired the area around the strut and sanded everything smooth. The original strut movement was so slight I didn't think it was necessary to tear everything apart. On my 28 the only way to reach this area from inside would be to remove the fuel tank.
 

Attachments

  • PICT0171 (800x600).jpg
    PICT0171 (800x600).jpg
    236.6 KB · Views: 78

Grizz

Grizz
What's hidden inside the mound

Perhaps these pics will help someone. The O-34 was built with a mound of fiberglass above the strut and when surveyed and purchased in August of '10, it had lateral wobble of @1/8". When viewed from the exterior, it appeared as though the PO had slopped thickened epoxy onto the junction of the strut and hull...and walked away. No fairing, no sanding, no nothing.

Lots of research within this site revealed hints and 1st cousins to this strut system, but nothing explicit and directly related. Could have been operator error. The forensic investigation followed over the winter, with the boat on the hard, laying prone on stomach in a confined space, Dremel in hand, carving (gently) into the mound.

Eventually the tip of the strut was exposed, then fully exposed. A plan evolved: use the Dremel to carve a recess port/starboard of the strut, fabricate an aluminum plate to fit the recess and drill & tap into the top of the strut to receive (3) SS screws. Sounded like a good plan at the time and eventually 66% of that plan was completed. These struts are hard and resistant to receiving a drill & tap, which is why only 2 were completed successfully. Thus, there are a couple broken taps that remain buried, forever, in the top of this strut. Ugh. These (2) screws receive very little shear load or tension loads in service (hopefully!).

The plate, once fabricated, was set onto a bed of thickened structural epoxy and the (2) SS screws snugged tight. Three (3) SS screws were then screwed into pilot holes in the mound port/starboard of the strut, penetrating @ 1/2". Yes, there was reluctance to screw into the hull, but the total thickness of the hull at that location is approximately 6"-8". It wasn't risky to penetrate 1/2".


These (6) screws, combined with the (2) SS snugged to the top of the strut, form a 'T', and as a system provide all of the lateral stability needed.


Once installed and fully cured, the exterior strut to hull union was filled and faired. The strut hasn't moved since, with no visible change in that junction. There is a bit of 'peace of mind', proof being that this 'fix' had been forgotten until this thread served as a reminder.
 

Attachments

  • 2 out of 3 ain't bad (1).jpg
    2 out of 3 ain't bad (1).jpg
    101 KB · Views: 45
  • Ready to Install.jpg
    Ready to Install.jpg
    102 KB · Views: 28
Last edited:
Top