rudder gland - replace & glass?

Akavishon

Member III
Alright then, it's mid-winter here in Boston, wicked cold, but time to start getting my act together for next season ;)

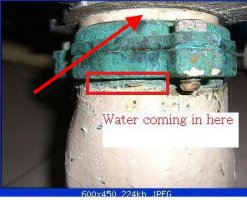
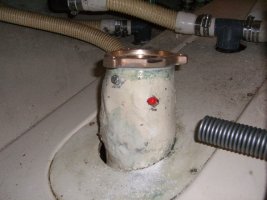
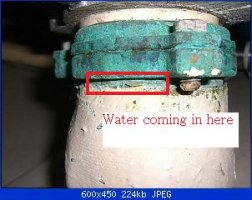
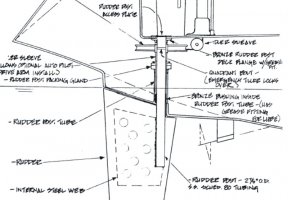
Last summer, I had lots of water coming in up the rudder post tube and leaking UNDER the lower rim of the packing gland. This would happen mostly when motoring at 4+ knots, or when the cockpit was heavily loaded with meatgrinding crew ... I whined about it, but did nothing to fix it.

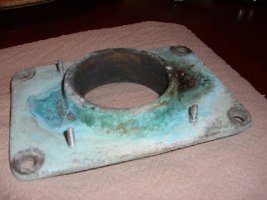
When I inspected the rudder packing gland, I found that a) it's badly corroded; b) it can't be tightened any further; c) the LOWER half of the gland is freely turning on top of the rudder post tube (!).

I'm not very mechanically talented, but - isn't the lower half of the packing gland supposed to be glassed into the rudder post tube? Clearly, it must have broken free, allowing water in? :confused:

So, my plan of action:

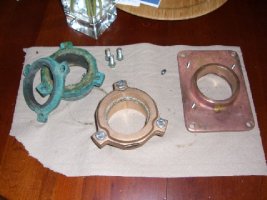
1. Order a new packing gland, maybe from here
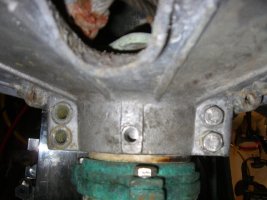
2. Unmount the quadrant, drop the rudder - maybe not all the way (boat is on dry, but not sure high enough), but just enough to clear the packing gland
3. Glass/epoxy the packing gland onto the rudder post tube
4. Assemble everything and grease the zercs :cool:

I'm wondering if this is something I should do myself, or let the yard handle it ... any insights/guidance from fellow Vikings?

TIA - Zoran
 

Attachments

  • Gland.jpg
    Gland.jpg
    17.7 KB · Views: 199
  • Rudder.jpg
    Rudder.jpg
    84.6 KB · Views: 3,034

treilley

Sustaining Partner
Go for it Zoran. If you have made it this far, you can certainly handle the rest. Most would just say they have water coming in. You have gone to the trouble crawing into the space and discovered the source of the leak. Your repair plan seems reasonable and there is no rocket science to perfect your methods. One thing I think I would do would be to somehow ensure the packing gland is square on the tube. Maybe you lift the rudder stock back up once you have fitted the new gland but before you do any glassing.
 

Loren Beach

O34 - Portland, OR
Senior Moderator
Blogs Author
I may have seen this movie

A friend of mine has an E-32-3, and I have been back in the quarterberth to help inspect some stuff around the rudder tube area. It is *crowded* around there! (The prior owner had added a below-desks AP to the boat and the ram really filled up what little working room there ever was there.)

Anyhow, my '88 has a very similar stuffing box and when we bought it in '94 the stuffing box was "broken loose" from the rudder tube. The surveyor made the seller have it fixed.
From what I can see, the yard added a layer of poly mush around the area you have outlined and this re-secured it.

Since this was my first boat with a spade rudder, it was all foreign to me, at the time.

Seller was upset, but evidently the stuffing box assembly had been turning with the shaft. You know, this is starting to sound familiar... my boat was assembled in the late summer of '88...
:rolleyes:

Loren
 

Akavishon

Member III
surveyor

Thanks for the support guys ... well, I got this pretty boat last summer, my surveyor missed this inconvenient detail, but he sure did find that some of my deck fills needed new o-rings :mad:

Ericson spec says rudder post OD is 2 7/8", I guess the new gland ID should be exactly the same?

cheers, Zoran
 

rgraham

Member II
Please post details of this project...

Hello Zoran,
I have an E36 (RH) and the rudder assembly looks very similar on my boat. And it has the same problem and I would really benefit from your experience with this fix. I will need to do the same thing to mine so please keep us informed of your progress. My boat is an ongoing project and I’m currently working on replacing the vinyl headliner with wood.
Robert
 

pick

Member II
Zoran, I also have a 32-3 which is leaking in that area. I assumed it was the packing gland and thought that I would replace it this spring when I get back to the boat. I'm currently in Arizona! Now you've given me something else to worry about! Are you able to turn the gland by hand? My boat is the one Loren was talking about earlier, there is darn little room in there especially when one has a below deck autohelm to deal with. Good luck on your project and please keep us informed of your progress.

Mike E32-3 Magic
 

rgraham

Member II
What part of the assembly holds the rudder in position?

In other words what keeps the rudder from slipping down until the steering quadrant is touching the packing gland? What part maintains the space that the red arrow is pointing to in the attached picture (which I borrowed from Zoran's posting).

Robert
 

Attachments

  • gap.jpg
    gap.jpg
    21.2 KB · Views: 2,221

Loren Beach

O34 - Portland, OR
Senior Moderator
Blogs Author
Robert, an indirect answer to your question is that the rudder, unless saturated with water in its core, floats up. Sometime when you are at the yard, note how many boats with spade rudders have a flat plastic washer, about 4 or 5 inches in diameter, between the top of the blade and the boat hull. That's to reduce friction from the top of the rudder against the hull.
Loren
 
Last edited:

pick

Member II
Hmmmm... Then why doesn't the rudder fall down when the boat is hauled? Perhaps the secret is in the upper flange but the diagram (above) doesn't seem to show enough detail.
 

rgraham

Member II
Maybe Guy Stevens knows the answer to this...

Thanks Loren, that makes sense but there must be something in the design that supports the downward pressure. I'm wondering if it is in the packing gland area maybe a collar is attached visible?
 

Akavishon

Member III
excellent idea

Excellent idea by Ray in the related thread - I think I'll try that. I've already ordered the new packing gland, but it'll be weeks before I can get started - will post progress and photos.

cheers, Zoran
 

Akavishon

Member III
scopecreep

Today was 45F in Boston (balmy!), so I figured I'd get a jump start on my projects while waiting for the new Edson gland to arrive.

I loosened the steering cables, removed the main quadrant bolt and two smaller bolts, but couldn't get the other two to move (see 1st photo) - the quadrant wouldn't let go of the rudder post. I've run out of time today ... is it necessary to split the quadrant completely in order to remove the rudder post? Seems I'm not the only one with this problem - there's a useful thread describing what to do ... hope it doesn't come to that though. I'll try a bit harder/longer next time around.

Alas, there was more bad news. I noticed lots of dust on top of the quadrant, clearly aluminum corrrosion. But the real shock came when I unscrewed the rudder deck plate in the cockpit floor - there was nothing underneath, I was staring directly at the top of the rudder post! That's right - the upper rudder bearing, attached with only screws to the underside of the cockpit floor, has dropped out of the wet floor completely ... I found it on top of the quadrant (see 2nd photo)! :jawsdown:

Clearly, the cockpit floor is saturated (it feels wet when I touch it from below), and most of the bolts (e.g. from the Pedestal, SS Guard and sheaves) are visibly rusty. Seems I'll have to do some major reconstruction here ... funny how my surveyor managed to miss all this?! :mad:
Ah well, at least I have something to play with this spring :esad:

Zoran
 

Attachments

  • pic1.JPG
    pic1.JPG
    70.3 KB · Views: 163
  • pic2.JPG
    pic2.JPG
    47 KB · Views: 163

Akavishon

Member III
update

Uff - I was finally able to wrench free the remaining quadrant bolts (they were no match for a gas torch), disassemble the quadrant and drop the rudder. All my former yoga practice came in handy too - the approach through the starboard lazarette was anything but elegant ;)

We took the old packing gland and deck flange home, where my girlfriend was able to restore the deck flange to a pretty bronze shine using a solution of salt, vinegar and saint-like patience. The old packing gland is a write-off, though ... never mind, I have a worthy replacement - the new Edson gland arrived in the mail a few days ago.

So the photo below shows the underside of the deck flange, with three protruding bolts (one is missing it seems). What are these for? Was there originally a cover that's now missing?

My project has now expanded in scope, here's what I plan to do:

1. Remove, re-drill/tap and replace the corroded zerk on the rudder tube
2. Epoxy and bolt the new packing glad onto the rudder tube
3. Through-bolt the restored deck flange to the cockpit floor
4. Inspect/replace lower bronze rudder bushing
5. Re-assemble steering system
6. Fabricate and install a beefy backing plate for SS Guard
7. Rebed Pedestal, SS Guard and any other h/w touching the cockpit floor
8. Drill holes (from below) into cockpit floor, let it dry this summer, then inject epoxy (much later)

Hmmm, I may also replace the hull, deck, rigging and interior, while I'm at it ... :cool:

cheers, Zoran (to be continued ...)
 

Attachments

  • flange.JPG
    flange.JPG
    45.3 KB · Views: 137
  • trio.JPG
    trio.JPG
    48.3 KB · Views: 144

Akavishon

Member III
zerk and gland

So today I finally got around to take the next step ... too much biz travel, and snowboarding got in the way too. My progress today:

- I took my new gland to a local machine shop and had them drill and tap a hole into the lower section of the gland, for a 1/4-20 machine screw. I drilled and tapped a matching hole into the rudder tube, maybe an inch from the top (see photo).

- It took a while to find a 45deg SS zerk with a red plastic cap (online), the right tap (1/8 27NPT), and the right drill size for it (21/64). I left the old zerk alone, seemed too much trouble to remove it, who cares. Drilled a new hole, tapped it and epoxied the new SS zerk into it.

- Then I epoxied the gland to the top of the rudder post, and screwed in the SS 1/4-20 hex head machine screw - this gland won't be turning anytime soon, I hope.

It's still cold in Boston, will take a while for the epoxy to cure, but so far it looks pretty good. Will check on it tomorrow ...

cheers, Zoran
 

Attachments

  • gland and zerk.JPG
    gland and zerk.JPG
    84.8 KB · Views: 1,289

Akavishon

Member III
all done - nasty surprise!

I've finally completed my project, but not without some nasty surprises ... below are photos of my new deck flange through-bolts (maybe a tad too deep, but hey), and the flange and quadrant below deck.

While at it, I wanted to dismount and rebed all hardware that was bolted through the cockpit floor. It was easy to get the SS guard off and rebed it, but the steering pedestal was challenging. All four large aluminum bolts broke when I attempted to wrench them lose, and I had to hammer/pull them out the hard way, one by one. It seems that the wet cockpit floor caused the aluminum bolts to completely oxidize in the middle section, leaving their heads and tails seemingly intact, and a bunch of white powder in the middle.

They looked perfectly healthy from the outside (above and below deck) - I would have never found this had I not tried to unwrench them!

Alas, even with the bolts out, I was not able to get the pedestal off the floor ... it seemed glued with some super-duper substance, did not leak, and I thought it'd be a pity to cut it lose only to rebed it with a weaker compound. So I just left it as it was, and replaced the corroded bolts with new 1/2" SS bolts (and lots of caulk).

Warning to all - if your cockpit floor is/was wet, and your pedestal is fastened using aluminum bolts, they may look perfectly good from the outside yet be completely junk like in the photos below!

Zoran
 

Attachments

  • cockpit above.bmp
    225.1 KB · Views: 138
  • flange below.bmp
    225.1 KB · Views: 136
  • quadrant.bmp
    225.1 KB · Views: 155
  • bolts 1.jpg
    bolts 1.jpg
    50.9 KB · Views: 130
  • bolts 2.jpg
    bolts 2.jpg
    54.4 KB · Views: 127

rwthomas1

Sustaining Partner
Alas, even with the bolts out, I was not able to get the pedestal off the floor ... it seemed glued with some super-duper substance,[/B]
Zoran

Hahaha! When I dug into the steering on my E38 this winter the pedestal was the same. The bolts were okay, stainless, but I had to kick and I do mean kick the pedestal to break it loose! I thought of leaving it but then I would never really know..... Whatever they used, its really tenacious. RT
 
Top