Rubrail paint fiasco

Sven

Seglare
We did something wrong and will try to figure out what.

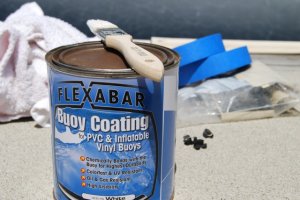
We got the buoy paint to chemically seal the rubrail and stop the chalking. This paint doesn't dry but actually chemically bonds with the rubber so it should be perfect.

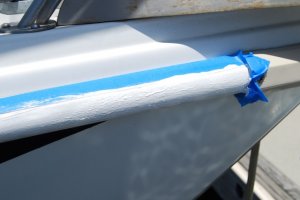
We sanded the rail lightly and then rubbed it down with acetone, twice. It was a pretty thorough job. We taped off the top edge and went to work.

The Horror !

The paint was well mixed in the can and very smooth. However, once it touched the rubber it immediately lumped up and became impossible to lay on smoothly. You can see what it looked like in the picture.

Panic !

Fortunately it came off with acetone so the rubrail doesn't look any worse than before.

One of our slip neighbors suggested that maybe the paint reacted with the acetone. There was no residue left from the sanding so maybe he is right. Enough time had elapsed in the warm sun so that all of the acetone should have evaporated but I have no other explanation.

Unless someone here has some insights I'll try to ask the manufacturer for advice. The can did say to clean the brush with their thinner before applying but since it was a new china bristle brush I skipped that step.

The sanded/cleaned rubrail looks better than before but I'd like to know what is going on before we try again. The paint definitely sounds like the right answer if we can just get it applied right.


-Sven
 

Attachments

  • DSC_1646.jpg
    DSC_1646.jpg
    88.5 KB · Views: 332
  • DSC_1647.jpg
    DSC_1647.jpg
    54.3 KB · Views: 378

mherrcat

Contributing Partner
Did the paint instructions specifically call for the use of acetone? IIRC rubber and acetone do not mix well...
 

Annapolis E-27

Member III
Sven,

Maybe it was fortunate that I ran out of maintenance time before launch as painting my rubrails was next on my list. Please let us know what the manufacturer says.
 

Dan Callen

Contributing Member III
Rub Rail Paint

I think the rub rail is rubber while the paint is for PVC.....wonder if this could be an issue. Dan Callen Ericson 32-3 Andiamo
 

jkenan

Member III
I can't offer any insights to the bouy paint, but I coated my rubrails with Nyalic, which is a clear hard acrylic coating originally developed for the space shuttle. After cleaning and sanding the rubrails, It went on easily and dried to a hard, semi-gloss finish after a couple of coats. They suggest it can be (and is often) used as a primer for other paints. Since my rubrails are pretty much already lost cosmetically and have a couple of cracks, and since I don't have the budget to replace them, I think I'm going to take them at their word and apply the 404/414 interlux primer then coat with some remaining perfection I have left over from painting the hull.

I also used it to resurrect my black plastic compass housing that was quite dingy, and to coat my prop in lieu of using bottom paint. The housing looks brand new glossy black, and the prop is very smooth with no bulky build up of anti-fouling paint. We'll see how it works out.

I am not selling or have any other interest in this product other than finding it a good solution for my own needs. That said, you can get more info at www.nyalic.com.

It may be a good base for the paint you are using. Good luck!
--------

I should also clarify I am using Nyalic on both the rubrail housing and the insert, but intend to only paint the housing with the topcoat. The rubrail insert will just have a heavy coating of the clear Nyalic finish on it to stop the oxidation runs - no topcoat since it's going to take some abuse.
 
Last edited:

u079721

Contributing Partner
I think the rub rail is rubber while the paint is for PVC.....wonder if this could be an issue. Dan Callen Ericson 32-3 Andiamo


This was my thought too. If all you are trying to do is reduce the chalking, I would give some Armour All a try on a small section.
 

Sven

Seglare
Rubber vs. PVC or Vinyl ... hmmmm, maybe that's it.

Acetone reacting with rubber ... another possibility.

There is a reason why I've stayed away from the chemistry side of rocket science :rolleyes:

If nothing else works we'll give Armour All a try.

The blue stripe sure looks pretty without the white chalk streaking it :)


-Sven
 

mherrcat

Contributing Partner
Nyalic

I looked at the Nyalic website and it looks like something I could use for the portlights that I am going to refurbish, but I didn't see any listing of distributors. Where did you get it and how much did it cost? What is the application process?

I found a couple of videos on YouTube and at the end of one there is a picture of an aerosol can. This would work great for my project.

Found more info on Nyalic here:

http://www.cruising-newcaledonia.com/nyalic_yacht_coating.html

This quote makes it sound a lot like Poliglow :(

Jeff explained that the coating could be applied with a sponge roller, paintbrush, even a rag. It was non-flammable and dried to a high gloss UV resistant finish. He also said two or three litres would cover my whole boat, inluding the mast. If, after a few years, it needed repainting you just had to wash it with a special soap and sponge, wipe or spray on a new coating. It would melt the old coating and blend in perfectly with no streaking, runs or visible edges.
 
Last edited:

jkenan

Member III
I saw that article too. I don't know anything about polyglow, but am wary of 'miracle products' in general. I would choose 2-part paint over Nyalic to recoat the entire boat, and would never consider it for decks as I would think it would be slippery, but think it could be of value for single parts that need refurbishing. The compass housing and the rubrails were perfect candidates for me because they were already so far gone having baked in the sun for 30 years. Using it for the prop was also compelling, because they claim marine growth can't get a good grip on it and can be wiped away if it is able to stay there at all. If it doesn't work, I'll sand it off, etch it, and apply bottom paint. I will say the bronze prop looks great with it on (not that anyone will be looking at it, except through a mask - and that would be me!).

I used the can at $27/can, and two cans was enough to put 2-3 coats on rubrails, compass housing, and prop. If you are applying it to bronze (which is porous), they suggest heating the metal up first with a heat gun to expand the pores slightly, then spray the 1st coat on for better adhesion. Wait 20 minutes, then spray on another. In the future, I might buy the quart and use my paint gun to spray it. I think the quart is more cost effective - more solids per part.
 

mherrcat

Contributing Partner
Where did you buy it?

When I search for it online everything links back to their website which makes it look like an industrial product that you would have to order huge amounts of.

(Sorry for the hijack of your thread Sven but this stuff looks promising...)
 

Martin King

Sustaining Member
Blogs Author
Sven,
That looks like some kind of surface contamination/incompatablity
to me. What is the manufacturer's recommended thinner for surface
prep/cleanup?

When I went down this road way back when, I tried sanding and
coating with LP. It bonds ok, but within a year, it was cracking as
the rubber flexed and looked like crap within 18 months. I ended up
replacing the insert-I think Wefco carried it, don't know if they still do.
Someone on this site might know where to get it.

The ultimate cure is to do away with that rubrail altogether. 'Course it's
a big chunk of labor, but it does solve the problem. I know a guy
who did it to his 39 and it looked awesome.

Just an f.y.i., even new brushes have oils and junk in them and should
be rinsed in the appropriate solvent before paint application. This little
nugget was drummed into me by the old timer who taught me how to
paint.

Martin
 
Last edited:

Sven

Seglare
Sven,
That looks like some kind of surface contamination/incompatablity
to me. What is the manufacturer's recommended thinner for surface
prep/cleanup?

In real time it looked like a reaction of some kind. We'd wiped down the surface enough to be sure that what we saw was not something picked up from the surface (particles). They suggested their own thinner and I should probably try thinner on a small patch again to see what that does.

The ultimate cure is to do away with that rubrail altogether. 'Course it's a big chunk of labor, but it does solve the problem. I know a guy
who did it to his 39 and it looked awesome.

What did he replace it with or what was the finish ? We're not looking for yet another "big chunk of labor" but I'd still be interested.


Just an f.y.i., even new brushes have oils and junk in them and should be rinsed in the appropriate solvent before paint application. This little
nugget was drummed into me by the old timer who taught me how to
paint.

I guess I could experiment with a pre-cleaned brush too. If the "paint" does bond it would solve a very annoying problem.

I don't know where I found it (hope I still have the link !) but there is a DVD that shows you how to install rubrails off all types. I've "heard" so much cursing here from those who used beer to lubricate the rubrail during replacement that I dread even trying :nerd:

Thanks for the suggestions.


-Sven
 

Martin King

Sustaining Member
Blogs Author
In real time it looked like a reaction of some kind. We'd wiped down the surface enough to be sure that what we saw was not something picked up from the surface (particles). They suggested their own thinner and I should probably try thinner on a small patch again to see what that does.

I don't know the product you're using. I have learned the hard way
that with LP, you better be using what the manufacturer recommends or
you will have problems. This extends to tack rags, surface prep solvents,
reducers, whatever. I follow the instructions to the letter.

What did he replace it with or what was the finish ? We're not looking for yet another "big chunk of labor" but I'd still be interested.

As I said, he did away with it. This means taking off the rail/insert.
Grinding off the remaining flange, and reglassing, fairing, primer, painting.
The finish was LP, and it looked like a million bucks. But this "treatment"
is not for the faint of heart and most would rather buy another boat than
attempt it. Had I kept my 39, it was next on my to do list.


I don't know where I found it (hope I still have the link !) but there is a DVD that shows you how to install rubrails off all types. I've "heard" so much cursing here from those who used beer to lubricate the rubrail during replacement that I dread even trying


Compared to what I just described doing, replacing the rubber insert
is a piece of cake. I have done it a couple of times and it's no big deal. Don't
let the rumor mill stop you.:):)
 
Last edited:

Mark F

Contributing Partner
Blogs Author
Sven,

I did what Martin mentioned on my E23 when I had it. I think I was inspired by Martin's description of that E39, also the gallons of water I would take on through the rubrail. It was a bit of work on an E23 and I would imagine removing/fairing the rubrail on an E39 would be quite a job.
 

Attachments

  • sidesm.JPG
    sidesm.JPG
    117 KB · Views: 58

u079721

Contributing Partner
Sven,
That looks like some kind of surface contamination/incompatablity
to me. What is the manufacturer's recommended thinner for surface
prep/cleanup?

When I went down this road way back when, I tried sanding and
coating with LP. It bonds ok, but within a year, it was cracking as
the rubber flexed and looked like crap within 18 months. I ended up
replacing the insert-I think Wefco carried it, don't know if they still do.
Someone on this site might know where to get it.

The ultimate cure is to do away with that rubrail altogether. 'Course it's
a big chunk of labor, but it does solve the problem. I know a guy
who did it to his 39 and it looked awesome.

Just an f.y.i., even new brushes have oils and junk in them and should
be rinsed in the appropriate solvent before paint application. This little
nugget was drummed into me by the old timer who taught me how to
paint.

Martin

The PO of our E38-200 was not that good at docking a 12' beam boat in his 13' 6" slip, and had soon crushed the original aluminum rub rail enough that just before we bought the boat he paid to have the entire rail replaced with a rigid white vinyl extrusion with a stainless steel insert (or overlap).

It may not have looked like a "proper Ericson" with that different rub rail, but it didn't get chalky and didn't crush either.

RubRail.jpg
 
Top