Removing galley sink

Christian Williams

E381 - Los Angeles
Senior Moderator
Blogs Author
I am considering--considering--removing the galley sink so as to change the water lines to the galley foot pumps. Anyone done this recently?

The best chronicled saga is Loren's, of a few years ago. He found the sink bedded in 5200, with studs, and used heat and wedges and patience. He then sent the stainless sink out for a polishing job that made it new.

Anybody else done this as a casual job just to improve access to plumbing?
 

peaman

Sustaining Member
Not the galley sink, but I did replace my head sink last winter. It had 4 skinny screw studs and some caulking, but it didn't put up much of a fight coming out. Posted pictures here.
 

Mr. Scarlett

Member III
I did this as part of a galley refit on our last boat. One thing I learned is that it's possible to make things too tidy. As in can't be accessed on once the sink is back in place.
 

Nick J

Sustaining Member
Moderator
Blogs Author
I wasn't planning on doing this, but.... The cockpit drain thru hull broke when I was pulling the hose off so I decided to replace all of them below the sink. And why replace just the thru hull and reattach old hoses? After all, that's what got me here in the first place.

So far I just have the hoses removed and the cabinet cleaned up ready for new backing plates. The companion area is separated from the rest of the boat while the yard grinds away at the strut. I'm waiting on the sink until that work is done so I don't create path for dust to get to the rest of the boat. This will be a good thread to watch until it's my turn to struggle with the sink.

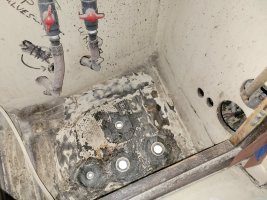
A pic of the work in progress:20221030_142152.jpg
 

Loren Beach

O34 - Portland, OR
Senior Moderator
Blogs Author
Please see replies 25 and 26.
 

Pete the Cat

Sustaining Member
I am considering--considering--removing the galley sink so as to change the water lines to the galley foot pumps. Anyone done this recently?

The best chronicled saga is Loren's, of a few years ago. He found the sink bedded in 5200, with studs, and used heat and wedges and patience. He then sent the stainless sink out for a polishing job that made it new.

Anybody else done this as a casual job just to improve access to plumbing?
I replaced the sink in my 32-200. there were some studs in the corners of the sink that had threads on them and a couple had tiny nuts on them, but mostly it was held in with 4200 (thank god not 5200). I made an L shaped knife to cut the sealant under the lip. Taped all the formica and ran the knife (with the aid of rubber hammer and block) around to loosen things. I would say it was not a complex job, just a took bit of patience. I was replacing the sink so I was not so awfully careful wth the lip of the old sink, but I think I could have gotten it out without damaging it. But the PO had done some ice picking and missed in the old one.
 

Christian Williams

E381 - Los Angeles
Senior Moderator
Blogs Author
Thanks all. I have chickened out.

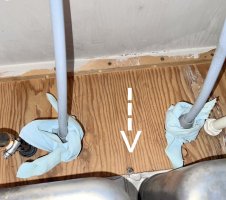
It's just a sink, but on the 381 there are nuts on the rusty studs*, two of which are just about inaccessible. I'm sure there's a tool to reach 6 inches into a two-inch wide gap and grab a nut tightened onto a 2-inch stud, but I don;t have it. The useful sink wrench--jaws flop sideways on a long shaft for typical house plumbing jobs--is far too big. There's no adequate place for an inspection port.

Also, the sink is bedded in a heavy layer of white compound, still shiny, which may be 4200 but, uh, it's hard to the touch--and 5200 gets hard to the touch. Not worth it to me just to change the water lines and the faucet.

One entertainment is the paper towels the factory wrapped around the faucet lines, no doubt to check for leaks when the line was pressurized. They're still there. I figure the foreman said, "check for leaks before you put the sink in, because you'll never reach in there after that."

He was talking to me, 38 years later.

*arrow identifies stud.
rotated sink with faucets and towels and stud -001.JPG
 

Loren Beach

O34 - Portland, OR
Senior Moderator
Blogs Author
if I might offer one bit of learned technique. You really do not need those little welded studs in the OEM sink rim to hold it down. Once you place the sink back with sealant all around, and pile some weight in it to compress the fit, in a day or three, it will be firmly in place for another 30 years. I did use heat to soften the old 5200. I would use something less eternal for re-sealing it.
 

u079721

Contributing Partner
I am considering--considering--removing the galley sink so as to change the water lines to the galley foot pumps. Anyone done this recently?

The best chronicled saga is Loren's, of a few years ago. He found the sink bedded in 5200, with studs, and used heat and wedges and patience. He then sent the stainless sink out for a polishing job that made it new.

Anybody else done this as a casual job just to improve access to plumbing?
I did this many years ago. Used an assortment of putty knives and heat gun, with the most useful being a putty knife that I had bent at a right angle to use on the hard-to-access back edge. After going through that I frankly didn't see the need for the sink to be bedded with caulk at all. So when I reinstalled the sink I just left off the caulk, and it made getting to the plumbing underneath that much easier in the future.
 

peaman

Sustaining Member
You really do not need those little welded studs in the OEM sink rim to hold it down.
Can confirm, at least for the head sink. The studs on the old were rusty, and one broken off long ago. The new sink had no studs at all, but the sink is now firmly attached. I would expect a galley sink, with much more rim length, would be at least as solid.
 

Pete the Cat

Sustaining Member
if I might offer one bit of learned technique. You really do not need those little welded studs in the OEM sink rim to hold it down. Once you place the sink back with sealant all around, and pile some weight in it to compress the fit, in a day or three, it will be firmly in place for another 30 years. I did use heat to soften the old 5200. I would use something less eternal for re-sealing it.
My new sink from Defender didn't have studs. Also, on the old sink, the studs were some kind of poor quality metal welded on with some very corroded welding product. I think could likely have been just broken off with the "wiggle til it falls off" method with a vise grip wrench--I agree that the studs do nothing to hold it in place. I am pretty sure the seal was original on my sink and that it was not 5200, but there were a couple of other places where I am sure the yard or the PO used 5200 on the boat--inappropriately. So I might have just been lucky that the guy did not grab 5200 that day.. Seems like you could just run a knife under the lip and tell. 5200 is almost impossible to cut. I bedded my new sink with regular kitchen silicone caulk. On the 32-200 I think it is not really possible to get a faucet wrench up in the narrow spot to fix or change out the galley fixture, so I changed that out while I had the sink out.
 

Nick J

Sustaining Member
Moderator
Blogs Author
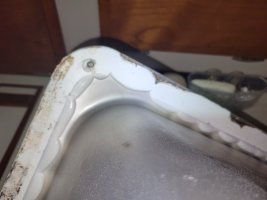
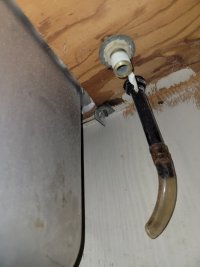
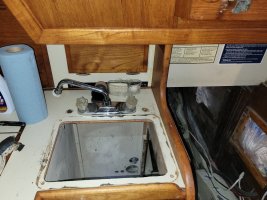
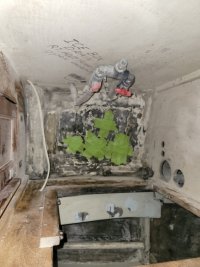
Success! No heat or debond needed. It only took about 20 minutes and 18 of that was finding the right tools (Socket extensions and a 3/8" socket). I had two major advantages; the engine out of the way and I didn't care about the sink I was removing. I bent the rim while removing it, but I'm sure the metal recycling place won't mind.
The sink im planning on replacing it with will further limit access. Hopefuly cutting an access hole in the trash compartment to get at the faucet connections will help. 20221101_180117.jpg20221101_175912.jpg20221101_180828.jpg20221101_180834.jpg
 
Top