Reinforcing teak hatchboard supports for offshore work (E29)

jkenan

Member III
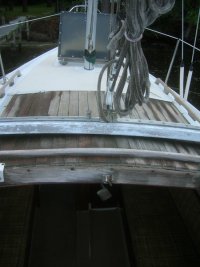
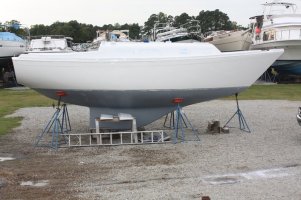
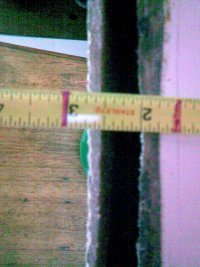
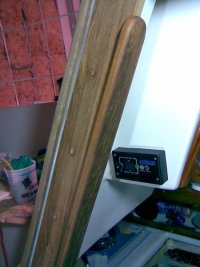
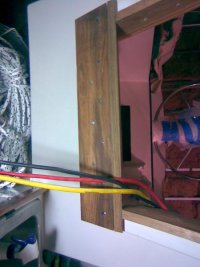
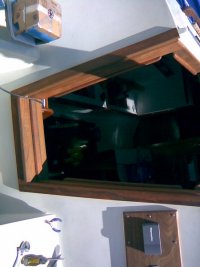
I am retrimming the companionway, and have removed all existing trim revealing the open seam between the deck and interior liner around the perimiter of the companionway. I believe Seth and other of the experts here have recommended the trim which holds the teak hatchboards in place should be reinforced with metal if the boat will be doing any offshore work. I am assuming the supports will only need to be installed for the vertical members supporting the hatchboards. What kind of metal should be used, what shape, and how should they be fastened?

I have also considered filling in the seam with thickened epoxy and fairing, which could allow the hatchboard trim to be fabricated out of a 1/2" thick fiberglass laminate, cut and milled just like a teak, then glued in place which I think would be as strong as metal. Any reason not to do this?

Thanks for any advice here.
 

davisr

Member III
companionway hatch cover

Dear John<O:p</O:p
<O:p</O:p

I am in the process of renovating an E25 cb that I recently purchased. Currently, I am removing all of the deck hardware for rebedding. Today, I removed the traveler, and I plan, in the next few weeks, to remove the companionway hatch cover as well. The former owner revarnished the cover between my first visit to the boat and my second (for the survey). The teak is quite attractive, but I am concerned that there is some rot on the underside. I am also concerned that the underside of the hatch cover itself is not strong enough to support a foot upon it (when reefing, etc.) and is probably not trustworthy enough for the near shore coastal cruising that I plan to do in in this boat. I wish that I could address your question about reinforcing the slots for the companionway boards (thank you for the idea), but I am wondering if there is something you are planning for hatch cover itself that will toughen it up for the offshore work you envision. <O:p</O:p
<O:p</O:p

Best regards,<O:p</O:p
<O:p</O:p

Roscoe Davis<O:p</O:p
<ST1:p<?xml:namespace prefix = st1 ns = "urn:schemas-microsoft-com
><st1:City w:st=
Charleston</st1:City>, <st1:State w:st="on">SC</st1:State></ST1:p<O:p</O:p
<O:p</O:p

E25, cb, <st1:City w:st="on"><ST1:pHull</ST1:pl </st1:City>226<O:p</O:p
 

Attachments

  • DSCN7987.jpg
    DSCN7987.jpg
    53.8 KB · Views: 105
  • Ericson25TransitNewBernOrientalCharlestonOct2009 048.jpg
    Ericson25TransitNewBernOrientalCharlestonOct2009 048.jpg
    56.7 KB · Views: 121

jkenan

Member III
Hi Roscoe-

First of all, welcome the the website - this forum is full of great information, which is easily searchable. I am also in the process of rebedding all deck hardware (a definite must-do if the existing bedding is 30+ years old as mine was). Prior to doing this, I did the prescribed widening/epoxy fill/re-tapping of all fastener holes to protect the balsa. Please keep us informed of what you are doing with your new E25.

In answer to your question about the hatch itself, I've already rebuilt it, and feel it is quite sturdy. Judging by the photos you posted, your re-varnished hatch looks great, but have no way of knowing whether it is compromised by rot. I would think tapping around the hatch with a ping hammer would reveal any soft spots, and if you are already planning on taking it off, lay it on the ground and jump up and down on it few times, . If it looks good, sounds good, and holds up to some field testing, it is probably OK for a while longer. After you own the boat for a while, you will become much more in tune with what the boat needs. Are you planning on taking it offshore soon?

My plans are not to go offshore any time soon, but since I am repainting both deck and hull and have removed all deck hardware, as well as interior trim around all hatches, I'd like to go ahead and set up the companionway with adequate reinforcement. Eventually, I will get offshore, so anticipating a cockpit full of water is a must.
 

jkenan

Member III
Roscoe- BTW, are you in Oriental? That looks like Sailcraft's building in the background of the 'varnished' photo.

My boat is in Oriental at Triton's yard....
 

davisr

Member III
Dear John,

This is indeed Sailcraft Boatyard in the foreground. Sharp vision. I actually live in Charleston. I purchased the boat from a fellow who lives on the water near New Bern. Sailed it down the Neuse to Oriental for haulout. Bob Lauzon of Sailcraft had done the survey. Did a professional job and seemed to be an all-round great fellow. Also liked Sailcraft's prices as compared to those in New Bern, which were over twice as much.

You mentioned that your boat is on the hard at Triton Yachts. It just so happens that it was Beth at Triton Yachts who brokered the sale, so I am familiar with the yard.

At any rate, yes I will stay in touch during the rebedding process. I have taken quite a few pictures and will post them on a pertinent thread.

Take care,

Roscoe Davis
Charleston, SC

E25, cb, Hull 226
 

jkenan

Member III
Roscoe-

I'll be down this weekend. I'm pretty much working from dawn to dusk when I'm down, since it's about a 3hr drive from Durham and I can only get down so much to work on her. Stop by Triton whenever you are down. Ours is the E29 in the middle of yard - as far away from any other boat as you can get since I'm spraying on her a new coat of paint. Right now, she has her final topcoat of white (Interlux Perfection Arctic White) on both hull and deck. This weekend, I'll be painting navy blue cove and boot stripes, as well as cream color non-skid on deck. After that, hardware goes back on, then final barrier coat, then bottom paint, then engine/bilge plumbing & wiring, and then launch! Attached a couple of photos so you know which one it is, and to give you sense of the scope of my project. I gotta say, these boats are beautiful. I have enjoyed revitalizing her, and can't wait to sail her again...

Hope to see you down there!

Best regards,
 

Attachments

  • Painted.jpg
    Painted.jpg
    110.5 KB · Views: 82
  • Prepped.jpg
    Prepped.jpg
    289 KB · Views: 89
  • Painted2.jpg
    Painted2.jpg
    116.3 KB · Views: 94

jkenan

Member III
Just saw your othe thread - Sorry we missed you in Oriental. Charleston is on our list of sailing destinations. We'll venture out more once our youngest learns how to swim (she's 10 months old now)...

Good luck with your project!
 

davisr

Member III
Triton Yachts Boatyard, Oriental, NC

John,

Your boat looks great! If you can believe this, I actually parked my trailer next to your boat when I came up there to sail the boat from the owner's house near New Bern to Oriental for haulout. I was in such a hurry to drop the trailer off and then pick it back up about 36 hours later that I didn't even notice I had parked next to an Ericson. I now, though, see the family resemblance. Hope that you'll keep in touch with your planned renovations. Mine will be similar, though I plan to put off painting for another day. Hope to get by with buffing the gelcoat back into shape.

Best regards,
Roscoe
 

jkenan

Member III
That's hilarious! It is a small world. Vikings abound :egrin:

Will post pics my progress, and look forward to hearing about yours...

On a different note, does anyone have suggestions about an effective way of reinforcing hatchboard trim..... anyone...?
 

Loren Beach

O34 - Portland, OR
Senior Moderator
Blogs Author
On a different note, does anyone have suggestions about an effective way of reinforcing hatchboard trim..... anyone...?

Until someone checks in that knows what's what....
If I recall, these boats have an external vertical piece of trim that covers the indent for the boards to drop into?
If so, the rest of the problem may be identical to the interior liner meeting the outer cabin molding on my old Niagara 26. On that boat there was also a vertical piece of teak on the inside for trim. A crack appeared where the inner and outer frp moldings met...

So I drilled straight thru the outside teak piece and inside piece. Then I overdrilled just enough for a plug on both sides. I did this in three or four places -- memory is dim, this was probably 20 years ago -- and then put an SS machine screw thru with a nut on one side, and cut off the screw to allow the thread to be about one thread proud when all tightened down. It takes some dry fitting and trial fitting...
Once all was drawn tight, I put teak plugs in, flush cut n sanded 'em, and varnished both sides. The crack was gone and it was a lot stronger than before. :nerd:

(What I cannot recall is whether the E-27 and E-29 series have a piece of vertical trim on the inside...)

Advice probably worth less than one cent.

LB
 

davisr

Member III
John,

My apologies for going off topic again, but I would like to ask a follow-up question based upon your photos. You mentioned that you removed the deck hardware and widened the holes and refilled with epoxy to protect the balsa core. I will be doing the same thing soon. In your pictures I cannot tell if you removed the toe rails. Did you, and if so, was this as big a chore as it sounds like it would be? My toe rails have lots of bolts, many of them with nuts that are difficult to reach.

Thanks,
Roscoe
 

jkenan

Member III
Did not remove Genoa Track along toe-rail, primarily because it does not fasten through a core area of the deck on my boat, does not leak, and it would have been a huge task to undertake. I also did not remove a couple of other items, such as rope clutches and an adjacent winch, because I had already done that treatment to those fastening holes and those items were installed and bedded only a few years ago. I know underneath those areas will not be painted, but I figure if I ever decide to remove/move them, I've got those holes to fill in anyway, which necessitates painting.
 

stuartm80127

Member II
What I did on E27 for Trim around hatch.

I had what I presume was 30 year old Teak that leaked like mad under the bottom strip in my companionway. And that was just from rain!

Having plans on going to the Pacific in 2010 I wanted something more substantial in-terms of keeping a wave out of my boat and still retaining the charm of teak - metal that grows.
After ripping all of that teak out, I went in and sanded the gaps between the liner and the hull(deck) (try paint mixer stick with #40 sandpaper folded over edge) and then washed 3 times with Acetone. This gap is quite cavernous in areas and I didn't want to wast 2 gallons of West Epoxy filling them up. On the wider gaps I applied a coat of epoxy to the surface inside the gap area and waited 45 minutes. I then infused epoxy into 4inch wide biaxial cloth on waxpaper and squeezed it out well, waited 20 minutes for it to start kicking and then placed it inside the groove and secured it well to the tacky inner edges with a wooden stick. Came back 2 hours later and then started filling with #403 thickened expoxy with some of the biaxial cloth cut up into very small strands - a goopy Peanut-butter consistency mess at this point. Applied into the holes trying to not apply more than an inch at a time due to the massive heat this stuff can generate. Put a fan onto it to keep cool. An hour later, after it kicked and the heat died down, come back again and put on more. Repeat until slightly over the edge. Then come back 48 hours later and sand it all flat. If you wait more than 8 hours(or so) between applications then you will need to de-wax the surface and sand it. Sanded until nice and flat.

I used 3/4 thickness teak from http://www.marine-plywood.us/Boat-lumber-pricing.htm . They had affordable prices and they package it all so nicely. Teak plugs from http://www.midwestdowel.com/catalog.php/CatID=38/ . I ordered about 10 feet extra knowing in advance that I would blow an angle or two. I chose to mount external trim, add in a small overhang(step) outside and in with a contiguous piece of teak. I also ensured that there was a 15 degree angle aft on this floor board to help water find its way. I added in a 1/2 inch beveled trim behind where the hatchboard rests. I now have a side gap sufficient to slide the existing and newly sanded hatch board(s) into. I had to shorten the lowest board and my single piece hatchboard commensurately. I took the chance to ensure that the bottom angles matched. I bedded the teak to the glass with a good bead of Polysulphide (sand and wash surface with 100% alcohol first). Wipe the Polysulphide off the visible surfaces fast or it gets into grain forever. For the curved piece at the head of the companionway, I painstakengly removed the original trim and then traced it over a 5 inch wide piece of 3/4" teak. For the trim on the inside edges, I kept the edges sharp and then added rounded 3/4 teak handles using a router to make a 3/4" slot about 3/8 inch deep inside and then epoxying the new handrails in. Used good panhead screws to mount teak to glass/epoxy sub-surface.

If you are going offshore then I would recommend perhaps making the first of your sectional hatch covers either permanent or adding closed cell weatherstrip along the forward edges and then mount a barrel bolt to the inside of the hatch and drill a hole into the teak edge. This will be plenty strong if you have a good 3/4" groove into which the hatchboard sits

Well the job survived 60kt mountain winds with driving t-storm rains this past summer and nary a drip inside. Now, I would like to believe that it would hold up to a small boarding wave or two from a summer storm on the Pacific with a minimal amount of water getting inside. I would be more concerned about the main hatch leaking like mad. That's another project entirely.

Forever a slave to teak oil and cleaning.

Pics attached.
 

Attachments

  • Oh those gaps.jpg
    Oh those gaps.jpg
    83.6 KB · Views: 70
  • No more holes.jpg
    No more holes.jpg
    46.4 KB · Views: 72
  • Side with rail trm.jpg
    Side with rail trm.jpg
    51.7 KB · Views: 81
  • First cuts.jpg
    First cuts.jpg
    51.8 KB · Views: 72
  • Done.jpg
    Done.jpg
    45.6 KB · Views: 90

jkenan

Member III
Beautiful work! I really like how you brought the teak around to the exterior of the companionway opening - it frames it very nicely. I considered filling the gap between the liner and deck as you have done, as it would provide a much beefier purchase for the fasteners holding the trim or other reinforcement in place, and will probably do this having seen your example. Still thinking of adding a section of stainless 90-degree angle bar or U-channel to hold the hatchboards firm against an oncoming wave, but I would also say your set-up looks mightly sturdy. Thanks for sharing!

At some point soon, I've got to finish what I'm doing and get launched and sea-trialed. Wife, kids and I are planning a long trip this May all around NC coastal waters. Not taking on any more improvement projects but focusing on resolving what I've already started, which is quite a lot (including replacing companionway trim). Can't wait!
 

bigd14

Contributing Partner
Blogs Author
I hadn't thought about doing this, but I may try it in the interests of keeping things dry. I would be inclined to mill some strips of white oak or other durable wood to fit in the gap between the liner and mash it in with thickened epoxy, then glass over it. Then you wouldn't use as much epoxy or burn up the boat when it kicks:egrin:

Doug
 

stuartm80127

Member II
Hi John,
Those teak boards are held in with 1.5 inch #10 pan heads on a bed of polysulphide. If you did something similar then i would recommend using barrel bolts mounted on your hatchboards with a hole drilled into the teak boards. This will serve to keep your hatchboards from swimming away if the cockpit fills. Btw how big are your scuppers? You may find the book Storm Tactics by the renowned Pardees a big help in keeping those storm waves off your boat. Good luck and post some pics when you are done.
 
Top