Recorring the Deck on a 36C

Rocinante33

Contributing Partner
Gogeon Bros. (West Systems) has a nice booklet that might be helpful to you. IIRC it is about $5 @ WM.......the kind of book companies used to give for free, but it IS worth $5 in any case.
 

Emerald

Moderator
All looks good with good reasons for the different approaches. I think it really gets down to a combination of access issues and the cosmetic condition of the decks. I recored my mast step from above due to the access, boat construction, and cracking in the top fiberglass skin. I targeted specific spots from dodger fasteners that were not bedded properly with a plug approach from below. I've got a sinking suspicion that I will be doing some work in the anchor locker this spring when I remove/build a new bowsprit. My original gelcoat and nonskid look good, and I'll do it from below, even though I know it's gonna suck :rolleyes:
 
Last edited:

Keiffer

Member II
Bow Sprit / Anchor Platform

David,

Are you going to make new anchor platforms when you re-build your bow sprit? If so I have the router template that I used when making mine if you interested I will send it to you.
 

robjpowell

Member II
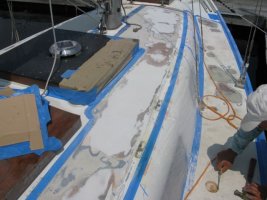
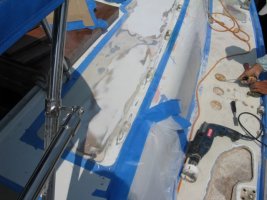
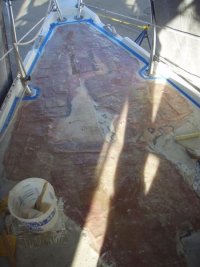
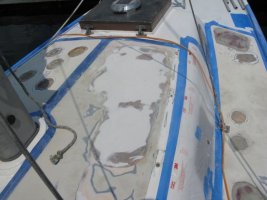
Given the extend of the wet core on our 35-2 we tackled this job from above (90% of the for for foredeck, 50% of the side deck and cabin top!). As a PO had already had the boat painted this wasn't a case of ruining a gelcoat finish. As far as feathering we cut about a half inch inside the edge of the moulded in non-skid. Remember the 12:1 ratio is on the resin and does not need to include the core so your feather can be less than 3 inches. That said we did scoop out the core from under the remaining deck and back fill with thickened epoxy so that is a plug in effect. It is a messy job but doable. It did use a LOT of materials.

blade for angle grinder to cut out under deck edge: http://www.woodcraft.com/Search2/Search.aspx?query=lancelot
company I buy resin from: http://www.epoxyproducts.com/marine.html

IMG_1649.jpgIMG_1650.jpgIMG_1651.jpgPB020031.jpg
 

Emerald

Moderator
David,

Are you going to make new anchor platforms when you re-build your bow sprit? If so I have the router template that I used when making mine if you interested I will send it to you.

I hadn't decided, but will certainly take you up on the offer if I do.

Thanks!
 

Wander

Member II
Recorring is well on its way

Sorry everyone for not keeping up with my own post. The past four weeks have been spent energetically, if not enthusiastically, removing about 50% of the core from my deck. I did decide to do this from below. From the perspective of hind-sight this was definately the correct way to go. The first lesson learned so far is how big of a mess this makes, with fiberglass dust, fiberglass chunks, and old wood littering every free space on the boat. Fortunately I had covered the sole throughout the boat, and I also lined all vertical areas with plastic to cover them from the dust. My hope is that this will make the final cleanup much easier.

The second lesson learned is how @#$$!! hard it was to get most of the core removed from the top skin. A lot of this wood, end grain balsa, was so wet that when I hit it with a chizel I got splashed in the face with water. Yet, it required hammer and chizel (or more correctly hammer and crow bar) to get 80% of the wood removed. It turned out to be an amazingly physical project, and I wouldn't be this far without the help of a couple good friends. I'm thinking of opening up an exercise center that specializes in deck core removal. Quite the upper-body workout when you have to swing the hammer above your head for three or four hours at a time!

One interesting factor about the original core is that in some (most?) places Ericson used a single sheet of 1/2" balsa for the core. But in other areas, especially near the edges of the hull, two 1/4" sheets of balsa were used. And while the top sheet adhered well to the top skin and the bottom sheet adhered well to the bottom skin, it appears no resin was used between the two sheets of balsa themselves. This meant that when I cut through the bottom fiberglass skin the bottom half dropped out cleanly, but another 1/4" of wood remained to be hammered out. Can anyone provide any insight into why this approach was used? I'm guessing it was mostly economical, in the "we're out of 1/2" use what we've got" approach. I'll be using 1/2" throughout for the replacement unless I learn of a specific reason not to.

I will post a few pictures when I remember to bring the camera off the boat.
Joe
 
Last edited:

Greg Ross

Not the newest member
The one vs two layers of balsa core material

The purpose of the vertical grain balsa is to act as a spacer between the two skins/ to create a beam like structure/ to provide depth and strength. The two layers of balsa as you've encountered with no bond between them does not achieve the same strength and would allow the two skins to move/ flex independently of one another. Not very desireable.
Glad to hear you're pleased with the decision to do the recore from below. I've actually been doing Gym sessions lately working on range of motion and flexibility and I can sympathize with all the overhead work! If you happen to have a 30 Ton Crane at your disposal you could always lay the boat on its' side for the balsa removal. That's a "tongue in cheek" type suggestion but certainly in manufacturing, positioners are often utilized to optimize labour effort.
 

bigd14

Contributing Partner
Blogs Author
Sounds like you had a great excuse to purchase a Fein Multimaster or other knock-off imitations. I spent a day trying to remove wet core material (from the top!) and eventually gave up and bought an oscillating tool, and when that burned out, the Multimaster. With that and the Porter Cable 7335 DA sander any boat demo job is possible! If you have any more core removal, I highly recommend an oscillating tool.

Now the real fun begins- overhead epoxy work! You might seriously consider shaving your head and removing any other exterior body hair. Because one way or another its coming off... :scared:
 

Wander

Member II
I do have an oscillating tool. I bought the first one on the market a couple years ago from Dremel. Definately not in the same league as the Fein or Milwaukee, but it was wonderful for getting around the chain plates and bulkheads.

(Un)fortunately I don't have a lot of hair left to go to much trouble about....
 

Mike Tinder

Member II
Joe,

If you look up E-39B Pictures 1 thru 8 I think, you will see pictures of my re-coring project that I did. I did just what you are doing. You cant see it becasue it is not in the pictures but I feathered the fiberglass back around the areas where I cut out the balsa.

Then for my fiberglass job I used the really thick glass mat, it was roving roven and mat all in one, extremely thick stuff. I cut it into 8 inch squares. So I went accross all my areas that needed glassed in with 8" squares. Then for the second layer I over laped the joints of the first layer, then the third layer overlaped the second, and the fourth overlaped the third. It was over kill. I used some where around 700 of the 8 inch squares. But when it was all cured I was able to lightly grind it fairley smooth without losing a bunch of its thickness.

As for putting in the balsa I did the following. I would lay out about 50 1 cup containers on the table and fill them all with resin, then I would put in the thicking powder so it was pretty dam thick and would be able to fill the biggest gap that could happen as I glassed in my new foam balsa, (I used the foam balsa). It took one cup of resin for each piece of balsa I glued back in. I also put my balsa in with anywhere from 6 to 10 inch squares, I did not try to put any bigger pieces than that in at a time. I would not put the hardner in until I was ready to use the cup, it would take a couple of hours to to thru all the cups. I would fill in around ever square of the balsa and then put at least a 1/4" thick layer of my thick resin/harder over the piece, along with a 1/4" slap of resin/harder on the overhead. I held each piece in place until the resin kicked. Lots of resin would squirt out as I put the pieces in place, just had to keep one area clean for the next piece to go in place.

Gotta say you are doing the right thing with yours, I think it is worth every penny and I think I spent around $2,000 for all my fiberglass repairs, It is worth the hours you spend to get it done also. Gotta say I love, love, love those 36 grit sanding disk, they saved me alot of time.

Keep up the good work.

Mike
E-39B
S/V Sea Maid
 

Wander

Member II
Fortunately I have a good friend that is a fiberglass expert. With his guidance I hope to make short work of things. Tonight the grinding begins!
 
Top