I'm posting this incase someone else needs moral support if they decide to do it. I hope these posts help. Since I didn't leave well enough alone with my existing rudder bearings I decided to go with Jefa bearings. So before I can do this I decided to open up my rudder to find the source of the rusty water that came out of it when I drilled several holes in it (when removed for the hull peeling several years ago). Also the skin was pulling away from the foam in this area. I used https://www.youtube.com/watch?v=MRXNnFx7DBQ (multi part tutorial) as a how to guide and basically followed it. The key for this job was to uncover the internal frame to the point where I could rotate it up from the rudder shell but leaving the foam underneath it as a position guide. I then removed some of this foam and replaced it with a very thick epoxy paste covered with a piece of plastic so when I rotated the frame back down it would create a position mold for the internal frame. The frame is made of mild steel welded to the stainless tube. The very upper tooth which was under the part, at the top of the rudder, I didn't cut away had broke off at the weld. Because I didn't want to remove any of the fiberglass in this area because of the shape transition I added to the existing frame. I had a piece of very thick walled stainless tubing that I heated and bent and used a piece of mild steel to attach to the existing frame. I didn't like how the teeth of the original frame covered so little of the internal area that I added to this. I just used some roofing shingles to protect the rudder shell while welding the frame extension by laying them over the areas near the welding. After cleaning up the frame I covered it with rust lock paint from petit. I then used 2 part 16# foam from US Composites and filled in the shell. I mixed it in basically in 1 pint batches and did the pours. I was afraid to use more than this at one time because I didn't want to distort the shell when it expanded. I still have to cover it with 1708 biaxial glass and epoxy then fair it. Things that surprised me
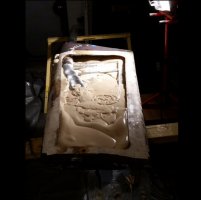
1) The shell is pretty thin as far as fiberglass in some areas it looks like one layer of mat and one layer of final weave.
2) There is a lot of fairing compound on it in some areas almost a 1/2 inch thick.
3) The internal frame covering so little of the internal area.
4) The original foam was very hard even though 3 years ago the bottom third of the rudder was saturated with water based on it pouring out of the holes that I drilled. (It took 2 gallons of acetone to soften it up for removal).
5) The top part of rudder tube (from the quadrant to the top of the rudder) is filled with some type of material to add a lot of weight. This is Hull number 2 (RH36) that I think was raced quite a bit at the factory. Maybe they did this for racing?
6) Like with all projects I spend more time worrying and procrastinating then the doing.
Pics
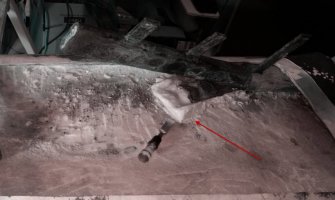
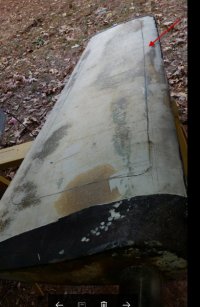
1. Water Source
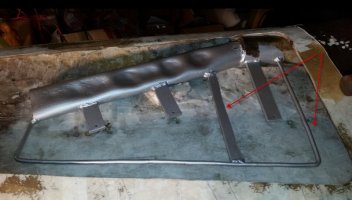
2. Cut Line
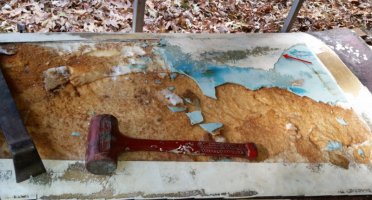
3. Removing Skin
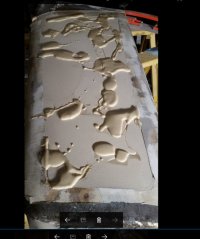
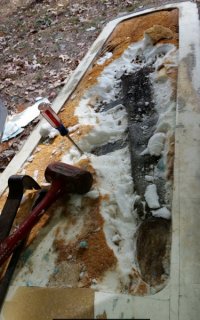
4. Uncovering Frame
5. Missing Tooth
Robert
1) The shell is pretty thin as far as fiberglass in some areas it looks like one layer of mat and one layer of final weave.
2) There is a lot of fairing compound on it in some areas almost a 1/2 inch thick.
3) The internal frame covering so little of the internal area.
4) The original foam was very hard even though 3 years ago the bottom third of the rudder was saturated with water based on it pouring out of the holes that I drilled. (It took 2 gallons of acetone to soften it up for removal).
5) The top part of rudder tube (from the quadrant to the top of the rudder) is filled with some type of material to add a lot of weight. This is Hull number 2 (RH36) that I think was raced quite a bit at the factory. Maybe they did this for racing?
6) Like with all projects I spend more time worrying and procrastinating then the doing.
Pics
1. Water Source
2. Cut Line
3. Removing Skin
4. Uncovering Frame
5. Missing Tooth
Robert
Attachments
-
 Water Source.jpg90.8 KB · Views: 34
 -
 Cut Line.jpg58.8 KB · Views: 26
 -
 Fiberglass Skin.jpg112.7 KB · Views: 26
 -
 Uncovering Frame.jpg76.1 KB · Views: 30
 -
 Broken Tooth.jpg72.2 KB · Views: 41
Last edited: