Rebedding Leaking Grabrails

Joe

Member II
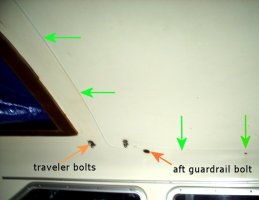
I decided to find the leak coming from the topside grabrails on my E25cb today.

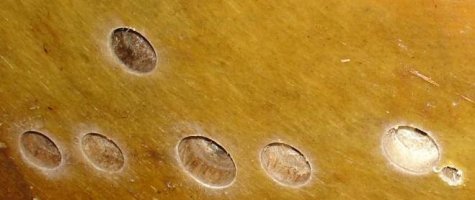
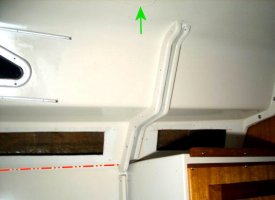
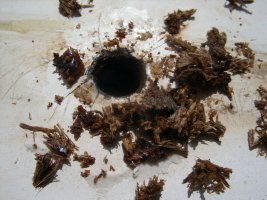
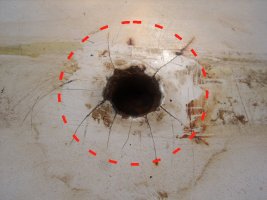
After I wrestled the postside grabrail off, I was dismayed at the amount of wet oatmeal I found (first picture). I dug around with a small allen key about as far as the marked dotted red circle shows (second picture). The stuff just kept on coming.

I would appreciate help on these questions:

How accurate is a moisture meter at edge detection? Would it help me determine how large this particular wet area is to any degree of certainty?

Is this a possible application for CPES?

I was hoping to follow the procedures detailed on this site for rebedding hardware by pouring epoxy 'plugs' and then redrilling but this area seems to be getting a bit large for that solution.

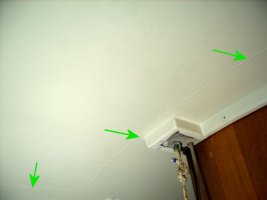
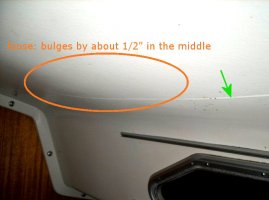
I should also mention that the headliner inside the cabin bulges in a few places (like reverse oilcanning). I haven't paid much attention to that until today. Could it be related to this moisture problem?

Thanks!
 

Attachments

  • Oatmeal.jpg
    Oatmeal.jpg
    123.2 KB · Views: 62
  • UhOh.jpg
    UhOh.jpg
    89.2 KB · Views: 55

chaco

Member III
West Systems Manual

Hop on down to your Local Fiberglass Supplier and get a Copy of the West Systems Manual. Most every Option is in there. The core is Balsa and you will need to DIG / DRILL until you can outline the Damage. Good Luck !
 

Emerald

Moderator
I'm currently performing a repair on Emerald where fasteners for the dodger were not properly installed and the damage is very similar to your problem and the basic approach may work if your core damage is limited to the areas around the fasteners for the handrails.

This will require working from below and I realize with your headliner you are going to be faced with cutting holes in it. I think there are several ways to address this, but first here's a possible approach to the core problem. By working from below, you leave the molded area around the handrails, non-skid etc. all in tact, and I feel the cosemetic issues are easier to address from below. So, what I have opted to do is to cut plugs out of the deck from below with a hole saw, as I found the damage extended only 3/4 of an inch or so out from each fastener e.g. a 1" to 1.5" hole saw would eliminate the mushy area. This left wet but still savable core exposed to air. I let it dry for about 2 months and then used Smith CPES to saturate the exposed balsa around the edges of the holes I cut. I am now at the point where I am cutting discs out of marine ply to place back into the holes I cut. I will coat them with West System Epoxy and then I will mix up West with the 406, which is a colloidal silica that provides good strength and bonding, to a thick goo and bed the plugs back into the holes I cut. Finally, I will finish off restoring the bottom skin with probably 4 layers of tape applied over this. I've attached a picture of the holes I cut in the state of air drying. I hope to have it finished off this weekend. A final thing I am doing when reinstalling the dodger fasteners is to drill oversize holes which will be filled with thickened epoxy and then drilled again for the actual fastener dimension.
 

Attachments

  • core-holes.jpg
    core-holes.jpg
    28.8 KB · Views: 86

Joe

Member II
Emerald: thank you for pointing the way. It makes a lot of sense to me to do the repair from below.

I wonder if the E25 in fact lacks a true headliner: after your post I went to the boat and poked around a bit. Could it be that what I've been calling a headliner is in fact just the lower fiberglass wafer of a balsa sandwich? I attach three images going from port to starboard: the WHOLE THING IS A SOLID MOLD starting at the dotted red line in the first image. The mold contains molded flanges to hold the bulkheads (port bulkhead is removed at this time). The overhead portion has a rectangle with rounded corners in the mold (indicated by the green arrows).

The fourth image is just the area near the hatch.

I assume I could use a dremel to carefully cut out along this rectangle and then replace it later (somehow). But what am I going to find behind the rectangle? Balsa? Or another fiberglass layer before the balsa?
 

Attachments

  • a.jpg
    a.jpg
    53.2 KB · Views: 60
  • b.jpg
    b.jpg
    48.6 KB · Views: 57
  • c.jpg
    c.jpg
    61.2 KB · Views: 61
  • nearhatch.jpg
    nearhatch.jpg
    45.6 KB · Views: 50

Emerald

Moderator
I know that on my prior E-27, the headliner was very similar and was a separate piece from the bottom of the deck. It did seem to touch the underside in places and not in others. My hunch is you are similar, so when you cut the headliner, you will then be looking at the bottom fiberglass layer of the balsa sandwich. You might be able to cut a round hole in the headliner and use a plug like you can find here:

http://www.mcmaster.com/#plastic-plugs/=3a0zra
 

Loren Beach

O34 - Portland, OR
Senior Moderator
Blogs Author
That interior liner

Joe, I owned another make of boat with the same design of interior frp liner for a decade. You will find that the cabin top was laid upside down in a female mold. First was the outer gel coat, whether one color or contrasting for the non skid, next a thin layer of mat or veil, and then layer(s) of cloth. Next a layer of balsa coring was pressed down everywhere there was a horizontal surface. Then a layer or two of cloth over the balsa. Meanwhile, nearby, in a separate mold, the interior liner was laid up with white gel coat and layered cloth. I am not sure at which point in the assembly process the two were mated, but am reasonably sure that thickened resin was applied over the one side and then the other was pressed against it and held there until it cured. This initial cure would not take long with poly resin.
For the next 3 or 4 decades, various owners are then left to ponder why some areas seem firm and hard and others have a quarter inch or more of give when pressed firmly. My old boat had about a half to three quarters of an inch clearance and when I added or changed any of the hardware on the housetop I bored neat little circles with a one inch (or approx) hole saw to put the washers and nuts on, and then put push-on plastic hole covers/plugs over each hole (sourced from a TrueValue hardware store).

The color of the off-white plugs was close enough that no one ever seemed to notice.

While the production process I am describing seems long on the initial labor to produce perfect tooling.... it eliminated a zillion hours of labor to stick build a headliner and associated interior trim for each individual boat.

Note that this opinion is worth less than the usual $.02 and that corrections from Martin, Seth, and others are more informed!

Regards,
LB
 
Last edited:

Joe

Member II
Emerald and Loren: Thank you very much for helping me along with the very clear explanations. I don't feel totally confused anymore. I'll report back when I learn a bit more about the extent of the moisture. I'm going to spring for a moisture meter: they're expensive but will probably save time/money on this project. To my dismay, the budget keeps on being revised upward.
 
Last edited:

tenders

Innocent Bystander
Personally I think you may be overengineering this. I'd start by using a longer allen wrench to beat out more of the wet pulp, squirt some acetone into the holes to absorb additional moisture, and let them dry for a few days. You might duct-tape a shop vac suction tube to each hole to increase airflow.

Then fill the holes with increasingly thick epoxy. CPES might be good to start with, but I would wonder where, if your holes are on a slightly sloped surface as mine are, that uber-runny stuff is going to end up. Instead I'd use a judicious amount of unthickened West System initially, then as that gets absorbed add a bit of thickener to subsequent pours.

Once everything has set up, then redrill. All the work would be done from above, and the handrail bases will completely cover everything.
 
Last edited:
Top