Oil in coolant?

footrope

Contributing Partner
Blogs Author
Thanks, Guy. Your remarks are entirely appreciated. I have looked into local yards and engine shops for re-engine advice, especially estimates of labor, with a modern 4-mount engine like a Beta 35 or an older, possibly used M-40. A friend who went with a re-engine a few years ago spent 150% of the new engine cost to change his. New mounts, new shaft, etc. Quite successful. A similar experience of ultimate success was related to me by another cruising friend who finally wore out an Atomic 4 and went to a new diesel. Many members of the Ericson board have echoed these stories, too. I spent a little money and time to prove that the problem is likely in the block and I can live with that.

I have a line on an M-40. Age unknown, but it is dusty and a bit rusty from sitting on a pallet here in the PNW. It was bought new and never used and never even unsealed. I think I'll be able go see it next week if we can arrange it. It is complete with heat exchanger and transmission. I haven't looked into a 5432 block or used engine yet. I will ask around about that too. There might be a rough old 5432 diamond out there. I found a Denso injector pump on e-bay, just like mine, right down to the three coats of chipping paint.

The head shop has offered to re-test the head, so if it's not too expensive I may do that. I trust his description of the tests he performs, though. Unless operating temperature is required to open the crack, I expect the head is ok. I certainly heard a couple horror stories of mystery engine problems that survive complete teardown, inspection, re-assembly, and dry-land tests, only to have the same problem when put back in the boat. I won't be going there with this engine.

I did call about my towing coverage from BoatUS. It includes dock-to-dock towing. yay!
 

footrope

Contributing Partner
Blogs Author
If the block is cracked then you are going to need a new block. You seem to have checked most of the other particulars (casting plugs, and the like). What remains if the head is not the leak?

Can you get a new or refurbished tractor block for it? Seems like a short block (except that you would have an extra head then), could be an easier route than trying again with the chance of again assembling without fixing all the issues with the existing block.

(This was a support post for you, not second guessing you, just providing some thoughts, like if we were at the bar, drinking Mai Tais....)


Guy
:)

Finding a different block: An engine block is listed as "available" out of California, from Kubota. Nominally a week to get it up to Seattle. A pleasant surprise. That was using the L285 or L345 for a reference tractor model. $1200 estimate before tax and I didn't ask about shipping. At that price there certainly isn't a head on it. I would need to confirm that the cylinder liners are installed for that price and to find out the block number - e.g. is it a V1501 or V1502? A new head is $1400 before tax and shipping.

But, I am not completely in favor of the new block option, even if the block is the problem. With labor, at a machine shop or engine repair place, total cost could approach the barn find M-40 cost. Internet searches for used blocks and complete used engines of the V1501/V1502 type turned up empty. I did get a lead on checking with someone for so-called "gray" engines that may be available from Japan.

I inspected the M-40 this week. Took a lot of pictures and did some research. It was built in late 1996, according to the engine tag and a call to Westerbeke. I could convert it to a 3-mount to fit my engine bay, at a low cost. I would re-use my front bracket and bell housing. It would require a tapped hole where one does not exist on the front of the M-40 crankcase. The V1501 block has a pad or lobe at the edge of the casting for that extra hole but I can't see that detail behind the front left mount of the M-40, which is a V1502 block. Doing the conversion to a 3-mount would also permit me to keep my large 2nd alternator configuration. Concerns about the M-40 are that both the engine and transmission have been dry for 20 years. Careful prep and a couple hours of running in a cradle are needed to get some confidence in the seals. The engine is not frozen.

So, I brainstormed an idea with Harold to pressure test my block and I hope to complete that test today.
 
Last edited:

footrope

Contributing Partner
Blogs Author
The block is holding pressure

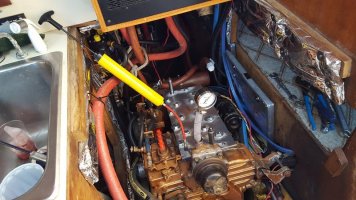
Saturday I filled up and pumped up the cooling system (block, heat exchanger, water heater) to 18-1/4 psi and observed for about an hour and a half. Pressure slowly dropped to 17-1/4 psi. I left it overnight and came back over 12 hours later to find 15 psi on the meter. No transfer of fluid to the crankcase. While I was there Sunday afternoon, as the inside of the boat warmed up, the pressure came back up to about 15-1/2 psi. Test rig is pictured.

20160813_153557-small.jpg
 

footrope

Contributing Partner
Blogs Author
Engine block test results

The cooling section of the block held 14+ psi pressure for three days until I relieved it yesterday. There was some air in the line to the gauge when I relieved pressure, where there had been water at the time I stuck the gauge in. Out of curiosity I refilled water into the gauge hose and it only took about 2 ounces. The oil dipstick was the same level as before I started the test. With so little water missing, I am presuming that there were bubbles in the coolant passages that worked their way out due to the rocking of the boat. In my marina, we get wakes from passing tugs and power boats that can rock the place significantly, so some bubble migration is expected.

I've been doing a little reading on the oil system in the engine. I'm thinking that high oil pressure could be a cause of my problem. There is a diagram and explanation of the lubrication system in the 5432/M-40 Service Manual. This is what I think I learned:
- The oil pressure is regulated by a valve in the oil filter first. Getting the correct filter is pretty important, to keep pressure at a maximum of 64-71 psi.
- Then if the filter gets plugged it has a safety (bypass) valve that opens and lets unfiltered oil circulate, saving the engine from starvation or blowing the oil filter up.
- Both the engine and oil filter have a relief valve. The engine relieves at 140 psi and excess oil is dumped back to the oil pan. If the oil filter relieves, it looks like the oil also is dumped to the oil pan.

I am surprised that the oil filter has a primary role in oil pressure regulation in this engine. I changed oil and filter before running the engine with the new head gasket. The oil filter that was installed at the time the problem appeared was a Carquest. I have a Bosch 3500 on the engine now. I have never used either of those brands before. I have used Fram on occasion, but usually buy Baldwin B2 filters. My usual source for Baldwins hasn't had any lately.
 
Last edited:

Rocinante33

Contributing Partner
Craig,

It seems within the realm of possibility that the freshwater pump could have bad seals and could weep coolant down the shaft and into the oil passages. Have you looked at that pump?

The thought just occurred to me.
 

footrope

Contributing Partner
Blogs Author
Craig,

It seems within the realm of possibility that the freshwater pump could have bad seals and could weep coolant down the shaft and into the oil passages. Have you looked at that pump?

The thought just occurred to me.

Hi Keith,
I took a look at the pictures and diagrams for the two external pumps on the front of the engine. You are thinking of the saltwater pump, which runs off a shaft that is poked through the gear case? I don't think that can be the cause, since no coolant passages are in the vicinity and that pump (which is an Oberdorfer on my engine) doesn't handle internal engine coolant. It is physically isolated from the internal cooling system.

The belt-driven coolant ("water") pump, which is on an extension of the gear case, could have a shaft leak. But the leak would only cause coolant to seep outside the front of the gear case and then down the front of the engine. That pump doesn't have a shaft that goes into the gear case where there is oil present. The back of the shaft seal is in coolant.

I appreciate your comments. I am working on a way to pressure test the oil passage in the head and will post results.
 

Gary Peterson

Marine Guy
When you are ready to test the engine I suggest using water and a mixture of Calgon, or some other dishwasher powder, to totally clean oil from the cooling system.
 

footrope

Contributing Partner
Blogs Author
When you are ready to test the engine I suggest using water and a mixture of Calgon, or some other dishwasher powder, to totally clean oil from the cooling system.

Thanks, Gary. I heard that the powdered dishwashing products (Cascade, etc.) work really well.
 

footrope

Contributing Partner
Blogs Author
Problem found - can it be fixed?

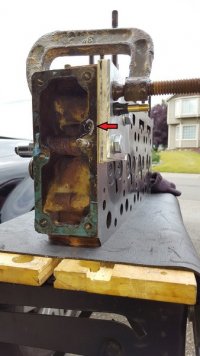
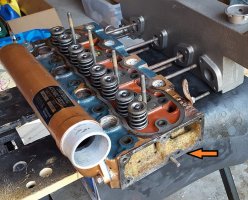
The problem is in the head. It is not a crack. It is the failure of a brazing, a plug, or whatever method Kubota used to seal a hole that was drilled during the manufacturing process, to make the oil passage in the head. See the picture of the forward end of the head, with the coolant/thermostat housing end plate removed. The arrow points to the hole, which is one of four that were drilled to make the oil passage. The coolant plate has the thermostat housing in it and the plate does not block that hole.

To do this test I made a couple small plates to cover the top and bottom oil openings, added the valve stem to the bottom plate, and used a 12v tire compressor to pressurize the passage. There are easier ways to do the same test if you have access to an air compressor and a nozzle with a rubber tip or something similar. The WD-40 I filled the hole with jumps right out when the compressor is turned on. I was not expecting this result. I was prepared to find out I did something wrong on the re-installation of the head. I guess that test will have to wait. I have a video, but it is 50 MB and too large to upload here.

20160831_Test fixture01-small-arrow.jpg
A better picture of the hole
20160715_191311-crop-arrow.jpg
 
Last edited:

hodo

Member III
Oil in Coolant

Hi Craig, Great Catch! I think I would consider re drilling the hole, to clean it up and run a small pipe tap into it, and then install a allen head pipe plug to just below the surface.
I will give you a call...
Harold
 

footrope

Contributing Partner
Blogs Author
I was pleased to find the problem. It means the head isn't cracked which is the best news. I need to let the guys at Hill know about it. Their tests were ok, most likely. Maybe they could add a step to check the passage.

Guess I can order a couple new gaskets. I think you have a good idea. I was trying to think of a way to plug it with an interference fit, but a pipe thread plug would be perfect. It's only about a 3mm hole. I'll talk to you Thursday.
 

footrope

Contributing Partner
Blogs Author
Oil passage repaired

The machine shop cleaned out whatever was left of the plug and drilled/tapped the hole for a hex plug. It looks good, ground flush, and it tests good with my test rig and air pump. So the gaskets are ordered (head gasket, water flange gasket and oil pipe o-ring) but the head gasket will take a week to get here provided the holiday doesn't totally mess up the trucking connection between here and the LA area. The head takes a couple hours prep before it's ready to drop on the block. And the block needs to be cleaned off and the bolt holes chased one more time.

20160902_115837_resized.jpg
 

Rick R.

Contributing Partner
Craig,

Congrats on finding the leak and the repair!

I've been following the challenges with your motor. I have been asking myself, what would I do in your situation? The hard part is the possibility of the problem appearing again after reassembly vs repower. Like most things, it's a roll of the dice. The good news is you know your engine better than most as a result of all of your labor and inspection.

My buddy with a Leopard 38 catamaran went through the same thing with "both engines". We all couldn't believe that he didn't just repower. He struggled through repair after repair, stalled ocean passages (I've been on three of them...lol) and a p.o.'d wife. I am pleased to say that after piles of money and lots of down time, he has two good motors and did not have to repower. He did need a used head he bought though. Good luck!
Rick
 

footrope

Contributing Partner
Blogs Author
Craig,

Congrats on finding the leak and the repair!

I've been following the challenges with your motor. I have been asking myself, what would I do in your situation? The hard part is the possibility of the problem appearing again after reassembly vs repower. Like most things, it's a roll of the dice. The good news is you know your engine better than most as a result of all of your labor and inspection.

My buddy with a Leopard 38 catamaran went through the same thing with "both engines". We all couldn't believe that he didn't just repower. He struggled through repair after repair, stalled ocean passages (I've been on three of them...lol) and a p.o.'d wife. I am pleased to say that after piles of money and lots of down time, he has two good motors and did not have to repower. He did need a used head he bought though. Good luck!
Rick

Thanks, Rick. The folks in the Ericson community, and in the boating community in general, are very supportive and sympathetic about these things. This particular situation lacks the drama and stress of many others I've heard about, although my wife is unhappy with the loss of another cruising season. Fortunately this all happened in the slip and didn't involve smoke or anything (so far). During my talks with mechanics I heard a few tales of drawn-out problems that eventually ended in a re-power, after many hours of troubleshooting labor and days of waiting for various tests to be performed. To be fair, few of them knew the engine well, and fewer still actually had seen the head. I also think the issue with this head may be in the extremely rare category. The only thing I can do to repay them is to let them know what the problem was, once I get a few trouble-free hours on the repaired engine.

Since I did most of the labor myself, I did save money. But I spent a ton more calendar time while I figured out what to do next and how to do it. So, even though I probably spent $2,000 to keep this engine, the alternatives were much costlier. Re-powering would have required a haul-out and introduced a bunch of other uncertainties, besides the increase in cost.

I appreciate the support. I'll post a few more times as I put time on the engine, hopefully to tie a nice bow around the experience.
 

footrope

Contributing Partner
Blogs Author
Turning point

Leak Test Failure

This pressure test failure is more interesting than the one that passed a couple of days later. It is a link to my facebook post. You do not need an FB account to view it.
 

footrope

Contributing Partner
Blogs Author
Some cleanup items

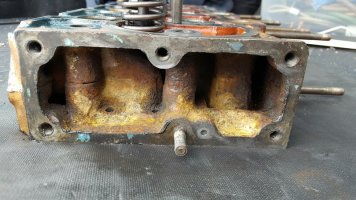
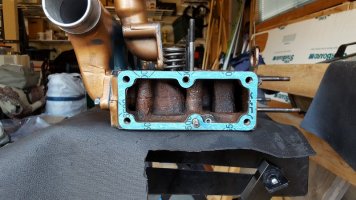
I took a picture of the new gasket for the water flange prior to adding a thin layer of Permatex-type gasket material and re-assembling it. Note that the repair to the oil passage manufacturing hole is not covered up by the gasket. The water flange itself has no mating surface there either. Thus, when the production plug fails, there is a couple hundredths gap for oil to seep into the coolant chamber. Then when the engine cools after shutdown, coolant can go the opposite way into the oil. This explains the very slow leak indicated during the coolant pressure tests Harold and I did prior to removing the head the second time. Coolant was forced back into the crankcase during that test. I used the thin coating of non-hardening gasket goop to ensure a good seal. The water flange is impossible to get off after the head is installed because the water pump housing gets in the way.

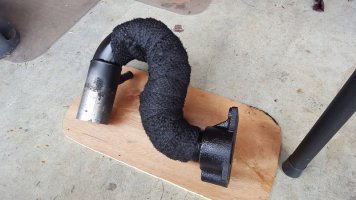
I also attached a picture of my 2" exhaust elbow and exhaust flange. The original wrap for the elbow was a loose fiberglass cloth and it was flaking nasty, tiny glass fibers as I re-wrapped it. I was breathing it for while before I realized how bad it was. I went looking for a different wrap material and ran across similar fiberglass cloth wraps at a performance engine shop. They also had a hi-temp paint (2000 deg F) made for headers. I decided to just buy the paint and re-use the original wrap and then try to stabilize the wrap with the paint. I think it will work and the picture is of the completed paint job. I suspect it will still flake some, but I can rub those fingers off carefully before handling it to put back on the exhaust manifold. I still need to either put on a couple hose clamps or wrap some safety wire around the wrap to keep it secure.

The 2" diameter exhaust system was installed back in 2004, about a year after I bought the boat. The original was 1-1/4" dia.

20160906_125401-small.jpg20160906_133735-small.jpg
 
Last edited:

footrope

Contributing Partner
Blogs Author
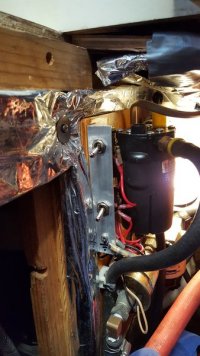
Final little task before re-installing the cylinder head and getting the engine started was to make a new bracket for a new (replacement) fuel pump switch and finish modifying the oil change pump for an external toggle switch. The old fuel bleed switch was a mess of crimped rings that was the positive bus for the power for the engine compartment light and the oil change pump, too.

I replaced the o-rings in the oil change pump since it was leaking all over, externally and internally. It still works, but is in need of a new impeller. It had a push button switch that required me to hold it down to power the pump. It takes 15-20 minutes to empty the 9 quarts out via the pump. Makes my fingers sore and wastes time. So, I re-wired it to add the external toggle switch, which is the top one. The bottom one is the new switch for the fuel pump. This electric fuel pump normally is only used to bleed the engine, but could also back-up the mechanical fuel lift pump.

This was way easier to do with the head off the engine. I didn’t lose any screws, and despite breaking a fatigued crimp ring on the power supply wire, didn't lose any more of my sanity.

Today I'll be installing the head and hopefully will get it running by later this afternoon.

The bracket is made of 1/16" x 1" x 1" aluminum angle.
20160912_182027-small.jpg
 

footrope

Contributing Partner
Blogs Author
The head is installed and the rest of the parts are back on the engine. Bled it and ran it for about 40 minutes today. Coolant system pressure test cold and hot was good. The oil level is stable. I put some cascade into the cooling system. I'll probably need to flush it twice to get most of the oil out.

There is a fuel leak at the base of the injector for #4 and a seep from the bleed ring around the #3. The #4 probably needs a new copper washer and the bleed ring might be from the hose, which has no clamp. Will tackle those tomorrow before firing it up again.
 
Top