My 3/4" solid marine holly/teak sole going in this week >>>

Filkee

Sustaining Member
You have 8 coats of varnish before you put your sole down!!! My sole is varnish-less and 75% installed...still have almost all the edge moulding to install. The word "clean" is relative...depends on whose relative! Oh my sole!!!

Interesting...March 26 Kiplinger Financial Report:
"Also in short supply: Recreational vehicles and boats. Bumper demand
from consumers looking to spend more time outside instead of traveling by plane, plus constrained production lines, point to higher prices. Inventories of RVs are down from a third to a half of normal levels. Boats...down 20% to 60%, depending on type."
Face it. Our respective sufferings are pure joy.
 

1911tex

Sustaining Member
OP here. Very slow but sure...one more section to stain, more plugs, then varnish (or gymnasium finish). All new bronze screws. Removable teak head grate. 3/4" marine backing is "heavy"!! Who says a restoration is cheap and easy...???
 

Attachments

  • B1BFE362-BA09-4906-AD0A-E3E695B4A670.jpeg
    B1BFE362-BA09-4906-AD0A-E3E695B4A670.jpeg
    45.9 KB · Views: 40
  • 2CEC29E8-4878-4326-B192-3137C0C4DD9D.jpeg
    2CEC29E8-4878-4326-B192-3137C0C4DD9D.jpeg
    56.4 KB · Views: 40
  • C5B51D10-6A00-46D8-B403-46143701D996.jpeg
    C5B51D10-6A00-46D8-B403-46143701D996.jpeg
    60.8 KB · Views: 40

Nick J

Sustaining Member
Moderator
Blogs Author
Looks great! What kind of table leg is that? I would love not having to remove the leg and stow it everytime we sleep there.
 

1911tex

Sustaining Member
Looks great! What kind of table leg is that? I would love not having to remove the leg and stow it everytime we sleep there.
trickdhat:
The next episode to this thread will give you the picture answer you are looking for...easier to show than tell, but that is a good guess...you are more correct than you may think!
 

Nick J

Sustaining Member
Moderator
Blogs Author
How am I supposed to handle the suspence in this Netflix world? We just aren't equipped to handle "to be continued" anymore
 

Christian Williams

E381 - Los Angeles
Senior Moderator
Blogs Author

1911tex

Sustaining Member
What kind of table leg is that?

Looks like a Zwaardvis adjustable pedestal from the 1980s. The idea was that the tube would extend down into the TAFG such that the table could become a double berth.

View attachment 38226
Christian you are absolutely correct. The pedestal with its table attached (just refinished) works as both an adjustable height and 360 degree turnable table in up position and lowered, the table ends rest in the extending wood ears you can see in the photo...so that a fitted companion mattress/cushion rests on the table making a nice wide bed with the settee cushions on 3 sides. Kinda hard to explain; however, I will include a photo of both the table and bed configuration once the finish is on the sole and table attached to the pedestal.
 

Filkee

Sustaining Member
BA703A9C-10B2-4308-B3DB-29669A2E0D83.jpeg
Today’s view of paint drying features the same pedestal but with the heavily oxidized and chipping powder coating. Can’t slay every dragon in one winter. I put satin varnish on all the kick panels because the new sole made them look too candy apple shiny.
 

1911tex

Sustaining Member
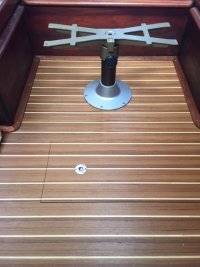
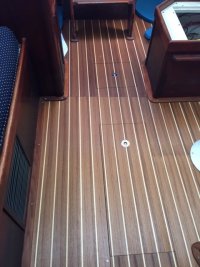
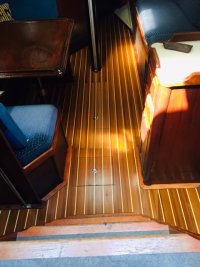
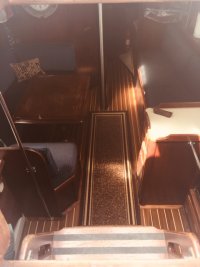
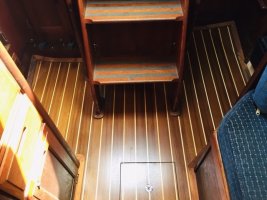
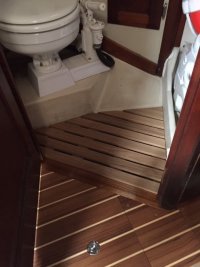
O/P here: OH MY SOLE!! Finally finished it...can't keep up with Filkee, but doing our darnedest! Original plan was for a one week project...it took 3 months! Final cost including everything (and my woodworker helper)...$2500.
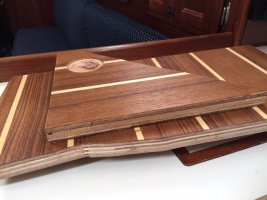
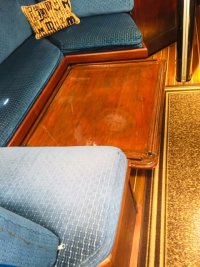
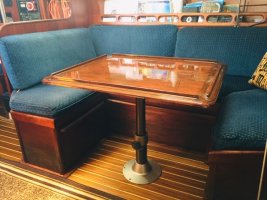
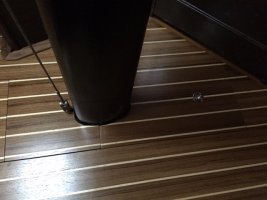
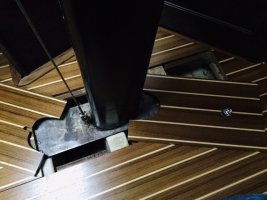
First pic are scraps of the laminated 3/4" marine ply using oil based Urethane satin varnish which made the final cut. Worked late, sorry for the lighting. Self leveling gloss varnish on the table. Head has a removable one-piece Teak section. Now to semi-gloss varnish all the "other" cabin woodwork; not to mention the exterior Teak. HAPPY HAPPY HAPPY
 

Attachments

  • 13F5DCDE-B4AB-4F1B-8BB5-581172A96B89.jpeg
    13F5DCDE-B4AB-4F1B-8BB5-581172A96B89.jpeg
    103.8 KB · Views: 49
  • D71CE4CB-7350-4913-9FCC-C9ECDDF5560F.jpeg
    D71CE4CB-7350-4913-9FCC-C9ECDDF5560F.jpeg
    112.3 KB · Views: 47
  • BB6779A3-8F14-430A-92F3-BFAA459FC6C6.jpeg
    BB6779A3-8F14-430A-92F3-BFAA459FC6C6.jpeg
    87.2 KB · Views: 46
  • 1D9BB128-AD9C-4149-A194-4A0FCA863855_1_201_a.jpeg
    1D9BB128-AD9C-4149-A194-4A0FCA863855_1_201_a.jpeg
    93.9 KB · Views: 40
  • 7D89EFFA-0A28-4C1F-8E3C-64FAA7B31613.jpeg
    7D89EFFA-0A28-4C1F-8E3C-64FAA7B31613.jpeg
    133.8 KB · Views: 40
  • 4424B3C8-FE03-4D6F-BCD6-ACCFA1D0CA53.jpeg
    4424B3C8-FE03-4D6F-BCD6-ACCFA1D0CA53.jpeg
    147.6 KB · Views: 39
  • DE990DC5-C5FC-4FFD-A0E2-8C9457A094A9.jpeg
    DE990DC5-C5FC-4FFD-A0E2-8C9457A094A9.jpeg
    149.5 KB · Views: 39
  • 83104BC7-94EB-48EB-AE95-5CB1F1E08BD2.jpeg
    83104BC7-94EB-48EB-AE95-5CB1F1E08BD2.jpeg
    129.6 KB · Views: 46
  • B1BFE362-BA09-4906-AD0A-E3E695B4A670.jpeg
    B1BFE362-BA09-4906-AD0A-E3E695B4A670.jpeg
    45.9 KB · Views: 48
Last edited:

Cory B

Sustaining Member
That looks terrific. I especially like the teak grate in the head. Whenever I get around to this I am definitely stealing that idea.

One question though, on my boat at least, there is a single sheet of ply surrounding the mast step. I noticed your mast is still in place. How did you divide up the pieces to work around it?
 

1911tex

Sustaining Member
That looks terrific. I especially like the teak grate in the head. Whenever I get around to this I am definitely stealing that idea.

One question though, on my boat at least, there is a single sheet of ply surrounding the mast step. I noticed your mast is still in place. How did you divide up the pieces to work around it?
Cory: There are removable inspection panels fore and aft surrounding the mast step. Used for bilge and mast support inspection I assume. Originals were used as templates. These I think are factory panels. If your sole does not have the removable panels, may be a good idea to cut them as panels....this weekend, I will take a close-up picture of the panels and post them here for you.
 

Nick J

Sustaining Member
Moderator
Blogs Author
This turned out beautifully!

Two questions:
1. How did you make it from your vehicle to the boat carrying those with everyone on the docks stopping you to ask questions / compliment the work?
2. (unrelated to the sole, but a good picture) Does your cabinet door hit the handle of your Raritan head? I just installed one and I couldn't angle it without interfering with the door. I ended up putting it straight facing the centerline. It's close to the bulkhead, but it's the best I could do. I just told the family to angle their legs. It's round so what's the difference?... They didn't buy it.
 

1911tex

Sustaining Member
This turned out beautifully!

Two questions:
1. How did you make it from your vehicle to the boat carrying those with everyone on the docks stopping you to ask questions / compliment the work?
2. (unrelated to the sole, but a good picture) Does your cabinet door hit the handle of your Raritan head? I just installed one and I couldn't angle it without interfering with the door. I ended up putting it straight facing the centerline. It's close to the bulkhead, but it's the best I could do. I just told the family to angle their legs. It's round so what's the difference?... They didn't buy it.
1. Have a cart...the larger 3/4" sheet are HEAVY. I'm generally at the boat 6am on weekends...no observers are present...but thanks for the compliment.
2. Yes the lid and seat barely rubs against the bulkhead. yep, what's the difference! Important thing EVERYONE SITS!
 

Filkee

Sustaining Member
1. Have a cart...the larger 3/4" sheet are HEAVY. I'm generally at the boat 6am on weekends...no observers are present...but thanks for the compliment.
2. Yes the lid and seat barely rubs against the bulkhead. yep, what's the difference! Important thing EVERYONE SITS!
I’ve been trying to convince my son of the sitting rule but he’s being a teenager.
 

1911tex

Sustaining Member
I’ve been trying to convince my son of the sitting rule but he’s being a teenager.
That is the purpose of the removable one piece teak grid section in the head...just in case some fella ignoring the sitting rule.... pull the grid section out, tie a cord and throw it overboard during a sail, bounces up and down on the surface and comes back plenty clean....or just dunk it with a cord in the drink at the slip. And let the one who ignores the rule, clean the bilge under the grid and retrieve the grid. After one time, the rule becomes clear.
 

1911tex

Sustaining Member
One question though, on my boat at least, there is a single sheet of ply surrounding the mast step. I noticed your mast is still in place. How did you divide up the pieces to work around it?
Cory: There are removable inspection panels fore and aft surrounding the mast step. Used for bilge and mast support inspection I assume. Originals were used as templates. These I think are factory panels. If your sole does not have the removable panels, may be a good idea to cut them as panels.
Here you go:
 

Attachments

  • C64ABAC9-6472-4552-801E-21E3322E9B3E_1_201_a.jpeg
    C64ABAC9-6472-4552-801E-21E3322E9B3E_1_201_a.jpeg
    76.6 KB · Views: 28
  • 703D2469-40C4-4855-9787-A297A12DAFEE_1_201_a.jpeg
    703D2469-40C4-4855-9787-A297A12DAFEE_1_201_a.jpeg
    88.1 KB · Views: 27

Ralph Hewitt

Member III
OP here. Very slow but sure...one more section to stain, more plugs, then varnish (or gymnasium finish). All new bronze screws. Removable teak head grate. 3/4" marine backing is "heavy"!! Who says a restoration is cheap and easy...???
Was this in sheets or like flooring tongue and groove?
Did you glue to grid?
 

Filkee

Sustaining Member
Jumping in…teak and holly plywood sheets. I just screwed. No glue. There are trade offs but once you’ve removed the sole once, you’ll swear off glue.
 
Top