You are using an out of date browser. It may not display this or other websites correctly.
You should upgrade or use an alternative browser.
You should upgrade or use an alternative browser.
Andrew Means
Member III
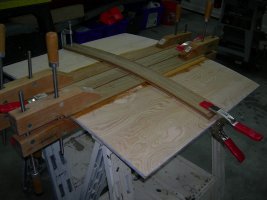
I'm midway through rebuilding my companionway hatch on my E27; I had to replace the forwardmost piece of teak because it had cracked, and in the process noticed that the teak boards had delaminated in places. After pulling the faulty end piece, we stretched the top boards away from the bottom plywood and poured a whole bunch of 3M (some number, can't remember - it was the one that's most permanent) adhesive inside and then clamped the whole thing down while we simultaneously clamped on the new end piece:

You may need to do something similar; the boards gradually delaminate from people stepping/sitting/jumping on the hatch - apparently the cracked end piece is super common too, so you might be overdue for that repair anyway. We upped the size from 1/2" to 7/8" and it's made a huge difference in the rigidity of the hatch.
You may need to do something similar; the boards gradually delaminate from people stepping/sitting/jumping on the hatch - apparently the cracked end piece is super common too, so you might be overdue for that repair anyway. We upped the size from 1/2" to 7/8" and it's made a huge difference in the rigidity of the hatch.
Last edited:
Andrew Means
Member III
Our hatch has 1/4" plywood on the bottom and solid teak top pieces, but we only replaced the end piece during our repair - does yours have no plywood on the bottom half?
Nope. Just the slats. We brought the hatch home this spring and the boss (wife), stripped the old varnish off and then sealed it with several coats of marine varnish. It looked wonderful, right up to the time it rained and drip, drip, drip. I really hated the thought of losing that wood hatch (replacing it with anything) so I pour over all ideas. I thought of the plywood idea but wondered if water soaking through the slats would cause me problems in the future (trapped water). If you post pictures of yours when it's finished, I would love to see your solution. No sailing now in my world so just sit and look at pictures, sigh.
Lee
Lee
Hi Lee,
I rebuilt my hatch using slats (individual boards). To stabilize the boards I used biscuits. There was still some movement and a little leaking so I added a layer of fiberglass to the under surface. That took care of the leaking and 99% of the movement. The movement shows up as a crack in the varnish between two of the boards. It's hard to see, only about 3" long and takes a while after varnishing to show up but I know it's there") .
.
I rebuilt my hatch using slats (individual boards). To stabilize the boards I used biscuits. There was still some movement and a little leaking so I added a layer of fiberglass to the under surface. That took care of the leaking and 99% of the movement. The movement shows up as a crack in the varnish between two of the boards. It's hard to see, only about 3" long and takes a while after varnishing to show up but I know it's there
.Andrew Means
Member III
Yeah, I think Mark's probably got the best idea (fiberglass on the underside).
Andrew Means
Member III
Well if he glasses the underside (and then does a number of coats of varnish) that will give the rigidity necessary to keep the varnish seal from breaking, while also keeping the hatch looking like wood, which would at least be a priority for me, though I suppose I'm not sure about Lee
Andrew Means
Member III
Also, short of rebuilding the hatch and using better adhesive between the boards, you could also do a coat of epoxy on the top before you varnish, which I would expect to seal it pretty darn well, and coupled with the rigidity of the glass on the underside, should be pretty much bombproof. Of course you'll hear differing reports about using Epoxy as a base layer before varnish, but I think it would at least fix the leaks problem, and so long as you encapsulate the wood you shouldn't have issues with moisture getting underneath the Epoxy to cloud it.
Andrew Means
Member III
Didn't know it got that thin; glassing both sides might be the way to get the best of both worlds.
davisr
Member III
Exodus,
Do you have any example pictures of the technique you describe, either from your hatch or another's? I ask, because this would be an unorthodox approach, at least compared to all other examples I have seen pictured on this forum, where hatches are finished with varnish and maintained by ritualistic applications of varnish from now to eternity.
Unorthodox, does not mean incorrect, just different. The techique you describe resembles that used by the builders of wood strip kayaks. I've thought about this technique myself, but it seems that some problems might arise when it comes to wrapping cloth around corners, even if using finely-woven Dynel.
Regards,
Roscoe
E25, #226
exoduse35
Sustaining Member
I do not have any photos as I have not personally had that problem to repair. However you are exactly on target as to where the recommendation came from! In my younger days I used that technique on model boats and a row boat or two and a planked canoe. I think it was shown to me by my grandfather who was tired of stuffing cotton between planks to keep the water out. The hatch is relatively flat and two ends are no problem. The other two ends should be pretty simple too. I would drape the cloth over, trim the front and back leaving a short tab on the sides and then fold the sides down over the tabs. the cloth is so thin that the small seams in the corners will disappear. After a base of cloth is laid down it can be faired with resin or a clear gel coat. the resin will turn the color of the wood just like an oil or varnish so it should give a good result. Of course all that said. I would probably start over and build a new hatch or sand the top fair and then laminate a solid sheet over the old lid.
Keiffer
Member II
Rebuilt sliding hatch
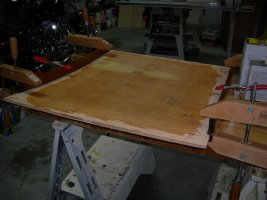
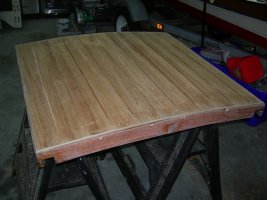
The sliding hatch on my E31 Independence was made from plywood and in bad shape. I was able to re-use the teak frame and decided to build a hatch with teak slats.
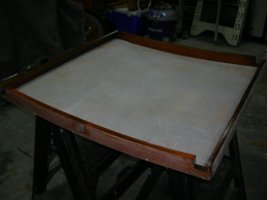
I kerfed a piece of plywood and used the existing frames as a mold to shape the plywood. I filled the kerfs with thickened epoxy to hold its shape, and attached the teak on top of the plywood with epoxy. After additional coats of epoxy and sanding on the bottom I painted it white.
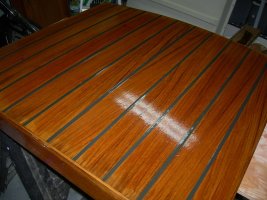
I caulked the teak joints which was pretty much for looks as the entire assembly was at that point coated with epoxy. I finished the teak with ten coats of varnish.
The sliding hatch on my E31 Independence was made from plywood and in bad shape. I was able to re-use the teak frame and decided to build a hatch with teak slats.
I kerfed a piece of plywood and used the existing frames as a mold to shape the plywood. I filled the kerfs with thickened epoxy to hold its shape, and attached the teak on top of the plywood with epoxy. After additional coats of epoxy and sanding on the bottom I painted it white.
I caulked the teak joints which was pretty much for looks as the entire assembly was at that point coated with epoxy. I finished the teak with ten coats of varnish.
Attachments
-
 DSCN7837.jpg85.1 KB · Views: 200
 -
 049.JPG116.8 KB · Views: 288
 -
 025.JPG77 KB · Views: 155
 -
 021.JPG102.8 KB · Views: 125
 -
 003.JPG101.9 KB · Views: 131
Andrew Means
Member III
The sliding hatch on my E31 Independence was made from plywood and in bad shape. I was able to re-use the teak frame and decided to build a hatch with teak slats.
I kerfed a piece of plywood and used the existing frames as a mold to shape the plywood. I filled the kerfs with thickened epoxy to hold its shape, and attached the teak on top of the plywood with epoxy. After additional coats of epoxy and sanding on the bottom I painted it white.
I caulked the teak joints which was pretty much for looks as the entire assembly was at that point coated with epoxy. I finished the teak with ten coats of varnish.
Looks gorgeous! Can we see it installed?


Greg Ross
Not the newest member
Hatch rebuild
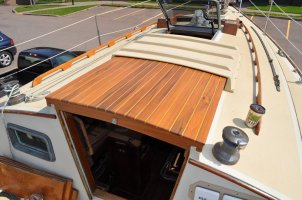
Must be the year for rebuilding hatches. My main hatch was similar in style to Keiffers' mid-ships' hatch, with slats over top of 1/2" plexi and it was in desperate need as well.
Plexi was removed, (teak frame salvaged) fitted with laminated ply set in epoxy and overlaid with teak, also set in epoxy. For contrast we used Pau Amarello otherwise known as Yellowheart. A new aft facing piece was added/ laminated to cover the old fractures from coming up against the stops too hard.
Mid-ships and forward hatches were replaced respectively with 26" Taylormade and 20" Bomar hatches.
Attachments
-
 Main Hatch rebuild.jpg99.4 KB · Views: 117
 -
 Main Hatch under way.jpg96.8 KB · Views: 105