Kenyon Gooseneck Reinforcing Plates

goldenstate

Sustaining Member
Blogs Author
A question for @Christian Williams, in the forum for the sake of general consumption:

I have recently joined the prestigious and exclusive club of people who have broken their Kenyon boom aluminum gooseneck castings. I have been able to order a replacement from Rig-Rite and plan to add a set of reinforcing plates for good measure.

Here is Christian's blog entry about the plates he installed to serve the same purpose:

Here is another thread where a member had a gooseneck fabricated/repaired with stainless steel:

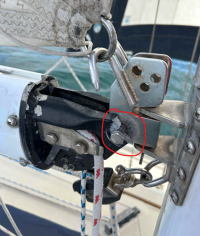
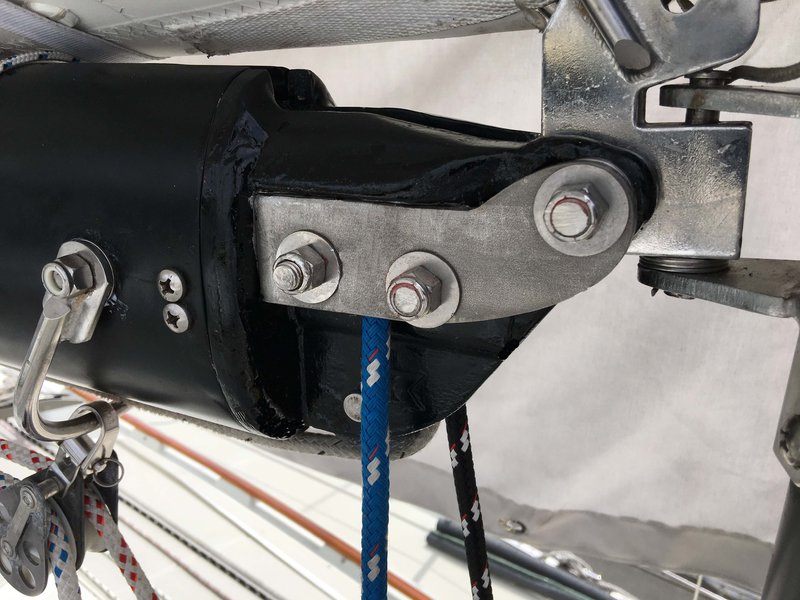
My question for Christian is if you could provide a photo at your convenience of how you have aligned the plates on either side of the gooseneck. I see some washers pictured here on the forward bolt but they appear loose. Do you have a big stack of washers on the aftmost bolts? I presume if the middle bolts are tightened you must have an bushing that is permitting the reefing sheaves to turn freely.


1650391599792.png

On my gooseneck, the reefing sheave bolts are in one plane, the gooseneck attachment is in a second, and the reinforcing bridge of aluminum between the bolt holes is in a third (the widest one, over which the plates must pass).

IMG_5378.jpg

A photo of the underside of the gooseneck fitting as mounted would be helpful. Thanks in advance.
 

Loren Beach

O34 - Portland, OR
Senior Moderator
Blogs Author
While awaiting the guru..... I am wondering if there has developed some wear in the place where the parts fit together in yours? I have the same gooseneck, so am curious to know if there is a future casting failure lurking? It's been a while since my boat was new in 1988.
 

Christian Williams

E381 - Los Angeles
Senior Moderator
Blogs Author
aligned the plates on either side of the gooseneck. I see some washers

Yes, there are multiple stainless washers on either side to fill the space created by the wider span of the new, longer, bolt.

gooseneck washers IMG_2310.JPG


Regarding the different planes, and the need for the gooseneck integral sheaves to turn even when the plates are tightened:

I just kept the original design. The mostly decorative stainless plates had spacers on the bolts to take the pressure of tightening, and keep pressure off the (crummy little plastic) sheaves for the reef lines.

Gooseneck spacer.JPG

The new sister plates merely replaced the original side plates, and lie against the casting in the same way. Same spacers, so the sheaves operate as before. This of course is an E38 gooseneck, I guess other castings might be a little different.

IMG_2226.JPG
Gooseneck without sheaves, bolts, spacers and cover plate.

For the record, these Hunziger plates (which a friend and engineer named Hunziger suggested) have 10,000 offshore miles on them now, and have been through thick and thin with no complaint.

The problem ear of the aluminum casting, shown cosmetically welded in these old pix, has now crumbled again. But it doesn't matter, because the ears no longer bear any force. I'll have to add a few more washers on that side.

A better idea, which I may do, is to obtain stainless spacers ("standoffs") to replace the washers on the long bolt. This would allow the old corroded ears to be sawn off entirely.

UPDATE: I eventually did that: the washers replaced by stainless spacers from McMaster-Carr, the broken ears sawn off with a hacksaw. Before and after:

gooseneck broken ear w washers revision 2022.jpg...gooseneck revision 2022-023.jpeg

Regarding replacement: I thought the all-stainless gooseneck our member made was really cool. When I talked to Rigrite, there was a six-month wait, and in the past Rigrite had been so unresponsive to me that I lost confidence in their advertised services. Sorta like dating usta be.
 
Last edited:

goldenstate

Sustaining Member
Blogs Author
aligned the plates on either side of the gooseneck. I see some washers

Yes, there are multiple stainless washers on either side to fill the space created by the wider span of the new, longer, bolt.

View attachment 42548


Regarding the different planes, and the need for the gooseneck integral sheaves to turn even when the plates are tightened:

I just kept the original design. The original, mostly decorative, stainless plates had stainless spacers on the bolts to take the pressure of tightening, and keep pressure off the (crummy little plastic) sheaves for the reef lines.

The new sister plates merely replaced the original side plates, and lie against the casting in the same way. Same spacers, so the sheaves operate as before. This of course is an E38 gooseneck, I guess other castings might be a little different.

View attachment 42549
Gooseneck without sheaves, bolts, spacers and cover plate.

For the record, these Hunziger plates (which a friend and engineer named Hunziger suggested) have 10,000 offshore miles on them now, and have been through thick and thin with no complaint.

The problem ear of the aluminum casting, shown cosmetically welded in these old pix, has now crumbled again. But it doesn't matter, because the ears no longer bear any force. I'll have to add a few more washers on that side.

Regarding replacement: I thought the all-stainless gooseneck our member made was really cool. When I talked to Rigrite, there was a six-month wait, and in the past Rigrite had been so unresponsive to me that I lost confidence in their advertised services. Sorta like dating usta be.
Thank you!
 

goldenstate

Sustaining Member
Blogs Author
Tom, I you end up taking the fitting off and can get it to me for a short time, I can reverse engineer it and create a CAD model so you can have one CNC machined.
Super generous offer. I will PM you details. Thanks Grant!
 

Christian Williams

E381 - Los Angeles
Senior Moderator
Blogs Author
Grant, that is superb. The forum explored this back when I was figuring things out. When CAD was recommended, I contacted a local firm , explained what a gooseneck was, showed photos. They came back with a bid for the price to make a CAD off my physical example:

$2,500.
 

dxulander

Member I
Noticed my gooseneck has similar problem today. Was this ever resolved, and the fix is by reinforcing it w/ additional material? Wondering if anyone has replaced just gooseneck itself (black part)?
 

Attachments

  • boom_gooseneck_starboard.png
    boom_gooseneck_starboard.png
    1.1 MB · Views: 14

southofvictor

Member III
Blogs Author
I’ve been thinking of rigging an 8:1 boom vang on our 38 but this thread has me second guessing myself. Anyone have an idea how much extra stress that could put on my gooseneck? Is it something I should worry about?
 

ConchyDug

Member III
I have a 6:1 vang that goes to a 8:1 winch... I've yet to fold a boom up. Just watch it on the heavy air gybes, that's kinda standard guidance for any keelboat. I've only seen goosenecks break on gybes with the vangs cranked.
 

Nick J

Sustaining Member
Moderator
Blogs Author
I never thought about it being too much stress on the gooseneck. I hope it's not a problem. Here's the 10:1 I recently installed. I thought it was 8:1, but looking at the pic show's it's actually a 10:1 which should give some insight into how well I thought this one out. Pretty basic but it functions well.
20230822_193111.jpg
 

Christian Williams

E381 - Los Angeles
Senior Moderator
Blogs Author
If a tackle vang goes to a winch, lots of purchase generally not required.

Is 10:1 a requirement of the Boomkicker, perhaps? (I can only see 5 lines in the tackle in the picture)
 

Nick J

Sustaining Member
Moderator
Blogs Author
Agreed, the 10:1 with a winch is overkill

The boom kicker doesn't add too much additional pressure the vang would have to overcome. This wasn't exactly thought out. The boat came to me with a 3:1. I didn't have much experience with it because one of the blocks blew out on our first trip. I sailed without a vang for 1.5years which I wouldn't recommend, but I didn't realize how useful they are until I put it back on.

I purchased the new set of Harken Element 50mm fiddle blocks to lift the engine for the strut work last year and when the project was done, I looked around for where I could use it and the vang seemed like a good spot. 4:1 seemed a little low, so I used a section of dynema I had laying around as a doubler (hidden behind the fiddle blocks in the pic, but you can see it going through the low friction ring), then when I installed it, I ran the tail of the 4:1 through another block which gave me the 5:1 x 2 = 10:1. In light air, I can easily tension the vang without the winch. I hadn't really thought about it until the original post came in and a few members tied gooseneck failure to over tensioning the boom vang.
 

G Kiba

Sustaining Member
Agreed, the 10:1 with a winch is overkill

The boom kicker doesn't add too much additional pressure the vang would have to overcome. This wasn't exactly thought out. The boat came to me with a 3:1. I didn't have much experience with it because one of the blocks blew out on our first trip. I sailed without a vang for 1.5years which I wouldn't recommend, but I didn't realize how useful they are until I put it back on.

I purchased the new set of Harken Element 50mm fiddle blocks to lift the engine for the strut work last year and when the project was done, I looked around for where I could use it and the vang seemed like a good spot. 4:1 seemed a little low, so I used a section of dynema I had laying around as a doubler (hidden behind the fiddle blocks in the pic, but you can see it going through the low friction ring), then when I installed it, I ran the tail of the 4:1 through another block which gave me the 5:1 x 2 = 10:1. In light air, I can easily tension the vang without the winch. I hadn't really thought about it until the original post came in and a few members tied gooseneck failure to over tensioning the boom vang.
I have a 4:1 on the Olson and it takes some strength to parallel the boom. Easing the vang prior to hoisting the main really makes a difference in sail trim on my boat. I can feel the difference in performance but can barely see it at all in the sail shape.
 

southofvictor

Member III
Blogs Author
I have a 4:1 on the Olson and it takes some strength to parallel the boom. Easing the vang prior to hoisting the main really makes a difference in sail trim on my boat. I can feel the difference in performance but can barely see it at all in the sail shape.
I agree the 4:1 is tough to get tight by hand but I'm not a fan of having the vang on a winch or in a clutch. I like to be able to ease it in a hurry if needed. That's why I'm thinking of going 8:1 with something like this, but I'm having trouble figuring out how to mount the fixed point since my vang line leads out of the upper fiddle and to a double turning block alongside my main sheet. My question is how to get the fixed line to clear the vang fitting on the boom if I mount it below or how to keep it from crossing and chafing against the line running to the double turning block if I run it above. Any ideas?
Screen Shot 2023-12-21 at 2.43.03 PM.png


Screen Shot 2023-12-21 at 2.50.24 PM.jpg
 
Top