installing new flush thru-hulls in original chamfered holes

davisr

Member III
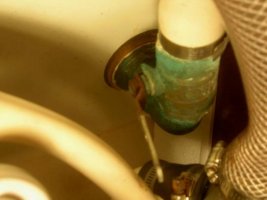
I recently pulled what appear to be the original bronze through-hulls for the head and galley in my E25. Given their pinkish appearance, I know I must replace these 35 year old pieces of hardware. I've read many of the debates on this forum (and on others) about the advantages and disadvantages of using either bronze or marelon through-hulls and seacocks. I'm opting for bronze, since my boat is moored to a trailer and thus does not sit in an electrically "hot" marina.

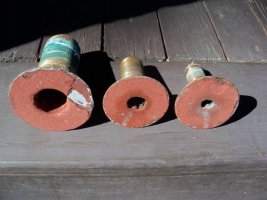
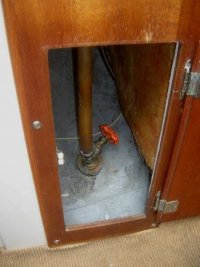
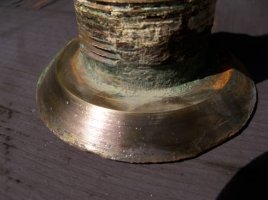
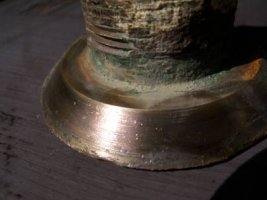
The original through-hulls are flush-mounted 1 1/4 (waste outlet), 1/2 (inlet for toilet), and 3/4 (galley drain). New, bronze flush-mounted through-hulls are not as prevalent as the mushroom-headed variety, so it's hard to shop around for a good fit.

Groco appears to provide the best match for replacements. The 1 1/4 inch Groco is almost an exact match, so I'm not worried about that one.

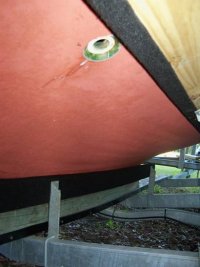
What I am worried about, however, is the other two sizes - the 1/2 and 3/4. The original flanges on these through-hulls are 2 7/16 inches in diameter, but the Groco replacement flanges are only 2 inches. I guess I should consider myself fortuntate the the heads of these flush-mounted replacements are somewhat smaller than the chamfered hole in the hull into which they fit. Is there a techinque, using epoxy or something of this sort, by which I can fill in the gaps around these new through-hulls in advance of installing them so that they will fit snugly in their new homes when the time comes to bed them?

Thanks for any suggestions,
Roscoe

P.S. I should note that I will be upgrading from a 1/2 inch water intake to a 3/4 inch. This upgrade will not require me to increase the size of the exisiting chamfered hole.
 

Attachments

  • E25ThruHullsPicture001.jpg
    E25ThruHullsPicture001.jpg
    33.7 KB · Views: 83
  • E25ThruHullsPicture002.jpg
    E25ThruHullsPicture002.jpg
    45 KB · Views: 87
  • E25ThruHullsPicture003.jpg
    E25ThruHullsPicture003.jpg
    37.6 KB · Views: 70
  • E25ThruHullsPicture004.jpg
    E25ThruHullsPicture004.jpg
    25.6 KB · Views: 71

rwthomas1

Sustaining Partner
I did exactly what you are about to do 5 years ago. Clean out the old thru-hull flush mount "socket" and scuff sand it well with 80grit or so. Clean with acetone, lacquer thinner, etc. Grease the backside and threads of the new thru-hull with vaseline, axle grease, etc. Mix up thickened epoxy to a peanut butter consistency. Use a structural filler, not colloidal silica, etc. Fill the area of the "socket" where the buildup needs to occur and press the greased thru-hull into position. You may need a second person inside the boat to thread on the nut to hold the thru-hull securely. Once installed, leave the thru-hull overnight to cure. A wood mallet or block of wood will pop the thru-hull loose after the epoxy has cured. Sand the surface fair, clean the recessed area with acetone, lacquer thinner, etc. to remove the grease and then install the new thru-hull normally. Works just fine. RT
 

davisr

Member III
Thanks Rob. Your instructions are clear and make good sense to me. Just out of curiosity . . . did you use Groco as well, or did you find someone who had a closer match to your originals?

Regards,
Roscoe
 

Emerald

Moderator
On my prior E-27, I found Buq Algonquin fit really well - don't know if they have a different angle/diameter or not. Of note, I highly recommend increasing any 1/2 inch through hull to a 3/4 inch and installing a proper full flanged seacock. I found the Buq Algonquin 3/4 inch flush mount through hulls fit the socket perfectly. Put a 2x4 on the other side to position the pilot on the hole saw (you'll need a helper to hold, probably) and carefully enlarge the hole on center for the increased diameter of the through hull.
 

Maine Sail

Member III
Davis,

Don't condemn those through hulls until you take them to a brass brush wheel on a bench grinder and really clean them up. Then, if you do see signs of dezincification, they can be condemned. If Ericson used real 85-5-5-5 bronze, as they should have, you should not expect to see much if any dezincification. I have seen bronze seacocks and through hulls at nearly 40 years of age clean up and be nearly as good as new.

From what I see in those pics, though they are admittedly small and the color you see may not be what I can see, they look like they may be in good shape once cleaned up. Once clean they should be fairly uniform in color.
 

footrope

Contributing Partner
Blogs Author
Red bottom paint

I replaced 4 "red" fittings during my 2008-2009 layup. The thru-hulls were showing red on the exposed flange area on the hull but they still had so much meat that I doubt there would have been a problem in 20 more years if I had re-installed them. By the way, I didn't find a 1/2" replacement thru-hull or sea cock and I upgraded to 3/4" by drilling a larger hole and re-working the seat with epoxy. I used Groco for the 1-1/4" and one 3/4". Buck Algonquin had a screened 3/4" that I used for the engine cooling intake.

I was more concerned about replacing the ball valves, which were pipe (NPT) threaded, and replacing the delaminating plywood backing plates. Thru-hulls are machine threads, so the valve threads didn't match. Admittedly, the incompatible thread combination worked for 28 years, but ... you never know anything is wrong until it's too late.

Sea-cocks are spendy, but I think that would be the way to go. Epoxy/fiberglass backing plates would be preferred instead of wood.

Best regards,
 

davisr

Member III
Yes, I've been wondering if the red bottom paint is deceiving me. The splotchy pink discoloration is visible on the inner part of the flange, i.e., the part that has been bedded in the chamfered socket. This pinkish color is most visible on the 1/2 inch through-hull. You can sort of see it in the picture above. I'm wondering if this is just the result of the red pigments from the bottom paint seeping into the socket. I guess there is no way to know for sure unless I clean them up with a bench grinder as Maine Sail has suggested. I should note that the prior owner kept the boat at his private dock (without shorepower) on an isolated brackish riverbank for about 20-25 years. These babies feel solid, but even if they clean up well with no pink at 35 total years of age, it's still hard to say what their max lifespan will be. I've googled around in search of such a life expectancy and have not found any definitive information. I know there are bronze helmets from 2500 years ago in museums. Maybe good bronze through hulls will last indefinitely in the proper setting/conditions.

In terms of seacocks versus in-line ball valves, I'm definitely sold on seacocks. The two valves in the head were in-line ball valves; the one in the galley was a gate valve. Check out the 1 1/4 through hull at the top of this thread. You can tell from the marks that that the prior owner (or whoever installed the ball valve) could only screw it down about 3 or 4 threads. I know that it was very easy to unscrew it. Not much holding it in place.

Regards,
Roscoe
 

Attachments

  • E25ValvePicture001.jpg
    E25ValvePicture001.jpg
    54 KB · Views: 63
  • E25ValvePicture002.jpg
    E25ValvePicture002.jpg
    27 KB · Views: 68
  • E25ValvePicture003.jpg
    E25ValvePicture003.jpg
    45.6 KB · Views: 67
  • E25ValvePicture004.jpg
    E25ValvePicture004.jpg
    44.2 KB · Views: 60

davisr

Member III
Following the advice of Maine Sail, I decided to hit one of my through hulls with a brass brush. Since I don't have a bench grinder, I decided to brush a portion of the flange of the 1 1/4 inch through hull with my Dremel. It easily removed the dull patina and left it with quite a shine. From my perspective it has what appears to be uniform, copper-like sheen, sort of like a freshly minted U.S. penny. The new through hulls that I have handled at the local West Marine have a brass-like sheen to them, so the copper-like color might be a sign of dezincification. Not sure. What I am sure of, however, is that there is pitting clearly visible in scattered places along the flange. Based on what others have seen on other through hulls in the past, should the pitting alone condemn them? This is, after all, what condemns chain plates.

I've done many google-image searches, in vain, to find an image of a through-hull that has been dezincified. There are a few images of corroded through hulls, but no dezincified ones. I'm really surprised that no one has juxtaposed a spent through hull with a new one. At any rate, here's an image of what I think is a spent one.

Roscoe
 

Attachments

  • E25ThruHullDetail001.jpg
    E25ThruHullDetail001.jpg
    21.5 KB · Views: 61
  • E25ThruHullDetail002.jpg
    E25ThruHullDetail002.jpg
    14.1 KB · Views: 52
  • E25ThruHullDetail003.jpg
    E25ThruHullDetail003.jpg
    25.3 KB · Views: 60

Emerald

Moderator
Replace them. It's not worth the risk for the cost. I had what appeared to be a perfectly good through hull snap on me while pushing a new hose on to the barb. This was after replacing everything else attached to the through hull, and I didn't feel like replacing the through hull. I was supposed to launch the next morning. This saved me, shall we say, a sinking feeling 24 hours later. Of note, this was on my '66 Columbia 24 way back, but point still is the same. Too critical an item to mess with for what, $15 each? For piece of mind, do it. You'll never 2nd guess new ones, and I bet in a nasty storm some night, you'd be hard pressed not to think about the old ones...

Just my opinion, and worth what you payed for it. :rolleyes:
 
Top