Icebox Improvement

larossa

Member II
Happy new year to all,

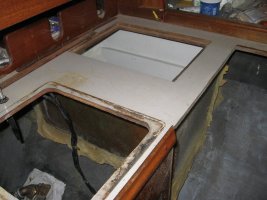
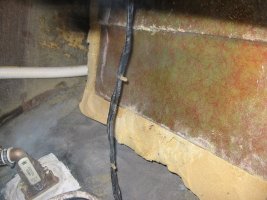
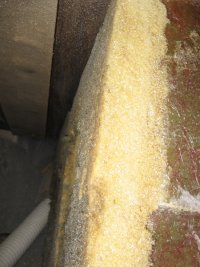
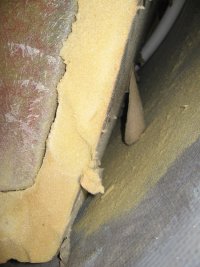
I’d like to improve the efficiency of my 30+ year old icebox. Right now it has the original pour-in-place foam. I do not want to take the icebox out. I can get at all but 1 side to replace the foam. Taking off the old and replacing with something new is what I would like to do. The fourth side, I can possibly add additional foam to the existing foam but I don’t have enough room to take the old off. If I do replace the foam on the 3 sides and bottom, what type of foam should I be looking at and how thick should it be. It is a bit of work, so I want to make sure its worth the trouble and expense. Thanks again for your help; your thoughts would greatly be appreciated

Brian Walter
E31 C Hull #2
 

Greg Ross

Not the newest member
Ice Box Insulation/ improving effeciency.

Brian,
When you say you have access to 3 sides of the ice Box/ refrigeration enclosure, how are you getting there, have you disassembled all the cabinetry around it? I have refrigeration/ Adler-Barbour and will modify that again sometime in the near future with installation of a "Frig-o-boat" Keel Cooler that I picked up (new-unused) to replace the fan/coil heat exchanger.
When I open the cabinet door below the galley sink (Hull #2 layout would be at least similar) I see plywood to my immediate right and the wall beside the the GalleyMate Stove is sheathed in stainless steel. That would be covering plywood I'm quite sure boxing in the front of the Ice Box. Immediately aft then is the water heater and I recollect that end would be boxed in as well from what I've seen from the hatch in the cockpit floor.
Running the 12V fridge, whatever effeciency improvement can be achieved for heat loss is obviously worthwile gain, I would like to do similar.
The materials we see here in Canada that I would think appropriate would be the closed cell "Pink/ or Blue" Construction Foam board products. I suspect they're more effecient then the white ureaformaldahyde beadfoam board.
If you've got space for 2"-3" of that sort of dense product and then bag the corner joints and inject the "foam-n-place" gap filler foam to close and fill all the voids and gaps.
If you can slide a piece of light panelling say in behind the box to give you a form and rather then disturb whatever insulation that's there but just add an extra layer of "foam-n-place" gap filler foam.
best I can suggest.
regards,
Greg
 

Glyn Judson

Moderator
Moderator
E31 ice box insulation or lack thereof.

Brian, Greg and all, I too have an Adler Barbour system for our ice box and you may already know this but on the occasions that I've had our boat on the hard to work on her, and have had power to the electrical system, over several hours, a spot of condensation will form on the port quarter of the hull in the exact location where the lower, aft, outboard corner of the ice box CONTACTS the hull. I can only assume that there is little or no insulation in that corner as well as for some distance adjacent to it. The only effective way I can imagine to re-insulate our ice boxes would be to remove the galley counter top in its entirety, easier said than done given all cabinetry on it. Greg's and mine must be at least five feet or more in length from the back of the dish locker to the port settee and two and a half wide. Brian, yours would of course be shorter but you'd still have the cabinetry removal to deal with. Brian, with all that said, how in the world do you have access to three sides of your ice box? Are you counting the bottom of the box as one of those sides? Curious minds want to know. Glyn Judson, E31 hull #55, Marina del Rey, CA
 

Emerald

Moderator
and just thinking of approaches to this on our boats, The original/prior owner attached about 3/8" thick foam like you'd make a cooler out off to the part of the interior above the shelf and the underside of the the top. I can't say how it is compared to original performance, but I've been surprised how long ice lasts for me, especially in quasi block form. I take the nice thick old anti-freeze jugs like from the Banfrost 2000 and fill them 80% or so of the way to the top with water and freeze them to make my own block ice. No water to make your food soggy as they melt, and back into the freezer for reuse at the end of the trip. It has worked well keeping my box reasonably cold for 3-4 days.
 

jkm

Member III
Brian

I dealt with that one a few years back. I ended up drilling small holes from the inside and used can after can of slow expanding foam (it's denser that the fast expanding). Probably used six or seven cans. It seems to have worked quite well.

I have a cold plate in the box. I fill the box with my food and drink night before, shut off the cold plate, and head to Catalina. Food stays cold for three days.

Not the most high tech way, but very inexpensive solution.

John
 

larossa

Member II
Icebox Insulation Improvement

Hi Guys,

I'm going to try and go out this weekend (its cold) so I’ll take some pictures. What I don't want to do at this time is add refrigeration. This is why I want to improve the insulation. What I can get at are the side that faces the bow (easy), the side that faces the center of the boat (easy), and the side that faces aft (but limited). This is crawling through the cabinet door under the sink. I took the plywood off of the front side and the side that faces the centerline. I can get at part of the side that faces outboard but maybe only to glue on some additional thickness of insulation. As for the bottom, the surface is extremely irregular as far as the flatness of the insulation goes. It’s obvious that the box was poured upside down. So to add additional insulation I would somehow have to flatten out the existing surface a bit in order not to have any gaps. I’ve thought a bit about using the two part poured method but I’m not sure that how well the R value is. I’ve also read about wrapping the insulation with plastic. Anyway I have two major projects this winter which are to improve the insulation for the ice box and to replace the headliner. This will more than keep me busy this winter. As always thanks again for your help.

Brian
E 31C
 
Last edited:

larossa

Member II
Hello Guys,
Well here are the pictures I took from this past weekend. It was a bit cold but with a propane heater I was able to put in a few hours of work for the upcoming season. As you can see I have access to all sides but the outboard and aft side is limited.
 

Attachments

  • IMG_1283.jpg
    IMG_1283.jpg
    92.9 KB · Views: 98
  • IMG_1284.jpg
    IMG_1284.jpg
    113.1 KB · Views: 97
  • IMG_1286.jpg
    IMG_1286.jpg
    73.8 KB · Views: 90
  • IMG_1290.jpg
    IMG_1290.jpg
    69.8 KB · Views: 91

Glyn Judson

Moderator
Moderator
E31, lack of ice box insulation, yikes!!

Brian, What an eye opener. Boy there is little or no insulation around the box. I wonder if making another smaller box or cutting the existing one down would then allow for more foam to be added? My first thought would be to remove the box through the stove space forward and cut out a section through the fore and aft of the box, say six inches or so. Then make a similar pair of cuts athwart and finally one the same to essentially make it six inches shallower. The result would be a much smaller storage area but would afford the space to really get a lot of foam around all four sides and the bottom. Pretty drastic I know, but there's no way to end up with four inches or more around the box other than to make it smaller in all three axes. One could use a power saw with a carbide blade to accurately remove all three sections that could then be glassed back together and be as strong as ever. Can others see a flaw in this thinking or suggest a better alternative? Good luck, Glyn
 

Tom Metzger

Sustaining Partner
If I was willing to reduce the size of the box I would make a box the dimensions I wanted, put it inside the existing icebox, and foam between it and the original box. That would leave the original top opening and the original foam.

I might use sheets of construction foam.
 

WBurgner

Member III
Inner Lining

Gary Petersen might chime in. His Quixotic's box was lined inside with a foam material and epoxied. I am not sure if it was done by Gary or his brother, but he might be able to give some details. It took up about two inches on each wall.
 
Top