I finally decided it was time to clean up the ice box covers. All in it took almost 2 weeks, and about 15-20 hours but the end result was very satisfying!
Here’s a 3 minute video time-lapse:
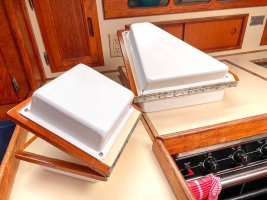
First Step, starting the project. I took home the small cover and started getting an idea of what I was up against. Firstly, the insulation is glued in with silicone and the bottom needed to be scraped with a razor and cleaned with some thinner/goo-gone. Then took to the bath tub and used a chemical Teak Cleaner, let it dry, then used a Teak Brightener. The laminate on the larger refrigerator lid was coming off so I used a zip tie to push in wood glue, and clamped that overnight. Then Sanding begins: started with 150, then 320, and 400 which is overkill.


Next Step is taping and varnishing. I used a household Minwax semi-gloss. Freehand was hit and miss, tape worked well and peeled off clean after 4+ coats


In parallel to varnishing the wood, I scrubbed the plastic insulation covers, then sanded lightly with 220 grit just to rough up. Some nicks I cleaned up with a razor blade then put down a very light coat of spray primer. Built that up with a few minutes between coats. Lesson learned on the first set- is that I could have put down MORE PRIMER because on the first set I sprayed on about 4 coats of semi-gloss, the last coat putting it on really thick until it is just about to run, this gave the bumpy surface a smoother finish. The dimples in the old plastic made a lot of air-bubbles that looked like tiny moon craters until the final thick top coat. It came out mostly smooth in the end. The second set I did a heavier primer coat, then only 2-3 coats of semi-gloss, the last one again- as thick as I could spray without it running. It took 1 can of Rustoleum primer, and 2 cans of Semi-Gloss to paint all 4. I know they'll get banged around so I hope this holds up being thick coats.


Here’s a 3 minute video time-lapse:
First Step, starting the project. I took home the small cover and started getting an idea of what I was up against. Firstly, the insulation is glued in with silicone and the bottom needed to be scraped with a razor and cleaned with some thinner/goo-gone. Then took to the bath tub and used a chemical Teak Cleaner, let it dry, then used a Teak Brightener. The laminate on the larger refrigerator lid was coming off so I used a zip tie to push in wood glue, and clamped that overnight. Then Sanding begins: started with 150, then 320, and 400 which is overkill.
Next Step is taping and varnishing. I used a household Minwax semi-gloss. Freehand was hit and miss, tape worked well and peeled off clean after 4+ coats
In parallel to varnishing the wood, I scrubbed the plastic insulation covers, then sanded lightly with 220 grit just to rough up. Some nicks I cleaned up with a razor blade then put down a very light coat of spray primer. Built that up with a few minutes between coats. Lesson learned on the first set- is that I could have put down MORE PRIMER because on the first set I sprayed on about 4 coats of semi-gloss, the last coat putting it on really thick until it is just about to run, this gave the bumpy surface a smoother finish. The dimples in the old plastic made a lot of air-bubbles that looked like tiny moon craters until the final thick top coat. It came out mostly smooth in the end. The second set I did a heavier primer coat, then only 2-3 coats of semi-gloss, the last one again- as thick as I could spray without it running. It took 1 can of Rustoleum primer, and 2 cans of Semi-Gloss to paint all 4. I know they'll get banged around so I hope this holds up being thick coats.


")
, Opens in a new tab")
