Headliner woes/replacement?

goldenstate

Sustaining Member
Blogs Author
During this hiatus in activity, I have been pondering several boat projects. A number of needs are conspiring against me to prompt the wholesale removal of my headliner (various headliner spaces). I need/want to:

1. Chase new wires
2. Find a leak, or several
3. Inspect chain plates
4. Inspect winch mounts
5. Remove the wires that exit my mast at the interior cabin-top, before the mast is removed at haul out.

I have the zip-up vinyl headliner original to the boat. A small fraction of the zippers still work and I have broken the pulls off of several during my 'testing process.' My expectation is that I will at some point soon pull out all of the headliner and replace it.

There are a number of Sailrite videos about methods to install headliners. This seems close to what I have:


This couple who re-commissioned an E-41 put in some PVC bead board. The reflective white seems to do a good job of pulling light into the cabin:


A previous owner also complicated the use of the zippers with a fold-over cover above the portlights. The zippers disappear underneath.

IMG_7920.JPG

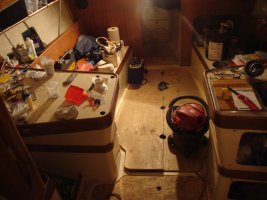
I'm also more than a little pre-occupied by the idea of having to pull all of the cabinets in my head to access the headliner. Do people really disassemble their heads in order to change the headliner? The 'bulkhead' wall does not go up to the ceiling. The headliner floats in between. Good design to sell a boat. Not a good design to fix the boat later. Here is the 'shower stall'. There are several dozen wires routed above the zipper shown at upper left, inside the headliner.

IMG_7971.JPG

Here's the other side of the bulkhead at the left of the shower space, where wires emerge into the nav station and main panel. Did they really install the headliner, and then build in the cabinetry? Very difficult to rehabilitate. It's almost like the boat manufacturer would rather people simply buy a new boat...

IMG_7972.JPG

So:

1. Carefully pull the vinyl, have an upholsterer recreate the original design
2. Add furring strips and use some solid panel product (beadboard, or flat panel) that can be removed with screws
3. Paint the fiberglass underside of the cabin surface white. The boat will be in California, not in Michigan or Tonga. I don't think insulation will make any meaningful difference. This would be easy and inexpensive, if inelegant, and potentially leave me with a visible pasta factory of wires passing into the cabin.

Commentary/suggestions welcome.
 

Loren Beach

O34 - Portland, OR
Senior Moderator
Blogs Author
Having seen pix of sister ships on the web, I have noticed that EY added some more zipper access to later versions of our boat. And, if I ever have a new headliner fabricated, I would use the old sections, after pulling out the hundreds of staples, as a pattern, and adding several more zipper openings.

After accessing our overhead areas several times over the years, I have pretty well figured out how the factory guys did this. Once they developed a good pattern for each section, the upholstery shop would cut, sew, and prep it with about an extra two inches all around the perimeter. The installer(s) would work from the soon-to-be-hidden "fins" across the top of the cabin. Stretch it out, probably with a person pulling on opposite sides, and air-driving staples where the finish teak batten would cover them. Finally they would trim it off about a quarter inch below the staple line, so that the batten would conceal all. Our headliner, except for all of the zipper pulls I have replaced, is still 97% as good as new.
With the quarter inch of soft foam above the vinyl, your head is pretty safe from harm, and the look is great.
That said, the first owner made one ink pen park about 2" long, and it cannot be removed without harming the surface. :(

In a more perfect world, I would prefer to have removable finished panels, but that would reduce the the already "barely enough" headroom in the boat for me. There is 6'2" headroom in the O-34, and I need every fraction of it....

As for the separate under-side-decks vinyl panels, yup. ours are installed the same. Long zipper reachable from inside the cabinets that coverers wiring runs. Still intact, but I also wish they had done it differently. Altho, all systems like this have plusses and minuses.
Regarding the video on installed vinyl, dismaying to see them casually talk about cleaning overspray when the adjacent areas should have been masked off with plastic sheeting. Really bad technique.

Thanks for the pix, and keep us up dated.
 
Last edited:

goldenstate

Sustaining Member
Blogs Author
@Loren Beach - You're a fastidious boat owner.
Are you able to inspect your chainplates by unzipping the headliner?
I don't think I would be able to see everything, even if I managed to unzip the zippers.
 

Christian Williams

E381 - Los Angeles
Senior Moderator
Blogs Author
Pretty sure that all the zippers can be made to work, and in fact the Nylon teeth are probably as new. The aluminum pulls are replaceable. A little awkward, but we've all done it.

I am a fan of the vinyl headliner and of the foam underneath it. I've taken down sections and been able to successfully reinstall using staples, as before. It looks hard to get taut but the material stretches and is pretty forgiving.

I'd think replacing the entire headliner, however, somewhat beyond my personal abilities. If I couldn't get the vinyl clean enough to pass muster I;d probably call in an upholsterer to have a look and give an estimate for the whole job (not a "marine" upholsterer). What looks hard for us is routine for them.

Sailrite--yeah, maybe. I doubt I would glue vinyl to a flat surface. If I had to strip a cabin surface flat, perhaps because the laminate was destroyed, I'd sooner paint it. Just my opinion.

Regarding construction sequence: we have some factory photos that show cabinetry being installed before the deck was put on, but the headliner obviously came after the deck. The reason the headliner vinyl is so tight to the bulkheads is that the bulkhead top trim was installed last. They're just screwed on with plugs and can be removed. That's the way it is on my model year, anyhow.
 

Loren Beach

O34 - Portland, OR
Senior Moderator
Blogs Author
@Loren Beach - You're a fastidious boat owner.
Are you able to inspect your chainplates by unzipping the headliner?
I don't think I would be able to see everything, even if I managed to unzip the zippers.
Thanks, and sadly there does not seem to be medication available.... :(
Our boat has teak 'covers' over the place on each side where the shroud bases pierce the deck. I long ago removed the two plugs on each cover and un-screwed them. Varnished the teak and will never replace the plugs.
In our boat the SS Navtec rods go down thru those and thread into solid aluminum bar stock embedded behind each settee back. So, after withdrawing some screws I can inspect those rods, top and bottom. Like some (all?) of the later Ericson's the O-34 does not have "chainplates" bolted to horizontal bulkheads. IMHO, not a better or worse scheme, just different; and our interior design does not have a cross bulkhead in a place to secure a chainplate to, anyhow.
 

Grizz

Grizz
A timely thread, as Sailrite delivered 6 yards of headliner Thursday and an array of projects, tools and components were pulled off the boat before the yard closed for an indeterminate duration. 1 of the projects/components was the OM headliner in the main cabin, which will be used as a template, including 1 transverse seam with a zipper and 2 pulls that meet in the center, just forward of the mast. This zipper allows access to disconnect/connect the mast head and VHF wires during the spring/fall step and unstep procedure.

In addition to the inability to clean the grime from the OM headliner in this area, the OEM upper tack strips used to fasten the headliner had sufficient dry rot to render them ineffective. These tack strips have been removed, the mating surface abraded/leveled and new tack strips have been glued/secured into place (4200 = to the task).

Plus...yes, there's more, as there are 2 interior grab rails to match the exterior OEM grab rails, which will eventually (!?) be steamed and bent into position. (10) 1/4" base plates to serve as a tack strip have been installed, allowing the headliner to be tacked around the base of the grabrail, not capturing/squeezing the headliner. Trim pieces have been fabbed to cover these grab rail base tack zones.

I'd include pics of the bracing & grab rail strip install, but my Iphone died last week, losing all additional pics into the ether. Ugh. I have included a picture of the brace system used to glue the aft most transverse tack strip and the cabin headliner. There's ample 'fudge factor' built in, as the strips are 3" wide, which is a fair +/- tolerance.

The sewing portion doesn't appear daunting (uh oh! Jinx!) as there's only about 15' of transverse seams to sew, plus the zipper, which I've never done, but Sailrite has a few 'Zippers for Dummies' vids, which have helped.

No clue when/if these projects will resume, but I'm thankful I have a shop to hide/disappear into. Thus far, all materials and components used were stashed/stored in a myriad of places within the shop and house. The Ipod on shuffle has also helped.

This concludes the Saturday early afternoon report. Be safe, take care.

Headliner Brace System.jpgHeadliner OEM Pattern Template.jpg
 

goldenstate

Sustaining Member
Blogs Author
@Grizz Bravo!

I look forward to an update on your headliner project.

Are you doing the central cabin headliner alone, or also the smaller parts in the berths and bookshelves etc.?
 

Grizz

Grizz
Update and answers: just the main cabin, the other components you mention are in good shape and the zippers to gain access function as designed. The color of the new headliner will not 'match', but will 'approximate', which means "close enough". The headliner in the main cabin is intertwined with 3-4 other components, each needs to be completed so the entire project can be completed:
  1. headliner replacement, with edge tack strips replaced
  2. mast partner plywood replaced, as it serves as a tack base for the headliner and a surface to mount the trim piece that covers the tacks that encircle the mast partner
  3. interior grab rails fabricated, which includes
    1. installing bases for the rails to mount to (these eliminate the uneven variables from the fiberglass as-built)
    2. these also serve as tack receivers
    3. steaming and bending the rails on site to match the exterior arc/belly of the OEM exterior rails
    4. These 2 grab rails had to be fabricated from scratch because all the current off-the-shelf grab rails are built with loops with 10" o/c spacing, these Olson o/c's are 15". ugh.
  4. And finally, these 2 new interior grab rails will serve as an anchor point for the block & tackle system to hang/support a pair of pipe berths that have been fabricated, which will put crew weight during off-watch sleep cycles on the high side
    1. these are built for 1 distance race, Chicago to Mac, 300 nm, with the justification being the theoretical speed increase from targeted weight position of .125-.250 kn, which calculates to @ 2+ hours saved at the low end, 4+ hours at the high end.
    2. 'If' this race is actually run this year...
The picture shows 1 completed grab rail and the trim pieces being sized and fabricated that'll eventually cover the tacks that'll attach the headliner around each loop base.

Project Creep is a real thing and definitely in play here, but there's light at the end of this tunnel...and it's not a train. The next 'big event' will be completion of the sewing of the headliner, including zipper run. That's when I'll know there's a chance I can pull this off...

On to the day. Be safe. Take care.
 

Attachments

  • Grb Rail + Trim Covers.jpg
    Grb Rail + Trim Covers.jpg
    247.4 KB · Views: 47

Loren Beach

O34 - Portland, OR
Senior Moderator
Blogs Author
Grab Rail "thread drift" question.....
Did you, in a fantasy moment, consider moving the teak rails to the inside and having some SS rails fabricated for replacing them on the outside?
I ask because replacing the outside hand rails with SS is on my "list." No time frame specified, however, but I am tired of refinishing them even tho I allow them to look scabrous for a couple years at a time.
Also, hope you add some zippers under the aft clutch/winch area, and also under the deck organizers. Wish we had that access.
Thanks for the report and take care.
 

Grizz

Grizz
Loren: I'll admit that I never considered SS, mostly 'cuz our Lake Michigan/Illinois cycles differ from your Portland cycles, as we're out of the water for 6 months, affording time for TLC on the as-built rails, among other items. Plus, with an eye to the 'Shoe String' budget, the cost for that change would be prohibitive. And then there's the aesthetic component of teak vs SS, which is a personal point of view. I'm definitely in the 'if it ain't broke...' camp.
Thus far, there's zero dollars in the wood to fabricate the rails + @ $90 in the (10) 6" 1/4-20 stainless screws and barrel nuts to thruough-bolt together the exterior & interior, the latter shockingly pricey!

As to the additional zipper locations you mention, I am considering the aft clutch/winch areas, somehow, but I'll let the transverse run forward of the mast dictate 'yea/nay' on that option. If I can pull that off w/o it taking hours and hours and looking like Jed Clampett sewed it, then perhaps.

On to the balance of the morning. Take care.
 

1911tex

Sustaining Member
WOW your "sole".....PLEASE tell us about that!!! What a terrific idea! What kind of boards are the inspection plates?
 

Grizz

Grizz
Ummm...I think I understand the question, but it's Day +10 of house arrest stay at home, so things are a bit fuzzy. The sole(s) I believe in question were fabbed in the Fall of 2010 from a combination of 3/8" plywood and OSB I scrounged & found, using the OEM teak/holly soles as templates. Every October for the past 10 years the teak/holly is swapped with these plywood 'over winter' soles, which are screwed to the stringers with maybe 6 drywall screws (1 1/4" max, from memory), these mostly just to eliminate the wobble from the plywood. These soles become sacrificial shop soles, and have been used as a base for braces, mount for a vice and grinder and have felt an array of 'fat-finger' impact drops that didn't induce a cringe.

If I remember to, these get a coat of 'whatever white' paint during the summer, which helps the brightness of the cabin during winter projects. The picture attached is from the 1st 'over winter', before these got painted and screwed into place, and shows typical winter mayhem; this was @ 9 months into stewardship of this lady...with a ton of items to address before that 1st season.

The teak/holly 'Season Soles' receive a couple coats of varnish in the shop in the winter, the underside a coat (or 2, depending) of white paint (on top of the base of white Interprotect 2000) and every May, the process is reversed, with the 'Season Soles' one of the last items installed before the boat is splashed, an activity that generates all sorts of warm & fuzzy emotions, as that action heralds the beginning of a new season.

This year will be different, for sure. Hope this fills in the blanks. Be safe. Take care.
 

Attachments

  • Saturday 5-7-2011 (2).JPG
    Saturday 5-7-2011 (2).JPG
    172.6 KB · Views: 40

Loren Beach

O34 - Portland, OR
Senior Moderator
Blogs Author
That's a practical idea. Must admit that I was tempted to temporarily replace the aft sole section during our engine swap, but finally protected it with fitted overlay of 'masonite' paneling. As long as it's kept dry that product is hard and tough. Worked well and the aft sole was unchanged. We had some short lengths of dimension lumber on it to support the old and new engine for a short time.
Your whole "season sole" concept is great!
Thanks for sharing, and this is one more time that a post here reveals a great idea that was not part of the original post or description. (Kind of like the time you sent me pix of the inside of the companionway entry and I saw your teak grab handles..... and then added them to our boat.)
:)
 

Grizz

Grizz
I'd forgotten about that interaction, and it wasn't due to the slow advance of CRS!

And...to your observation of 'not part of original post', I did have a combination of fleeting thoughts before I hit 'send': 1) 'have I hijacked this thread' and 2) 'how do you switch a hijcked thread into a different/focused thread'. And then the thoughts flitted...
 

goldenstate

Sustaining Member
Blogs Author
As usual, this thread has provided helpful direction to my efforts. My current tactic is not to replace the headliner wholesale, (a la Grizz,) but to try first to resuscitate the zippers in place with new pulls.

I found this good thread from a decade ago on the zipper topic:


Outdoor Wilderness Fabrics is still in business and I hope they ship the handful of zipper slides I just ordered:


Size 5 coils everyone says. Beige.

For my main cabin headliner, it's really only the zipper that bisects the mast that has corroded irreparably. Several of the other pulls above the bookshelves are irreparable, but I do not "need" to remove those as I do the center headliner to disconnect wiring prior to pulling the mast

I think my grabrails are leaking and need to be re-bedded. I also need a new mast boot.

IMG_8008.JPG

My boat has, as other have noted of their craft, a slight starboard list. The headliner staples on the port side are not nearly as corroded as the ones to port, suggesting that the water graping along the interior of the hull is being pulled disproportionately to starboard.

It may also be the main hatch. Does anyone have a clever way of checking beneath the perimeter of the metal trim piece visible from inside the boat? Can one un-tuck the vinyl and hope to tuck it back in? Guessing the entire hatch and trim piece need to come out to get a good look. (Want to replace your standing rigging? No problem. Start by renovating your interior....)

IMG_8015.JPG

Finally, I would add that my mast trim piece is cracked and would be improved by following along on Loren's recent similar project. He may be shooting for closer to perfection than I am, however....

(You guys really want to put new floors in your boats for the off-season? God bless you!) :)

IMG_8006.JPG
 

Christian Williams

E381 - Los Angeles
Senior Moderator
Blogs Author
Can one un-tuck the vinyl and hope to tuck it back in?

Usually there's a trim piece on one side to hide the staples, which makes it "easy." Yes, the original staples are rusty--but even so I recommend using mild steel staples as replacements. It takes them 30 years to rust. I used stainless steel staples for a while, but found them extremely difficult to remove when I needed to start over. There is a bit of trial and error in stretching the vinyl.
 

Grizz

Grizz
One of the trial-and-error discoveries that has helped was the benefit of using a hairdryer on a section of the headliner, warming the area sufficiently to allow a bit of increased 'stretch' of the headliner to permit a fresh untacked edge to accept the new tacks. Just warm enough (like the porridge in the 3 Bears) and @ 12" at a time, with a hairdryer, NOT a heat gun. Patience and technique are a good combination, as there is still resilient life in these headliners (writes the guy who has the main cabin headliner rolled up in the shop...).

Good luck! Time for lunch...
 

Slick470

Member III
Once the season can begin, I'll be in the process of rebuilding the headliner in our Olson 911 v-berth. Sometime when I'm not a couple glasses of wine in, I'll come back and read all of the previous posts, but we had to rip ours out a few years ago due to a bad leak around the the forward hatch, but haven't gotten around to putting it back together.

I have a few thoughts, but would love to follow along to see how you all do it. A lot of the wood holding the headliner in place was rotten, so in some ways I can start from scratch, but I didn't not like the original arrangement.
 

goldenstate

Sustaining Member
Blogs Author
Breadcrumb back to my recent blog post about installing a couple of replacement headliner zipper pulls.

If not for the corroded pulls and a few rusty staples, it would have been a 5 minute job.

Cheers for the suggestions and pointers.
 

Mr. Scarlett

Member III
This seems like a good thread to bump....
We have a portion of our liner over the starboard settee that wants to fall off, and a section near the chart table that had to come down during some un-wiring. I do plan to tackle this properly, but not right now, and not all at once. I'm wondering if anyone has tried the 3M General Trim Adhesive shown in the OP. Seems like it might be a good band aid. Any other recommendations appreciated.
 
Top