Handrails E-35 MK II

Dave Neptune

Member II
Greetings I'm new and this is my first post. My old 1970 E-35 has had the handrails come loose and begin leaking terribly. The port side was the worst and had to be removed with a saws-all and a chisel. The screws from the factory (and a few added by the previous owner into the deck)were screwed into wood-nuts bonded into the cabin top, a less than good way tro mount with such a narrow base. Now to the problem the boat was shipped with the optional handrail in the cabin (starboard side) which is very handy in a seaway when moving around below. I have the drawings supplied by Ericson when the boat was shipped. Those drawings show the inside and outside are screwed into each other with the deck and glass liner between them. Does anyone know if this is actually how they did it. I wish to keep the inside h/rail and do away with the outside one if possible. I like the looks better without them. I also have a new set purchsed from Seacraft cut for the 35 that I would like to get rid of. Anyone have any experience they could share about this?

Thanx Dave Neptune
Alimitos Bay, So. Ca.

Volador :egrin:
 

Tom Plummer

Member III
When I rebedded the handrails on my 1981 E35 the hand the inner and outer handrail were indeed through bolted just as you described in your post.
 

chaco

Member III
Looks is not the Issue

Safety is the Issue. I hang on to my handrails ALL THE TIME when moving
forward and aft during Sailing. I do NOT like spending my sailtime maintaining
BrightWork. These Handrails are an essential part of your Boat :) I would replace my wood handrails with SS tubing in a HeartBeat.
You have new wood Handrails and need to attach them properly.
Screwing Handrails in to each other is Nonsense. The way to do this is to
ThroughBolt your Handrails through the Cabin with SS machine screws and
fender washer backing on the Port Side. SS machine screws through both Handrails on the Starboard Side. Sika Marine Caulking is a good bedding compound for this application :nerd:


Happy DRY Handrails :egrin: :egrin:
 
Last edited:

steven

Sustaining Member
I just had my yard pull and re-bed my star. side handrails (and also, winches, cabin top fittings, and portlights - everything that penetrated the cabin that was leaking). They told me that the inside and outside rails are through-bolted to each other as you describe. They also told me that there is plywood core in that part of the cabin top. Part of the core was wet but not rotten or delaminated so they dried it out, then rebedded the rails and re-installed with ss screws.

I'm hull#446 from 1976, so yours may be different.

--Steve
 

CaptDan

Member III
Grab rails

Replace them with well secured upgrades. Alleviating the exterior rails is a bad idea; there are paltry few reliable things to grab onto when moving about the deck underway.

My '77 E35 has two interior rails screwed to two exterior ones. The forward fasteners in the exterior rails loostened up a few years ago and it was a royal pain dealing with it. I ended up 'sistering' longer stainless screws into the rails' ends, then rebedding the loostened tips and bunging the screw heads. Haven't had a problem since.

This isn't the most fun job you'll undertake, but if your rails are falling apart, remove the old ones, and either go with stainless - as Chaco suggests - or new, throughbolted teak units.

The handrail attachment method wasn't one of Ericson's shining moments, IMO.

Capt Dan G>E35II "Kunu"


I
 

Loren Beach

O34 - Portland, OR
Senior Moderator
Blogs Author
Railing against rail removal

There have been some fun exchanges on this site, over the years, on the looks of teak hand rails vs. the low maint. of SS rails (or, as Kim put it, going over to the Dark Side....) :)

What with local ss fabricators to contact and the possibility of getting a bid from any one of the several big US production sailboat builders on a pair in the length range that fits your boat, I would put together and RFP and do some calling and writing.

Admission: I do love the look of freshly-varnished teak rails and trim. Equally true: I do dislike sanding and varnishing.

So I keep Light Cetol on our exterior teak, every other year... or until it starts to look bad. :rolleyes:
But IF we ever get a break or crack in either of those long teak hand rails, they *are* getting replaced with ss!

Yeah, I know, the holes likely will not match up. Fill 'em and redrill (and epoxy in the new holes, too).

Best of luck, and, to echo some other comments here, DO keep those external hand rails. They will save your life one day.

Best,
Loren
 

gareth harris

Sustaining Member
Welcome - always good to have another owner here of the greatest boat ever built.

I have had the same handrail problem, and got new teak rails for the interior and exterior. Below are some instructions I wrote a few years ago for someone else replacing his rails.

Gareth
Freyja E35 #241 1972

1. Remove old handrails.
If the bolts will not turn, just use a crowbar under the hand rail.

2. If the bolts unscrew, then once the hand rails are gone, use the same size drill bit into the hole, and the nuts will come up on it. Drill gently to not damage the bit.

3. Drill right down through the hull into the cabin.

4. At each hole in the headliner, use a 1" hole saw to cut access to the deck.

5. Use a 3/4" hole saw from above to cut right through the deck at each hole.
5A. Some people prefer to use a bent nail, allen key, or some such device in their drill to dig out the balsa core instead of using a hole saw all the way through the deck, I find it very difficult to get all the core out that way.

6. Push some duct tape up through the headliner to cover the hole in the deck, and seal it the best you can. Place some plastic beneath the holes to catch drips from step 7.

7. From above, pour in a little epoxy to the hole. Let it just start to gel, but not go hard. The intention is to wait until it has sealed any drips right through the deck, and then fill the hole while the epoxy is still bonding.

8. Thicken more epoxy with adhesive filler to the point that it will JUST run, almost like peanutbutter. Pour this into the hole until it fills. Be ready to top it up a little if it is still leaking at the bottom. Let it harden fully (overnight).

9. Drill new screw holes for the handrails right through the epoxy fill. Place a 1" circular backing block in the hole in the headliner. Secure the hand rails with appropriate sealant, bolts long enough to go right through the deck and fasten to nuts under the 1" circular backing blocks.

10. You can also mount interior handrails directly under the exterior, which are both useful and nicely cover all the work from inside - teak is expensive of course.
 

timday5

Member II
I have had the same handrail problem, and got new teak rails for the interior and exterior. Below are some instructions I wrote a few years ago for someone else replacing his rails.

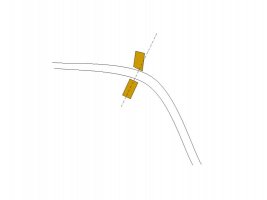
Gareth, did you mount the handrails so that they are (A) plumb (vertical), or (B) perpendicular to the cabin top? Of coures, if the cabin top where you mounted yours was level, your answer would be yes and yes... but where mine are located, sort of on the "shoulder" of the cabin top, the PO had angled the handrails so that they were almost vertical. However, this means the through bolts bore through the rails at an angle.
 

Brisdon

Inactive Member
I had new handrails made at H & L, and they are meatier than the original ones (a full inch thick). I had them make interior handrails for both the port and starboard sides. The exterior handrails go further forward than the interior rails, so in the head and passageway you see washers and acorn nuts on the liner. Where the rails are back to back, they are through bolted. I wouldn't eliminate the exterior rails if I were you. They are good to grab, but also to lash things down to when needed. A friend of mine has done hers out of Starboard, so she won't have to varnish.
 

gareth harris

Sustaining Member
I cut the top handrails with a slight angle to make them more vertical. I did not attempt to cut a curve to exactly match the deck, figuring it would have to be filled in with sealant.

The internal rails were cut perpendicular, since they mount below spacers through the headliner.

My last post was done in a hurry, here are a few other thoughts:

Teak usually comes in inch thick boards, there is no reason to plane them down, so my new hand rails were thicker and more solid than the originals, as Brisdon mentioned. Since teak is so expensive, consider carefully the width of the boards you buy to maximise the parts that are used. Perhaps one long board to cut both the top rails, and a shorter one for both the internal.

Make sure the width of the boards is enough that you have enough height in the rails not to take the skin off your knuckles on the non skid.

Forward of the main bulkheads in the cabin, there was room for a short hand rail in the head, which nicely mounted right over the sink, and I think one on the other side too (I am too far from the boat now to check). There were one or two bolts from above that needed to be cosmetically tidied up as best as possible.

Anyone who makes them out of starboard should be banished to roam the seas alone forever.

Gareth
Freyja E35 #241 1972
 

timday5

Member II
I cut the top handrails with a slight angle to make them more vertical. I did not attempt to cut a curve to exactly match the deck, figuring it would have to be filled in with sealant.

The internal rails were cut perpendicular, since they mount below spacers through the headliner.

My brain is stuck at this part. With some certainty that I am missing something obvious, here's my follow-up question:

If the top handrails are vertical (something other than perpendicular to the cabin top) and the inside handrails are perpendicular, how did you line up all the holes? Or is that not an issue if you are going to plug anyway?

If you use the holes you drilled in the cabin top as a guide, it seems like it would be easy to drill through the side of the hand rail.
 

Attachments

  • Hand Rail Enigma.jpg
    Hand Rail Enigma.jpg
    10.8 KB · Views: 61

Brisdon

Inactive Member
THis was a few years ago, but once I had the angle that I wanted for the top rails, I loose bolted them and checked the bottom rails by sliding them on to the bolts to see how they met to the head liner. I can't remember if they got the same angle as the above deck rails, or whether it was slightly different. The hollow gap between the cabin and the fiberglass headliner had to be filled with thickened epoxy and then redrilled. Other wise the space between the two would try to close and morph the headliner.
 

gareth harris

Sustaining Member
TThe hollow gap between the cabin and the fiberglass headliner had to be filled with thickened epoxy and then redrilled. Other wise the space between the two would try to close and morph the headliner.

That seems a good method, since it would allow you to set the angle of the inner hand rails to a degree, although it must have been critical to mix the epoxy right to keep it in place while it set.

My solution was to fudge it with wooden spacers through the headliner. The angle at the base of the top hand rails was not very large, and they are not vertical, just a bit closer to vertical than perpendicular to the deck. The difference in angle to the interior rail is taken up by the spacers.

Gareth
Freyja E35 #241 1972
 
Top