Handhold Refinish Advice

fool

Member III
I should also temper my favor of Cetol by saying I don't expect to touch them again for finish for the next five to six sailing seasons, perhaps longer if faithful about using the sun covers. Inspections on the other hand will continue to avoid premature finish failure or worse, failure when reaching for a handhold...
 
Last edited:

tenders

Innocent Bystander
Call me a Philistine if you want, but after refinishing my handrails several times I noticed one of them seemed weak and as I idly tugged on it wondering how weak, it broke off in my hand.

I took the handrails off, carefully filled the mounting holes with epoxy, and had new ones made of 3/4" Starboard that I had left over from a big hatchboard/cockpit coaming replacement project. A boat shop in Ithaca, NY did it that advertises in Good Old Boat. I added a set of interior handrails to the order - NICE.

That was 2011. All the handrails are still in my basement. I can't say I've missed them on the boat.
 

Christian Williams

E381 - Los Angeles
Senior Moderator
Blogs Author
If stainless is the answer, Railmakers in Costa Mesa will fabricate anything to your design, matching existing holes and bends.

Not all that expensive, either, usually.
 

Wet Willy

Junior Member
Eternal debates rages on....


I’m a varnish guy. Valkyrie’s teak rails were refinished as part of a refit in 2011, five coats for hatches and handrails. Once that was completed, one coat at the beginning of each season has been all that’s required.


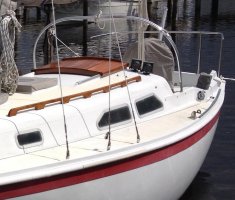
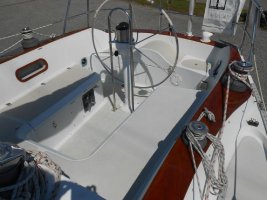
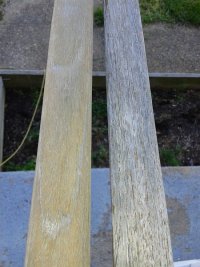
Handrails were removed and bleached for the refit; the only casualty was one crack that was easily repaired. After sanding with 3M Fre-Cut 220, two coats of Captain’s Varnish were applied before installation. First coat of varnish thinned 25% with Pettit 120/T-10 Brushing Thinner, second coat thinned 10%, Handrails did not straighten and were easily re-bedded/re-installed. After installation, new teak plugs were set in varnish, and matched perfectly after the final three coats of varnish were applied - full strength, or thinned slightly if needed for better flow. After lightly sanding between coats, I do wipe the handrails with rag and paint thinner, and then a tack rag just before finishing. For handrails I use a 1” bristle brush, and no masking tape except for very tight situations, with 3M Adhesive Remover close at hand. Hatches are taken off the boat for finishing. I sand/varnish as the last job on a spring day when I’m leaving the boat, so I’m not losing sailing time. I do use sun-covers, as seen in the photo below, taken during fit-out last season (handrail covers not shown). The dodger, when installed, serves to protect the companionway hatch.


Full disclosure: all the other sailors in our group swear by Cetol.


Headed down tomorrow to get started for this season!!


Attachments

  • IMG_0639.jpg
    IMG_0639.jpg
    89.6 KB · Views: 399

EMKoper

Member II
OK -- didn't get to the hand-holds but ....

... Didn't get to the hand holds (totally) but experimented with cleaner, brightner, and oil ... so far, I like the results for the amount of work. I realize the oil might need some near-term re-application but let me marvel on the nearest-term results! Will move onto the handrails when a little bit warmer (ducking the snow this week).

Before:

attachment.php


After:

attachment.php


Happy with this for now ... will hit the hand-holds after bottom painting.

<smile></smile>
 

Attachments

  • 20160403_135855.jpg
    20160403_135855.jpg
    94.2 KB · Views: 284
  • 20160403_155114.jpg
    20160403_155114.jpg
    86.4 KB · Views: 333

Christian Williams

E381 - Los Angeles
Senior Moderator
Blogs Author
Looks good. You know, my present boat doesn't have that trim piece on the stern. Just gelcoat there.

I found maintenance of that piece difficult, with all the fittings in the way.

attachment.php
 

Attachments

  • ERicson 38 Vetus cowls installed.jpg
    ERicson 38 Vetus cowls installed.jpg
    105.4 KB · Views: 625

EMKoper

Member II
I like the wood trim on the cockpit

I found that I really like the wood trim around the cockpit combing area ... I looked at this Sabre 32 before I obtained my E35 and the trim made the space feel just special. Makes me want to add teak on the horizontal along the cockpit ... one thing at a time. :esad:
 
Last edited:

EMKoper

Member II
Like this!

I found that I really like the wood trim around the cockpit combing area ... I looked at this Sabre 32 before I obtained my E35 and the trim made the space feel just special. Makes me want to add teak on the horizontal along the cockpit".. one thing at a time.

Photos of a an E35 from yachtworld:

attachment.php
attachment.php
 

Attachments

  • 4434714_20130906143903018_1_XLARGE.jpg
    4434714_20130906143903018_1_XLARGE.jpg
    91.6 KB · Views: 288
  • 4434714_20130906144020378_1_XLARGE.jpg
    4434714_20130906144020378_1_XLARGE.jpg
    81.4 KB · Views: 283

Loren Beach

O34 - Portland, OR
Senior Moderator
Blogs Author
Photos of a an E35 from yachtworld:

attachment.php
attachment.php

Interesting equipment trivia from a couple of pix......
That boat is used mostly in "crowded" waterways and so the AP control is by the helm, like ours.
Yet it ventures into blue water or overnighting sailing sometimes and thus has pad eyes for tethers in the cockpit and also adjacent to the helm, like ours. Stern-mount radar post also like us.

Good Heavens, that's lot of teak to maintain! :0

Loren
 
Last edited:

csoule13

Member III
A little late to the thread, but for those wondering what some light sanding w/ 180 grit looks like, here you go. These are from an '83 30+, handrails are off the boat for another project. The left is maybe 15 minutes of sanding. The right is the original condition. I'll probably go over it with some Comet or other gentle household cleaner, but given where they started, I'm pretty OK with the end result. Good luck to everyone battling the teak war these days!

attachment.php
 

Attachments

  • handrails_before-after.jpg
    handrails_before-after.jpg
    65.6 KB · Views: 442

Christian Williams

E381 - Los Angeles
Senior Moderator
Blogs Author
Right, now oxalic acid (wood bleach). It may take five coatings. Let it dry in the sun between each. Then wash with water.

Should come out pristine.

If not, there is residual varnish or Cetol or CPES or some other previous coating absorption, so sand more. Take the surface right off.

Then the protective treatment of choice, oil/varnish/whatever.

Or, of course, you could declare it close enough for jazz, and actually go sailing....
 
Last edited:

Martin King

Sustaining Member
Blogs Author
Brightwork OCD

My rails were pulled off the boat, hung in the garage from the rafters and stripped of the existing brightwork. 8 or so build coats of varnish were applied followed by brushing a topcoat of clear LP, Sterling brand in this case. They have not
been touched in 15 years and still look damn good. With your rails, I would pull them off, strip whatever finish is on there, epoxy coat only the bottom followed by varnish, reinstall them with new bungs and finish it in place. I don't know about
your experience, but I've tried the west epoxy underlayment trick on exterior brightwork and lived to regret it. Unless the wood is fully encapsulated including any fasteners, moisture from within will first turn the film cloudy and eventually
lift it. If you think stripping varnish is bad, wait until you try scraping epoxy off!...Lol. And you are going to need more than 2 coats of varnish to give it enough uv protection. Whatever you decide, if it's wood, do yourself a favor and have
some nice sunbrella covers made, they do an admirable job of extending the life of any coating.

Martin

Dorade&guard.jpg
 
Last edited:
Top