Halyard Organizer Plates

simdim

Member II
Folks,
Hope everyone had wonderful holidays!
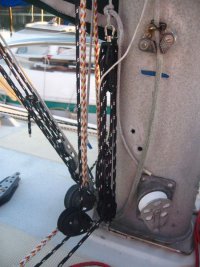
Though temperature outside is balmy 6F it is time to think about refitting for the new season. I wonder what you would say about installing Organizer Plates ( http://www.dwyermast.com/items.asp?...milyID=19&familyName=Halyard+Organizer+Plates )under the mast step as opposed to installing mast base blocks that are bolted to the cabin top. How big of a deal is it to remove ( and reinstall) a mast step (i am storing with mast down this winter). I really want to move all lines aft with minimum trough cabin drilling...
 

tenders

Innocent Bystander
My term for that thing is a "witches' hat" or a "witches' head." Not sure where that word came from or if it's even correct but I'm pretty sure I didn't make it up!

My 32 has that installed under the deck-stepped mast with holes protruding from all four sides, and it's quite useful. I do not know how it got put on, though.
 

rwthomas1

Sustaining Partner
I put one of those on a Catalina 22 to do just what you are asking. It was pretty simple, it just bolted on underneath the mast step. Don't know if it would work on your boat. RT
 

Moor'ea

Savage Sailor
They sometimes go by 'Gadget Plate' as well.

I've got one on my 29' and works great. I've got Reef 1 led aft, Main Sheet - which is double ended, main halyard, jib halyard, spinnaker halyard, outhaul, cunningham, vang, boom lift, topping lift, foreguy all led to the cockpit (if you can believe it) Well, that's the plan anyway. still working out the details on the spinnaker rig. Having the plate at the mast base affords several blocks placed pretty close together without having to drill myriad holes right at the base of the mast, a place I am rather reluctant to go drill crazy... The plate itself is just wedged between the mast and the deck. take the mast step off, mark off where the holes in the step are in relation to the plate, then bolt the whole assembly back on the deck. no additional holes needed. Should be no problem with the mast already downl

this pic is missing a few lines that have been removed for the winter. The 'salsa braid' is the mainsheet, the fiddle assembly there is the cunningham, which is part of a cascade affording an 8:1 purchase. same goes for the vang. outhaul comes down from the gooseneck in between the cunningham and mainsheet. I'll get some pics up of the full rig when I finish a few other winter projects and get sailing again... like installing a gibmalled oven :)
 

Attachments

  • IMG_3983.jpg
    IMG_3983.jpg
    54.8 KB · Views: 432
Last edited:

steven

Sustaining Member
I had one on former boat - Hunter 27. Just seated over the mast step and under the mast - not bolted down. Worked great. When I next pull the mast on Indigo I'm going to put one on. But I don't know who sells them these days.

--Steve
 

Frank G

Member II
I bought mine for my old Catalina from Catalina Direct. I don't know if they come in different sizes.
It had a hole in the middle of it so you could put a lag bolt through it, the deck, and into the wood center post in the cockpit.
I also bedded it with 4200. You don't want it to slide around if you have differential side loads.
A very handy device and well worth it.
 

simdim

Member II
Folks,
Thank you all for the info. Looks like putting the plate under step is not going to be a major undertaking (as soon as temperature rolls over 35 for a day or two will go and inspect how my step is mounted). From my understanding of applied forces (turning blocks by the mast will take the brunt of load ) I am planning not to put backing plates under deck organizers and clutches - just mount them to the cabin top with 4200 to seal. Am I off base here?

Cheers,
 

Moor'ea

Savage Sailor
you're just about right!

here is a thread detailing the installation of the clutches for my array.

http://www.ericsonyachts.org/infoexchange/showthread.php?t=7067&referrerid=1480

I sail primarily in SF Bay, which in the summertime has regular winds in the slot of 25-30kts, so the loads on my rig can be pretty heavy. I opted to not use a backing plate, but instead drilled out oversized holes and filled those in with epoxy, then drilled the fastener holes through the epoxy 'slugs'. This translates all the compression load to the epoxy and not to the balsa core of the deck. I had a problem of tearing though the bottom layer of glass in the deck and blowing away the balsa core. They also lower the sheer load impact on the deck by having the loads transferred to a larger area of the deck.

As far as bedding compound is concerned, I used Sikaflex 291 fast cure, but 4200 or 4000UV would work just as well.


cheers,
Jay
 

Attachments

  • IMG_8385.jpg
    IMG_8385.jpg
    72.4 KB · Views: 403

simdim

Member II
Jay,
I had looked at that post (and your blog - hope you will continue posting your progress there :egrin:
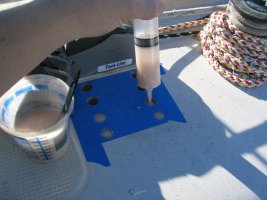
). and have a question - what was the reason to drill all way trough? I was planning to just to drill 5/8" holes from the top, remove the core and fill the void with epoxy - one of my goals is to reduce the cosmetic damage to the inside of the cabin.

Cheers,
 

Moor'ea

Savage Sailor
The only reason I went all the way through was so that I could through bolt them. I'm not sure a tapping screw would have enough 'oomph' for my application. In addition to sailing in the Bay here, the boat is being prepped for offshore use. The headliner in my boat has gone though a few years worth of upgrades here and there and looks like swiss cheese :-( I still haven't figured out what to do about that!
 

hankcope

Junior Member
just the ticket!

Moor'ea
The organizer plate looks nice - nice fit, and nice work. I've had this on my list for a while - its time. Do you have a source or part# for the organizer? Ballingerspars as per Mark F?

Simdim - if you still have your mast down, any chance you could post a pic of the mast bottom and cabin top so I can see what to expect?

Glad to see the posts - thanks.

Hank
'79 E29 LittleWing
 

Cory B

Sustaining Member
When I put one on our old 32 I bought it from Seal Spars. It was a worthwhile upgrade. I was repairing the rot under the step with epoxy/glass, and attached the plate with a few decent length screws.
 
Last edited:
Top