Fiberglass Water Buckets

Jason

Fellow Ericson Owner
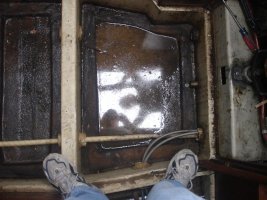
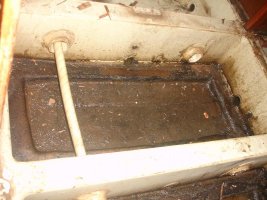
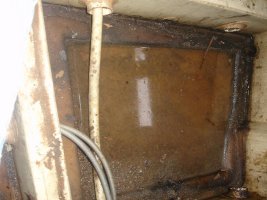
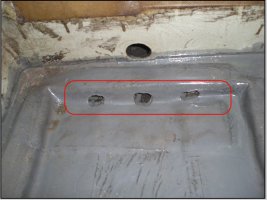
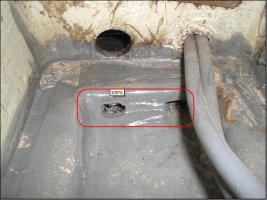
After removing the flooring under the chart table on my 1981 36RH I found two "pockets" that will always hold water. (See picture of one of them)

My idea is to rough up the glass and fill with epoxy till level with top of pocket.

Ideas as to what type of epoxy to use?
 

Attachments

  • 2007 Sailboat 007.jpg
    2007 Sailboat 007.jpg
    99.7 KB · Views: 89
Last edited:

Loren Beach

O34 - Portland, OR
Senior Moderator
Blogs Author
Your idea should work fine, and I would use a microbaloon filler.
Dumb question:
Is that a limber hole to the main bilge at the bottom of the photo? And if you glassed over that hole, would the compartment get wet from any other source?
Does your model have a relatively deep centerline sump, to which the external lead keel is bolted?

As I dimly recall, the nav station is on starboard side aft, across from the galley, very similar to the E-33RH interior, correct? Or is it.... ?

Loren
:confused:
 
Last edited:

Tom Metzger

Sustaining Partner
As an alternative...

On my E-34 I filled some of the voids by glassing in exterior construction foam. The 3/4" foam thickness was just what I needed, and it is readily available from Home Depot, et al. It does come in various thicknesses, and is very easy to shape.

Not a work of art, but it did the trick while a long way from any marine outlets. Handsome is as handsome does when working below the sole.
 

Attachments

  • 5-1-03_0011B.jpg
    5-1-03_0011B.jpg
    53.6 KB · Views: 83

Bob Grenier

Member II
What about expanding foams

You also might check into expanding foams...You can get it in a spray can or two part mixable...After it expands you just shave off the extra foam with a sharp knife or old saw blade...It's impervious to water and if you ever have to remove it, you can dig it out very easy...

Just another thought...BOB
 

Jason

Fellow Ericson Owner
> Is that a limber hole to the main bilge at the bottom of the photo?

Yep.

> And if you glassed over that hole, would the compartment get wet from any other source?

Hmmmm - Dang fine question - short answer; yes, for now as my windows leak. (Next project on list before floor goes in.)

> Does your model have a relatively deep centerline sump, to which the external lead keel is bolted?

Yes. That part of the boat is done correctly.

Pics were taken directly under the companion way steps; diesel, oil, everything sitting in there.

By the way anybody have experience with this?

Mas Epoxies - Phenolic Micro Balloon

Thanks!
 

Attachments

  • 2007 Sailboat 024.jpg
    2007 Sailboat 024.jpg
    82 KB · Views: 97
  • 2007 Sailboat 025.jpg
    2007 Sailboat 025.jpg
    87.7 KB · Views: 67
  • 2007 Sailboat 026.jpg
    2007 Sailboat 026.jpg
    73.5 KB · Views: 70
Last edited:

Loren Beach

O34 - Portland, OR
Senior Moderator
Blogs Author
Jason, Before you removed that part of the sole, was it all one piece, sealed? If so, this might be a good time to make a removeable access panel for the future.
I did this for the aft section of bilge in our cabin -- original was all sealed off with a one piece teak and holly sole plywood panel with screws and plugs from the factory.
I split it into three sections with the center section lifting out nowadays for cleaning. The two sides are now screwed down with flush bronze square-drives.
The right hand picture in reply #72 in this thread shows part of this aft section.
http://www.ericsonyachts.org/infoexchange/showthread.php?t=1526&referrerid=28

Best,
Loren
 

Tom Metzger

Sustaining Partner
You should note in my picture that the fill only goes to the bottom of the limber hole. The purpose is to keep water from collecting and damaging the sole. I have given up trying to keep the water out for a number of reasons, including head cleaning and water tank overfilling.
 

Jason

Fellow Ericson Owner
> Before you removed that part of the sole, was it all one piece, sealed?

No. Separate pieces for galley, nav station, etc. 5 sections total. But the moisture had realistically turn them into one :rolleyes:.


I agree with Tom about not trying to keep the water out of those areas. Water will find it's way there. I just want all the water to find it's way back to the bilge pump.


Ericson had no less than 25 SS screws holding down a roughly 2' x 2' section of sole in the galley. My daughter, who was helping me remove the sole, thought whoever built the boat was crazy or really drunk at the time.


I also want a very "removable" sole. I value functionality above looks as any sailor should.

If Any of you saw my other post about a plastic lumber sole, I'm still looking into it. The plastic flooring is looking better to me ever day. Our boats are made out of plastic anyway, not wood, so why not a plastic sole. Easy to install 3/4" x 6" tongue and grove planks with bronze square head screws - I'd be all set. I'd make sure to make separate sections as Loren suggested.

Jason
 

rgraham

Member II
Cut drain holes

Hello,
I have an E-36 RH with the same problem. What I did was used a drill and a drimel tool with a drill bit like cutting blade and cut drain holes in all of the vertical faces of the lower pan areas. After a short trip from Pensacola Pass to Mobile Bay I found water in everyone of these pan areas because at the time I didn’t have much of a floor to speak of so it was easy to observe. Later after removing the water and holding tanks and the plywood they sit on I found water in the pans below them as well. It is a little scary drilling and cutting in these areas I'll admit. These channel sections all end of draining into the bilge. I then gave each pan a coat of epoxy with a gray additive that is for bilge areas.

For the floor I used two 4 - 8 sheets of 3/4" teak and holy sole plywood.
1) I went to Staples and bought some of the architectural foam board and used this to create a pattern with a hatch for each area of the bilge except the triangular section in the very front (which I wish I would have).
2) I then used West Sytem epoxy and the 207 harder and coated the plywood front and back with two coats.
3) I then took the patterns and drew and transferred them to the plywood.
4) I found a wood shop that had a CNC router and they were able to cut the plywood precisely enough that I was able to go back with 1/4 inch teak trim on the faces of the holes and the hatch pieces so I was able to use the cut outs as the hatches (there are eleven).
5) I had to use a hand saw to cut the trim pieces of wood high enough to allow for me to side the flooring in to place (6 sections).
6) After I had fitted everything the way I wanted it I removed it all from the boat.
7) I then cut out strips of 3/4" marine plywood and used these as backing plates for the hatches I fitted all the backing pieces and screwed them into place.
8) Next I removed all the screws and backing plate pieces. I slid the floor back into place and screwed it down.
9) Then I epoxied the backing strips and screwed them into place from underneath using the access areas created by the hatches (this was a pain).
10) I then applied a top coat of epoxy (which I totally botched up because it was to hot and setup to fast. So maybe this year I’ll re-sand and reapply a top coat.
This was a labor intensive job, looking back on it I spent more time worrying that I was going to screw it up then the actual work took. The patterns and many trial fittings of the patterns and the actual wood are the keys to this job.

If you want I think I have some pictures of the patterning process that I could post.

Robert
 

Attachments

  • Drains.jpg
    Drains.jpg
    120 KB · Views: 86

Emerald

Moderator
[snip]

If Any of you saw my other post about a plastic lumber sole, I'm still looking into it. The plastic flooring is looking better to me ever day. Our boats are made out of plastic anyway, not wood, so why not a plastic sole. Easy to install 3/4" x 6" tongue and grove planks with bronze square head screws - I'd be all set. I'd make sure to make separate sections as Loren suggested.

Jason

I'll just throw this out on the plastic sole, and perhaps you've already thought of it. My only concern would be resale. I know more and more folks like these new products, but then there are really crusty folks like myself who want teak and holly, period. My only worry would be trying to sell her down the road and loosing a sale to another boat that was "original". Of course, some might consider it a selling point to have the plastic.

Just my .02 to stir the pot. :devil:
 

Jason

Fellow Ericson Owner
I'll just throw this out on the plastic sole, and perhaps you've already thought of it. My only concern would be resale. I know more and more folks like these new products, but then there are really crusty folks like myself who want teak and holly, period. My only worry would be trying to sell her down the road and loosing a sale to another boat that was "original". Of course, some might consider it a selling point to have the plastic.

Just my .02 to stir the pot. :devil:


David,

It is a valid point and I did think about that.

I can do the plasteak much cheaper than a real teak and holly sole.

10 years from now when I got to sell the boat, if it is a negative selling point, I'll switch it over and roll the cost in :D
 

Jason

Fellow Ericson Owner
Hello,
I have an E-36 RH with the same problem.

Robert,

Thanks for posting. You picture looks identical to mine. Same exact set of problems too.

What epoxy paint and gray bilge additive did you use?

> Later after removing the water and holding tanks and the plywood they sit on I found water in the pans below them as well.

Thanks for letting me know Robert. I figured as much. Won't get to that area till next year.

I'm still leaning toward plank plastic lumber instead of plywood w/ teak and holly. The lumber is tongue and grove and you attach the tongue with a SS clip (see attached image). I like the idea of plank lumber instead of plywood because it is easier to work with. I will make several sections so I can remove a section when needed.

I'll document the process complete with photos if I decide to go the plastic lumber route.

BTW, it's nice hearing from a fellow 36RH owner, not many of us! :egrin:

Jason
 

Attachments

  • clip.jpg
    clip.jpg
    4.8 KB · Views: 275
Last edited:

Jason

Fellow Ericson Owner
Just talked with a tech person at Mas Epoxies. Here was there idea to fill the pan.

Just like Tom did, I'd fill in most of the pan with a filler. I like foam board panels from Staples. I can stack them up like pancakes till I get the right height. I would also put a shim in so that the water drains towards the limber hole. However construction foam would work just as well.

You then mix up the epoxy - 2 parts resin to one part slow hardener with 2 parts fumed colloidal silica. Coat each side of the foam board panels, then do the next till I get the correct height.

The epoxy is self leveling. Put a shim in the last one or even have the last panel's height go above the top of the pan. According to them, when it hardens it will be extremely strong.

Went this route as I suck at fiberglass - should be easy enough. Worst part will be cleaning and sanding.
 
Last edited:
Ok, I'm a total newbie and probably have no idea why I would know anything. However, why not make that a removable sole plate and use that as storage?
 

Jason

Fellow Ericson Owner
Ok, I'm a total newbie and probably have no idea why I would know anything. However, why not make that a removable sole plate and use that as storage?


There is really no room in these areas not to mention anything you store in there needs to be waterproof. Also you can't mind if it gets a coat of diesel film on it.
 
Last edited:

rgraham

Member II
How I cleaned those pan areas...

Hello Jason,
The reason that picture looks identical is because it is I used your photo of your pan to illustrate. I'll get out to the boat and take some photos of mine to show you what I did. To clean up those pan areas if you get the boat on the hard this summer during the hottest days then it is easy to use dish soap (that cuts grease) and water and a good scrub brush and a shop vac. I did each pan at a time then moved to the next one. Vacuum out the pan and use a scraper to get all of the sludge out of it then wash with the soap and scrub brush. Vacuum out and then rinse with water (hot if you can get it). Then repeat this process of washing and rinsing and vacuuming until all of the oil film is out of the raw fiberglass and it is clean. I wanted to keep the moisture level down as much as I could so I did it this way always vacuuming up the water and soap as soon as I could. Because the boat was sitting on the hard and the sun was reflecting back up off the ground and onto the black bottom paint each pan would dry very quickly. It was like an oven in there here in Alabama in the middle of August. After I finished with all of the pans I let it day in the heat for a day (just to make sure) I then covered each pan with West System epoxy (just painted it on with a cheap brush). I can't remember if I drilled the drain holes before the epoxy painting or after. This process was still time consuming and hot but I think filling each pan will be a lot more. But either way this method worked well for me as far as getting the pan areas clean and keeping them dry.

It is good to hear from another E-36 RH owner I will gladly share any info that might be helpfull. I 've been working on the black hole of time and money now for 5 1/2 years...

Robert
 

rgraham

Member II
Here is what I did

Hello Jason,

I've attached photos of how I fixed this problem. This way all the water drains back to the center of the boat. Ive put these in all of my sections of the grid.
Robert
 

Attachments

  • drain1.jpg
    drain1.jpg
    52.1 KB · Views: 70
  • drain2.jpg
    drain2.jpg
    70 KB · Views: 59
Last edited:

Jason

Fellow Ericson Owner
Thanks for the pics Robert.

I've finished filling in the pans with a "pancake" of foam boards and epoxy.

After it cured I took and poured water into all the pans. Any place water was still standing I leveled off with epoxy. Hopefully, I'll never have a water issue with these pans again. Except for the pans under the tanks - but hey I guy has to sail his boat, not just work on it :egrin:


This weekend I'll be painting this area. I'll take pics and post them up.


Hopefully I'll have the cabin sole completely installed this weekend. I'm going with the PlasTeak tongue and grove planks. I'll be sure and doc that whole project and post it up as well.

BTW, I was at the marina taking shop with the Hunter dealer and he said brand new Hunter's still have this issue. Makes you wonder why boat builders haven't gotten this one right yet.

Jason
 
Top