Ericson 27 - broken keel

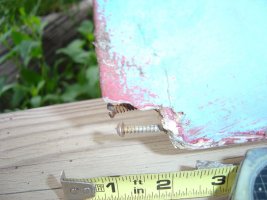
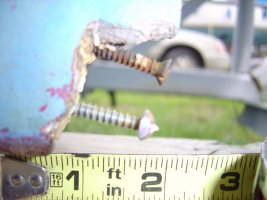
When putting the Island Girl on the trailer last fall I must have banged the aft edge of the keel against the trailer. It was a very strong gusting cross wind and I knew I hit the trailer but I was surprised to see the damage on the keel this spring. Do to working out of town I am just now getting the boat read for the season. Never the less I have attached some pictures. I have several questions.

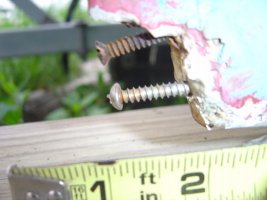
1) Does anyone have any thoughts on what the purpose of the 2 screws in the picture are? Is it perhaps the previous owners left overs from a similiar problem in the past?

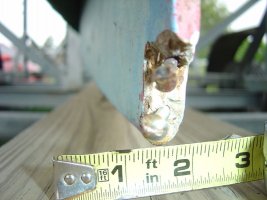
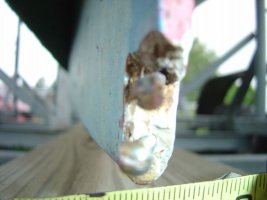
2) I know of the deep bilge and the possibility of keel damage allowing water into the bilge/boat etc. Any thoughts on how deep the bilge goes or how much damage it takes to penetrate? The damage does not appear to have penetrated that far.

3) My greatest concern at this point not so much taking on water and sinking the boat as much as water seeping into the fiberglass and wicking up the hull etc. Does that seem reasonable?

4) Any thoughts on the best way to repair this damage?

Any advice will be greatly appreciated.
 

Attachments

  • DSC01221.jpg
    DSC01221.jpg
    67.4 KB · Views: 99
  • DSC01222.jpg
    DSC01222.jpg
    52 KB · Views: 71
  • DSC01223.jpg
    DSC01223.jpg
    65.5 KB · Views: 77
  • DSC01224.jpg
    DSC01224.jpg
    46.2 KB · Views: 78
  • DSC01225.jpg
    DSC01225.jpg
    55.1 KB · Views: 77

treilley

Sustaining Partner
The 2 screws are not factory. They were put there to help anchor a previous repair. Probably thinkened epoxy. This is why it was so easy to knock it off hitting your trailer. That hit would not damage the lead in that way. No chance of leaking. just patch it again with some thickened West epoxy.
 

Rob Hessenius

Inactive Member
Keel

Islandgirl~
I agree with Tim that you knocked off a previous patch. I would take the grinder and round off the trailing edge and get the boat in the water and go sailing.
 

Brookelise

Member II
Keel repair

It's an easy repair with the West System epoxy. West System has a booklet with complete instructions for keel repairs. You'll need the resin, hardener and low-density (red) filler. -- Brooke
 

NateHanson

Sustaining Member
I probably wouldn't just put thickened epoxy in that, because I think it'll come off again. I'd grind down the surrounding area a bit, fill the void with thickened epoxy, and then lay a course or two of glass fabric over the repair to hold it in place. (oh, and remove those mickey-mouse screws too!)
 

Steve Swann

Member III
Apply Suction to the Area First?

If there are any penetrating deep cracks in the damaged area, you might put on a vacuum bagger over the area and run it a while to see if you pull any water out of the area before you attempt a repair. You might be surprised - but better now than later.
 

Randy Rutledge

Sustaining Member
Sv.islandgirl

I don’t know how far forward the keel is glassed solid but I would guess that you are close to reaching the galley through that hole. I would not launch that boat without proper repair of the keel. This is a real issue for me on the 25, 27 and 29 keel. I have not glassed in the deep bulge on my 29 yet but intend to do so with a floating ball valve to allow water down and not up (and a line from the bilge pump that is mounted in the port lazarette that is fitted to the barrier I am installing to the bottom of the deep bilge.)

I would clean off all filler and remove the screws, bevel the glass past the break to allow bonding of the repair. Use glass in the epoxy to give strength and lap the glass past the bevel and grind flush. There is a crack on the starboard side showing in the top left picture on your post that needs attention.
 

Emerald

Moderator
Definitely chase out that crack. You might find that the earlier repair extends upwards along it. You will need to bevel the surrounding area back as Randy has mentioned. If the chunk were any bigger, I'd start thinking about glassing and pinning a solid piece of something in versus just building up thickened epoxy, maybe. Want to see pictures after you've attacked the crack some. I agree you could be very close to the bottom corner of the sump on the E-27.
 

tenders

Innocent Bystander
It appears that your PO hit ground pretty hard.

This is a great excuse to get an inexpensive grinder and a full complement of epoxy fixins if you don't have those already. This is a pretty straightforward repair to make as long as the damage (or your grinding) don't extend into the keel to the point that the lead shot that was used for ballast around the lead pigs in the keel starts gushing out. If that happens, apply duct tape immediately, but if it doesn't....

After investigating that crack and fairing down what's left to solid material unfettered by some previous owner's fractionally-assed idea to use those screws in lieu of metal rebar, you could easily:
  • wet down the surface with syrup-consistency West System epoxy, followed by
  • a thick layer of mayo-consistency epoxy, and
  • press in a nice chunk of JB Weld epoxy as solid, adhesive, bulk filler.

Instead of the JB Weld you could also mix up a slurry of well-chopped fiberglass cloth as Randy Rutledge suggests to thicken a batch of epoxy, but--and maybe it's just me--I've found this often leaves voids and is hard to control in tall, thin repairs like this. Once that sets up,
  • build up some layers of glass cloth tapered well into the body of the keel like NateHanson suggests,
  • grind 'er flush, and
  • you'll be good to go: an hour of grinding, and half an hour of epoxy work in between cure times.

>The 2 screws are not factory.
This was another great line from treilley.
 
Last edited:
Top