Great job! Thanks for keeping us up to date on how it’s going. Look forward to seeing pics in the water!
You are using an out of date browser. It may not display this or other websites correctly.
You should upgrade or use an alternative browser.
You should upgrade or use an alternative browser.
Engine Compartment Clean up
- Thread starter Nick J
- Start date
The yard finished up the paint repair yesterday and I got a chance to see it today. It looks good enough to make the rest of the paint look bad. The positive side is the majority of this area is just washed and buffed out, showing there's hope for the rest of the top sides. I should have found more time to clean and buff the hull while it was out, but we were too busy with everything else which is why we hired someone to help in the first place.


And here's some pics of the completed dripless install. The ran the vent up above the cockpit bench. Those water lines and bilge hoses are first on the list once we're back in the water, but I owe my family a few weeks off before diving into that project.


Well.... Today didn't go as planned. We put the boat in the water to find out one of the thru hulls leaked (one of the ones I did). So we pulled it back out and its still on the hard.
I pulled the valve and found the threads were pretty dry, so I cleaned them up, put new sikaflex on and threaded it back on. Now I'm questioning all the others. I don't think I saw them leaking, but...
This was the one thru hull I had a difficult time aligning the valve on, so I remove it, applied new sealant and reinstalled at first. Then it moved slightly after. I thought sikaflex would still seal, but this has me second guessing everything. The guys at the yard were reassuring and helped with what they could including lending me a tube of sikaflex and advice.
The funny thing is one of the first conversations I had with one of the owners was about not using black Sikaflex under the waterline. He said it was kind of a superstition he learned from an old timer, but there was something to it as he'd had issues with black and never white. of course harbor marine only had black and west marine didn't know what sikaflex even was, so I went with black. Maybe there is something to the superstition or maybe I just need more practice installing thru hulls.
Frank Langer
1984 Ericson 30+, Nanaimo, BC
I'm sorry to hear this! When I decided I needed new thru hulls two years ago (they were 20 years old and two showed some corrosion, not something to take a chance with!) I removed the old ones but had a pro at the boatyard install the new ones--two of the seven leaked slightly when we launched, so they hauled the boat and redid all of the thru hulls at their expense--so it happens even to the pros.Well.... Today didn't go as planned. We put the boat in the water to find out one of the thru hulls leaked (one of the ones I did). So we pulled it back out and its still on the hard.
I pulled the valve and found the threads were pretty dry, so I cleaned them up, put new sikaflex on and threaded it back on. Now I'm questioning all the others. I don't think I saw them leaking, but...
This was the one thru hull I had a difficult time aligning the valve on, so I remove it, applied new sealant and reinstalled at first. Then it moved slightly after. I thought sikaflex would still seal, but this has me second guessing everything. The guys at the yard were reassuring and helped with what they could including lending me a tube of sikaflex and advice.
The funny thing is one of the first conversations I had with one of the owners was about not using black Sikaflex under the waterline. He said it was kind of a superstition he learned from an old timer, but there was something to it as he'd had issues with black and never white. of course harbor marine only had black and west marine didn't know what sikaflex even was, so I went with black. Maybe there is something to the superstition or maybe I just need more practice installing thru hulls.
I have also heard and read that the black sikaflex doesn't work as well as the white, and only use white myself. I don't know why that is, but it is talked about at our marina and I've read about it too (maybe Practical Sailor?).
So don't feel too bad about this slight setback! Once the boat is launched and under sail again you may not even remember this!.
Frank
Frank Langer
1984 Ericson 30+, Nanaimo, BC
On a job as big and complex as yours, setbacks are almost impossible to avoid. If you look at the posts on this site alone you'll find many of the repairs accompanied by reports of choice four letter words, edited out of course because we're all polite people.Thanks frank, I need all the words of encouragement I can get right now. Currently looking for a few in a healthy pour of bourbon.
")
Good choice of drink after a tough day!! Enjoy!
Frank
dhill
Member III
Hi @trickdhat ,
The plumbing work you did in the engine area looks amazing! What PEX manifolds and tooling did you use?
Thanks!
Dave
The plumbing work you did in the engine area looks amazing! What PEX manifolds and tooling did you use?
Thanks!
Dave
Today was a much better day. The sealant cured enough so I tested each new thru hull with an inboard engine flusher (aka plunger with a hose nozle). When I found the toilet paper I wrapped around each thru hull dry, I asked the yard if they had time for one more trip and they did. The engine fired right up, came up to temp with zero leaks, and none of the new hull penetration including the strut leaked! I'm exhausted and excited to finally have our boat back where it belongs.

Frank Langer
1984 Ericson 30+, Nanaimo, BC
Congrats! Yup, boats should be in the water! I just returned from a three day sailing trip in our beautiful BC Gulf Islands. First anchorage I was alone with seals, eagles and a blue heron. Second night there was one other sailboat and me, but still so peaceful. The sailing wind was a nice 12 to 15 knots, boat speed 6 to 6.5 knots, and my repaired wind instrument worked perfectly.
Those days are what keeps us all loving boating and investing the money to keep them in good shape. Good job getting yours done, and back in the water.
Frank
Those days are what keeps us all loving boating and investing the money to keep them in good shape. Good job getting yours done, and back in the water.
Frank
Beautiful and way to get out in the cold!Congrats! Yup, boats should be in the water! I just returned from a three day sailing trip in our beautiful BC Gulf Islands. First anchorage I was alone with seals, eagles and a blue heron. Second night there was one other sailboat and me, but still so peaceful. The sailing wind was a nice 12 to 15 knots, boat speed 6 to 6.5 knots, and my repaired wind instrument worked perfectly.
Those days are what keeps us all loving boating and investing the money to keep them in good shape. Good job getting yours done, and back in the water.
Frank
Frank Langer
1984 Ericson 30+, Nanaimo, BC
Yes, it was beautiful!Beautiful and way to get out in the cold!
Attachments
-
 20221215_155921.jpg215.9 KB · Views: 13
 -
 20221215_131615.jpg255.2 KB · Views: 13
 -
 20221215_160102.jpg222.7 KB · Views: 13
I'm getting to the last fiddly bits of the project including cleaning up and reinsulating the access hatches. If anyone's looking for a good sander, I highly recommend the Bosch GET75-6N
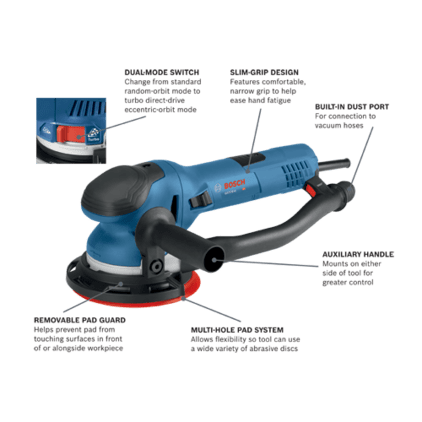
if used with mesh sanding discs and a vacuum, it is almost completely dust free which came in handy removing the old glued on insulaiton. I was able to go from this:

to this:

In under 10 minutes
The end result:
I also started building a new frame for the front access. The old plywood piece had been cut apart at the top to provide easier access, but it has become delaminated and cracked in mulitple places. I probably could have repaired it with epoxy, but I'm not sure it would be worth it with all the oil and diesel that had soaked in to the bottom. The new fram is made our of sapele. I'll route out a rabbet to accept the original panel and trim the top and bottom to fit.

if used with mesh sanding discs and a vacuum, it is almost completely dust free which came in handy removing the old glued on insulaiton. I was able to go from this:
to this:
In under 10 minutes
The end result:
I also started building a new frame for the front access. The old plywood piece had been cut apart at the top to provide easier access, but it has become delaminated and cracked in mulitple places. I probably could have repaired it with epoxy, but I'm not sure it would be worth it with all the oil and diesel that had soaked in to the bottom. The new fram is made our of sapele. I'll route out a rabbet to accept the original panel and trim the top and bottom to fit.
Little by little, I'm getting closer. Here's the frame trimmed to fit, routed to accept the original panel, and the original fiddle being glued to the top. The frame is thicker than the ordinal, so I had to route out a half lap joint to accept the old fiddle. I was reminded once again, nothing is straight or parallel on a boat. I had to scribe the bottom to the sole and the top is slightly off 90. At lease the sides are close enough to parallel to make it work.

Here's a pick from above before I routed out the half lap:

I'll have to do some final fitting on the fiddle to notch around the trim on the left side. It's binding and bowing out the port side panel in this pic:

Here's a pick from above before I routed out the half lap:
I'll have to do some final fitting on the fiddle to notch around the trim on the left side. It's binding and bowing out the port side panel in this pic:
Sea Trial and First Trip
All things considered, the boat performed beautifully after the engine compartment cleanup/ strut replacement / refit. We did a sea trial and shakedown cruise 2 weeks ago to Langley (1.5hr trip from Everett) and a weeklong cruise to Alderbrook Resort last week (10.5 hr from Everett). However, nothing is perfect on a boat and here’s a small list of what we found over the two trips:


Coolant leaks – The engine block and heat exchanger is great, but the water heater loop and fill cap have been a source of coolant leaks since putting everything back together. I installed mini ball valves in the water heater loop to isolate the water heater if it ever develops a coolant leak. Ironically, the NPT threads between the valves and hose barbs and the hose barbs themselves have been an issue. I took them apart, applied new thread sealant and reinstalled which solved the leak at the thread, but the hose barb leak was a bit of a head scratcher. I used Skanvik and PYI non perforated hose clamps throughout the engine compartment clean up. One downside of the non perforated clamps seems to be overtightening. When the slip from overtightening, the loosen up quite a bit. Finding the balance point between tight enough, but not near the point where the slip has been difficult. I eventually got it to stop.
The leak from the fill cap is a different story. I used the same hose and hose clamps, but replaced the cap. It doesn’t seem to leak when the engine is up to temp, but after the engine has been run, there’s a significant leak from either the cap, fill neck, or hose. I assumed the hose barb was the cause since the filler neck wasn’t changed and the cap was new, but now I’m thinking it may be the filler neck. The weird think is it’s almost stopped on it’s own after the trip to alderbrook. I ordered a new neck and cap, but replacing the neck seems to be a difficult job. I’ll keep an eye on this over the next few weeks to see if I really need to dive into this one.

Water System – The Viega manifolds were a complete failure. Out of the 12 ports installed (3 x 4 port manifolds), 3 leaked consistently and I could get the others to leak just by touching the water line. These have no place on a boat and I question their use in homes. The only reason I replaced the water system plumbing was because access was so much easier with the engine removed. Unfortunately, I didn’t pressure test the system until the engine was reinstalled, so I ended up replacing the manifolds with the engine in place and the added complexity of attaching the new manifold to an insulated piece of plywood. It was slightly easier with the realization of being able to use fabric hole drill bits and 1” stand offs to make attaching through the insulation easier. The new manifold is much better and more compact. I considered using this one at first, but was discouraged by it being a made in China Amazon purchase. After getting it in hand, it is a much better manifold and was fairly easy to work with.
Before:

After:

The other self-imposed water system issue I ran into was the dual pump configuration. There weren’t instructions from the manufacturer, but they said the pumps have a pressure bypass feature that allows them to work together. I assumed this meant they should be set up in series, but I could never get them to function correctly (one should start at low flow and the second should turn on when a higher flow is needed). I emailed their technical support contact, and their response was “try it in parallel”. Easier said than done…. These pumps aren’t any different than the ones sold individually, so I’m not sure how they will work as advertised. Nevertheless, they are installed and I like the idea of a redundant pump, so I’ll connect them in parallel with valves and power switches to isolate them. The single pump ended up function perfectly and was much quitter than the previous pump I had installed. They are also variable speed, so they don’t cycle nearly as much as the previous pump.
Shaft Alignment – This is the big one. In theory, everything should be spot on. I have a new strut, new engine mounts, new cutlass bearing, and a new dripless shaft seal. Everything was rebuilt, except for the shaft log, from the ground up, so it should be perfect. However, there’s a verry tiny rhythmic sound when the transmission is engaged. I can’t quite describe it and you have to be consciously listening for it at cruising speed (2800 rpm), but I’m convinced it’s there. At 1200 RPM it’s very noticeable and can almost be described as a clunking. I don’t remember if it was there before and I’m just hypersensitive to it now after becoming intimately accounted with the drive line over the last 6 months. There was some concern after the final alignment when the shaft didn’t turn easily by hand. Even when the coupling was disengaged from the transmission, it was tight. So much so, we hauled out again (at the yard’s expense) to loosen the cutalass bearing set screws. This did free it up some and after the 120 nm trip to Alderbrook, it now turns as free as it did previously with the stuffing box. I’m not quite sure where to go from here. I’m thinking first step is to call the yard and see if I can get them on the boat to see if they can hear what I’m hearing. I’ll probably have to follow that up with 2nd opinion to settle my mind.
Engine insulation – IT’S LOUDER NOW THAN IT WAS BEFORE ALL THE WORK! But, there’s a light at the end of the tunnel. I didn’t reinstall the boards between the sink cabinet and the engine compartment, so I think the engine noise is reverberation off the sink. It seems much quitter in the quarter birth than before, so I think the boards, with added insulation, will quite it all down. It’s also quitter in the cockpit despite not reinstalling the divider between the engine compartment and the lazarette. I’m thinking of making a canvas piece with sewn in insulation and a pocket for the companion way hatch. The boards are awkward and after 40 years, there’s not much life left in them.
Steering pedestal bushing – When I disassembled the steering pedestal to replace the control cables, I didn’t look at the assembly drawing or Christian’s excellent blog post before diving in. I thought the screws above the bushings were holding the throttle control module to the pedestal, so I attempted to remove them. The forward one was simple to remove, but the aft one broke off. I forgot to reinstall the forward screw and had no idea of the mistake until my son asked why the wheel was so “movey” when he was steering. Everything was embarrassingly clear when I removed the compass to reveal my mistake. Thankfully we found this during a relatively easy downwind sail on the leg from Alderbrook to Port Ludlow and not on the 30+ knot trip with 6+ seas from Port Ludlow to Everett. We spent the remainder of the trip with the compass removed to provide easy access to the bushing and a screwdriver near by to pry it back into place when needed.

Rudder tube leak – I was working on this before the initial haul out, but it took a back seat to everything else. I even purchased a battery powered grease gun and a replacement Zerk fitting to perform the fix Christian has pointed out in his blog, but didn’t finish up the project. After cleaning up the engine compartment and having the dripless installed, I was surprised to find water under the coupling, but quickly remembered that I hadn’t completed this project. With a quick peak below underway, I confirmed that it was the rudder tube and not the new dripless that was the source of the water.
Cabin leaks – This wasn’t part of the engine compartment cleanup project, but it was a new found annoyance. It poured two days of our trip to Alderbrook. One of the fixed port lights, a few of the opening port lights, and a somewhat concerning drip from the headliner in the head kept us on guard. The fixed portlight and opening ports are somewhat expected. The fixed ports look awful after what looks like a few attempts by the previous owners to seal without removing them. I’ve only replaced a few gaskets on the opening ports, so I’m actually surprised they didn’t’ leak earlier. There’s a chance a few are still not leaking and just a source of condensation drips with all the added moisture in the boat from 4 humans, a dog, a cat, and all the damp cloths.
The headliner drip is a little more concerning. I’ve sealed off the center section of the dorade box, and have drilled some exploratory holes with only dry core coming out. There’s two potentially simple explanations, and one difficult one as I see it; condensation from using the head as a wet locker (I removed the insulation above the headliner, so this may be what’s happening), the screws securing the dorade box guard is leaking, or my 35-3 is experiencing the same issue most other’s have experienced with the dreaded leaking dorade box. I’ll have to dry out the interior and monitor over the next few weeks to see where to go from here.
On the positive side, the engine ran flawlessly, the sink and faucet are huge improvements, the thru hulls are easy to use, the fresh water system taste clear and clean, We achieved hull speed of 7.2 knots under cruising RPMs of 2800 with the new bottom (was at 6.5 knots before), and the new raw water manifold made pumping water out of the ice box extremely simple. The paint in the engine compartment makes finding new leaks very easy as well and it’s almost a pleasure (I said almost) working in the engine compartment.
All things considered, the boat performed beautifully after the engine compartment cleanup/ strut replacement / refit. We did a sea trial and shakedown cruise 2 weeks ago to Langley (1.5hr trip from Everett) and a weeklong cruise to Alderbrook Resort last week (10.5 hr from Everett). However, nothing is perfect on a boat and here’s a small list of what we found over the two trips:
Coolant leaks – The engine block and heat exchanger is great, but the water heater loop and fill cap have been a source of coolant leaks since putting everything back together. I installed mini ball valves in the water heater loop to isolate the water heater if it ever develops a coolant leak. Ironically, the NPT threads between the valves and hose barbs and the hose barbs themselves have been an issue. I took them apart, applied new thread sealant and reinstalled which solved the leak at the thread, but the hose barb leak was a bit of a head scratcher. I used Skanvik and PYI non perforated hose clamps throughout the engine compartment clean up. One downside of the non perforated clamps seems to be overtightening. When the slip from overtightening, the loosen up quite a bit. Finding the balance point between tight enough, but not near the point where the slip has been difficult. I eventually got it to stop.
The leak from the fill cap is a different story. I used the same hose and hose clamps, but replaced the cap. It doesn’t seem to leak when the engine is up to temp, but after the engine has been run, there’s a significant leak from either the cap, fill neck, or hose. I assumed the hose barb was the cause since the filler neck wasn’t changed and the cap was new, but now I’m thinking it may be the filler neck. The weird think is it’s almost stopped on it’s own after the trip to alderbrook. I ordered a new neck and cap, but replacing the neck seems to be a difficult job. I’ll keep an eye on this over the next few weeks to see if I really need to dive into this one.
Water System – The Viega manifolds were a complete failure. Out of the 12 ports installed (3 x 4 port manifolds), 3 leaked consistently and I could get the others to leak just by touching the water line. These have no place on a boat and I question their use in homes. The only reason I replaced the water system plumbing was because access was so much easier with the engine removed. Unfortunately, I didn’t pressure test the system until the engine was reinstalled, so I ended up replacing the manifolds with the engine in place and the added complexity of attaching the new manifold to an insulated piece of plywood. It was slightly easier with the realization of being able to use fabric hole drill bits and 1” stand offs to make attaching through the insulation easier. The new manifold is much better and more compact. I considered using this one at first, but was discouraged by it being a made in China Amazon purchase. After getting it in hand, it is a much better manifold and was fairly easy to work with.
Before:
After:
The other self-imposed water system issue I ran into was the dual pump configuration. There weren’t instructions from the manufacturer, but they said the pumps have a pressure bypass feature that allows them to work together. I assumed this meant they should be set up in series, but I could never get them to function correctly (one should start at low flow and the second should turn on when a higher flow is needed). I emailed their technical support contact, and their response was “try it in parallel”. Easier said than done…. These pumps aren’t any different than the ones sold individually, so I’m not sure how they will work as advertised. Nevertheless, they are installed and I like the idea of a redundant pump, so I’ll connect them in parallel with valves and power switches to isolate them. The single pump ended up function perfectly and was much quitter than the previous pump I had installed. They are also variable speed, so they don’t cycle nearly as much as the previous pump.
Shaft Alignment – This is the big one. In theory, everything should be spot on. I have a new strut, new engine mounts, new cutlass bearing, and a new dripless shaft seal. Everything was rebuilt, except for the shaft log, from the ground up, so it should be perfect. However, there’s a verry tiny rhythmic sound when the transmission is engaged. I can’t quite describe it and you have to be consciously listening for it at cruising speed (2800 rpm), but I’m convinced it’s there. At 1200 RPM it’s very noticeable and can almost be described as a clunking. I don’t remember if it was there before and I’m just hypersensitive to it now after becoming intimately accounted with the drive line over the last 6 months. There was some concern after the final alignment when the shaft didn’t turn easily by hand. Even when the coupling was disengaged from the transmission, it was tight. So much so, we hauled out again (at the yard’s expense) to loosen the cutalass bearing set screws. This did free it up some and after the 120 nm trip to Alderbrook, it now turns as free as it did previously with the stuffing box. I’m not quite sure where to go from here. I’m thinking first step is to call the yard and see if I can get them on the boat to see if they can hear what I’m hearing. I’ll probably have to follow that up with 2nd opinion to settle my mind.
Engine insulation – IT’S LOUDER NOW THAN IT WAS BEFORE ALL THE WORK! But, there’s a light at the end of the tunnel. I didn’t reinstall the boards between the sink cabinet and the engine compartment, so I think the engine noise is reverberation off the sink. It seems much quitter in the quarter birth than before, so I think the boards, with added insulation, will quite it all down. It’s also quitter in the cockpit despite not reinstalling the divider between the engine compartment and the lazarette. I’m thinking of making a canvas piece with sewn in insulation and a pocket for the companion way hatch. The boards are awkward and after 40 years, there’s not much life left in them.
Steering pedestal bushing – When I disassembled the steering pedestal to replace the control cables, I didn’t look at the assembly drawing or Christian’s excellent blog post before diving in. I thought the screws above the bushings were holding the throttle control module to the pedestal, so I attempted to remove them. The forward one was simple to remove, but the aft one broke off. I forgot to reinstall the forward screw and had no idea of the mistake until my son asked why the wheel was so “movey” when he was steering. Everything was embarrassingly clear when I removed the compass to reveal my mistake. Thankfully we found this during a relatively easy downwind sail on the leg from Alderbrook to Port Ludlow and not on the 30+ knot trip with 6+ seas from Port Ludlow to Everett. We spent the remainder of the trip with the compass removed to provide easy access to the bushing and a screwdriver near by to pry it back into place when needed.
Rudder tube leak – I was working on this before the initial haul out, but it took a back seat to everything else. I even purchased a battery powered grease gun and a replacement Zerk fitting to perform the fix Christian has pointed out in his blog, but didn’t finish up the project. After cleaning up the engine compartment and having the dripless installed, I was surprised to find water under the coupling, but quickly remembered that I hadn’t completed this project. With a quick peak below underway, I confirmed that it was the rudder tube and not the new dripless that was the source of the water.
Cabin leaks – This wasn’t part of the engine compartment cleanup project, but it was a new found annoyance. It poured two days of our trip to Alderbrook. One of the fixed port lights, a few of the opening port lights, and a somewhat concerning drip from the headliner in the head kept us on guard. The fixed portlight and opening ports are somewhat expected. The fixed ports look awful after what looks like a few attempts by the previous owners to seal without removing them. I’ve only replaced a few gaskets on the opening ports, so I’m actually surprised they didn’t’ leak earlier. There’s a chance a few are still not leaking and just a source of condensation drips with all the added moisture in the boat from 4 humans, a dog, a cat, and all the damp cloths.
The headliner drip is a little more concerning. I’ve sealed off the center section of the dorade box, and have drilled some exploratory holes with only dry core coming out. There’s two potentially simple explanations, and one difficult one as I see it; condensation from using the head as a wet locker (I removed the insulation above the headliner, so this may be what’s happening), the screws securing the dorade box guard is leaking, or my 35-3 is experiencing the same issue most other’s have experienced with the dreaded leaking dorade box. I’ll have to dry out the interior and monitor over the next few weeks to see where to go from here.
On the positive side, the engine ran flawlessly, the sink and faucet are huge improvements, the thru hulls are easy to use, the fresh water system taste clear and clean, We achieved hull speed of 7.2 knots under cruising RPMs of 2800 with the new bottom (was at 6.5 knots before), and the new raw water manifold made pumping water out of the ice box extremely simple. The paint in the engine compartment makes finding new leaks very easy as well and it’s almost a pleasure (I said almost) working in the engine compartment.
dhill
Member III
Hi @trickdhat ,Sea Trial and First Trip
All things considered, the boat performed beautifully after the engine compartment cleanup/ strut replacement / refit. We did a sea trial and shakedown cruise 2 weeks ago to Langley (1.5hr trip from Everett) and a weeklong cruise to Alderbrook Resort last week (10.5 hr from Everett). However, nothing is perfect on a boat and here’s a small list of what we found over the two trips:
...
What manifolds did you end up going with for the water system? Sorry, if I missed it.
Thanks!
Dave
Here's a link:
I also noticed I didn't inlcude any pics of the install process:

The bit cut a perfect hole in the insulation, then I drilled a hole in the plywood, installed the spacer, and attached the bracket. This was much easier than the wood block method I discussed previously. The only change I would make is finding spacers with a thicker wall to provide more surface area for the hardware to sit.
Amazon.com: Customer reviews: 3/4" 4 Loops Plumbing Manifolds w/ 1/2" Pex Ball Valves, Red and Blue Handles
Find helpful customer reviews and review ratings for 3/4" 4 Loops Plumbing Manifolds w/ 1/2" Pex Ball Valves, Red and Blue Handles at Amazon.com. Read honest and unbiased product reviews from our users.
www.amazon.com
I also noticed I didn't inlcude any pics of the install process:
The bit cut a perfect hole in the insulation, then I drilled a hole in the plywood, installed the spacer, and attached the bracket. This was much easier than the wood block method I discussed previously. The only change I would make is finding spacers with a thicker wall to provide more surface area for the hardware to sit.
Bepi
E27 Roxanne
I recently did a project for a friend with a fishing boat. An enormous 60 year old diesel was being replaced and I cleaned and painted the bilge. The paint took an hour, but the prep took four days (tiki time). Once the sludge was removed the real task was getting the fiberglass clean enough to not instantly gum up sand paper. Easy off oven cleaner and clorox degreaser work very well to remove the last of the residue.
Pete the Cat
Sustaining Member
On the engine vibration issue: What is your prop tip clearance from the hull? You need at least 2". Check the top nuts on the engine mounts--Yanmar tries to take engine vibration into their mounts (rather than into the boat--that is why Yanmar's shake more when idling) and if they are not tight they can quickly work loose.. I have forgotten to snug them. The engine may settle on the mounts a bit after reinstallaton and require adjustment. Just brainstorming here.Sea Trial and First Trip
All things considered, the boat performed beautifully after the engine compartment cleanup/ strut replacement / refit. We did a sea trial and shakedown cruise 2 weeks ago to Langley (1.5hr trip from Everett) and a weeklong cruise to Alderbrook Resort last week (10.5 hr from Everett). However, nothing is perfect on a boat and here’s a small list of what we found over the two trips:
View attachment 46568
View attachment 46569
Coolant leaks – The engine block and heat exchanger is great, but the water heater loop and fill cap have been a source of coolant leaks since putting everything back together. I installed mini ball valves in the water heater loop to isolate the water heater if it ever develops a coolant leak. Ironically, the NPT threads between the valves and hose barbs and the hose barbs themselves have been an issue. I took them apart, applied new thread sealant and reinstalled which solved the leak at the thread, but the hose barb leak was a bit of a head scratcher. I used Skanvik and PYI non perforated hose clamps throughout the engine compartment clean up. One downside of the non perforated clamps seems to be overtightening. When the slip from overtightening, the loosen up quite a bit. Finding the balance point between tight enough, but not near the point where the slip has been difficult. I eventually got it to stop.
The leak from the fill cap is a different story. I used the same hose and hose clamps, but replaced the cap. It doesn’t seem to leak when the engine is up to temp, but after the engine has been run, there’s a significant leak from either the cap, fill neck, or hose. I assumed the hose barb was the cause since the filler neck wasn’t changed and the cap was new, but now I’m thinking it may be the filler neck. The weird think is it’s almost stopped on it’s own after the trip to alderbrook. I ordered a new neck and cap, but replacing the neck seems to be a difficult job. I’ll keep an eye on this over the next few weeks to see if I really need to dive into this one.
View attachment 46570
Water System – The Viega manifolds were a complete failure. Out of the 12 ports installed (3 x 4 port manifolds), 3 leaked consistently and I could get the others to leak just by touching the water line. These have no place on a boat and I question their use in homes. The only reason I replaced the water system plumbing was because access was so much easier with the engine removed. Unfortunately, I didn’t pressure test the system until the engine was reinstalled, so I ended up replacing the manifolds with the engine in place and the added complexity of attaching the new manifold to an insulated piece of plywood. It was slightly easier with the realization of being able to use fabric hole drill bits and 1” stand offs to make attaching through the insulation easier. The new manifold is much better and more compact. I considered using this one at first, but was discouraged by it being a made in China Amazon purchase. After getting it in hand, it is a much better manifold and was fairly easy to work with.
Before:
View attachment 46571
After:
View attachment 46572
The other self-imposed water system issue I ran into was the dual pump configuration. There weren’t instructions from the manufacturer, but they said the pumps have a pressure bypass feature that allows them to work together. I assumed this meant they should be set up in series, but I could never get them to function correctly (one should start at low flow and the second should turn on when a higher flow is needed). I emailed their technical support contact, and their response was “try it in parallel”. Easier said than done…. These pumps aren’t any different than the ones sold individually, so I’m not sure how they will work as advertised. Nevertheless, they are installed and I like the idea of a redundant pump, so I’ll connect them in parallel with valves and power switches to isolate them. The single pump ended up function perfectly and was much quitter than the previous pump I had installed. They are also variable speed, so they don’t cycle nearly as much as the previous pump.
Shaft Alignment – This is the big one. In theory, everything should be spot on. I have a new strut, new engine mounts, new cutlass bearing, and a new dripless shaft seal. Everything was rebuilt, except for the shaft log, from the ground up, so it should be perfect. However, there’s a verry tiny rhythmic sound when the transmission is engaged. I can’t quite describe it and you have to be consciously listening for it at cruising speed (2800 rpm), but I’m convinced it’s there. At 1200 RPM it’s very noticeable and can almost be described as a clunking. I don’t remember if it was there before and I’m just hypersensitive to it now after becoming intimately accounted with the drive line over the last 6 months. There was some concern after the final alignment when the shaft didn’t turn easily by hand. Even when the coupling was disengaged from the transmission, it was tight. So much so, we hauled out again (at the yard’s expense) to loosen the cutalass bearing set screws. This did free it up some and after the 120 nm trip to Alderbrook, it now turns as free as it did previously with the stuffing box. I’m not quite sure where to go from here. I’m thinking first step is to call the yard and see if I can get them on the boat to see if they can hear what I’m hearing. I’ll probably have to follow that up with 2nd opinion to settle my mind.
Engine insulation – IT’S LOUDER NOW THAN IT WAS BEFORE ALL THE WORK! But, there’s a light at the end of the tunnel. I didn’t reinstall the boards between the sink cabinet and the engine compartment, so I think the engine noise is reverberation off the sink. It seems much quitter in the quarter birth than before, so I think the boards, with added insulation, will quite it all down. It’s also quitter in the cockpit despite not reinstalling the divider between the engine compartment and the lazarette. I’m thinking of making a canvas piece with sewn in insulation and a pocket for the companion way hatch. The boards are awkward and after 40 years, there’s not much life left in them.
Steering pedestal bushing – When I disassembled the steering pedestal to replace the control cables, I didn’t look at the assembly drawing or Christian’s excellent blog post before diving in. I thought the screws above the bushings were holding the throttle control module to the pedestal, so I attempted to remove them. The forward one was simple to remove, but the aft one broke off. I forgot to reinstall the forward screw and had no idea of the mistake until my son asked why the wheel was so “movey” when he was steering. Everything was embarrassingly clear when I removed the compass to reveal my mistake. Thankfully we found this during a relatively easy downwind sail on the leg from Alderbrook to Port Ludlow and not on the 30+ knot trip with 6+ seas from Port Ludlow to Everett. We spent the remainder of the trip with the compass removed to provide easy access to the bushing and a screwdriver near by to pry it back into place when needed.
View attachment 46573
Rudder tube leak – I was working on this before the initial haul out, but it took a back seat to everything else. I even purchased a battery powered grease gun and a replacement Zerk fitting to perform the fix Christian has pointed out in his blog, but didn’t finish up the project. After cleaning up the engine compartment and having the dripless installed, I was surprised to find water under the coupling, but quickly remembered that I hadn’t completed this project. With a quick peak below underway, I confirmed that it was the rudder tube and not the new dripless that was the source of the water.
Cabin leaks – This wasn’t part of the engine compartment cleanup project, but it was a new found annoyance. It poured two days of our trip to Alderbrook. One of the fixed port lights, a few of the opening port lights, and a somewhat concerning drip from the headliner in the head kept us on guard. The fixed portlight and opening ports are somewhat expected. The fixed ports look awful after what looks like a few attempts by the previous owners to seal without removing them. I’ve only replaced a few gaskets on the opening ports, so I’m actually surprised they didn’t’ leak earlier. There’s a chance a few are still not leaking and just a source of condensation drips with all the added moisture in the boat from 4 humans, a dog, a cat, and all the damp cloths.
The headliner drip is a little more concerning. I’ve sealed off the center section of the dorade box, and have drilled some exploratory holes with only dry core coming out. There’s two potentially simple explanations, and one difficult one as I see it; condensation from using the head as a wet locker (I removed the insulation above the headliner, so this may be what’s happening), the screws securing the dorade box guard is leaking, or my 35-3 is experiencing the same issue most other’s have experienced with the dreaded leaking dorade box. I’ll