E35-3 Aft-led lines and Traveler Setup

supersailor

Contributing Partner
I'm down in Portland for xmas and after the third attempt at posting this message, I realize how much I hate this HP Pavillion. :mad: I may leave off the pix or shorten the message. The program says it auto saves but I don't see a way to retrieve the message. I will try posting the pix then do the narrative this time as the pix seems to be the problem.

attachment.php


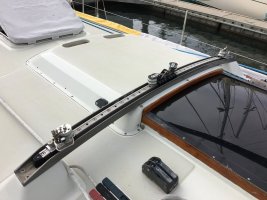
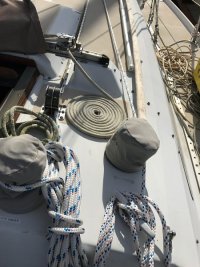
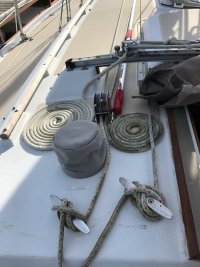
All my lines lead aft including all of both ends of the reef lines and my jib furler is on the cabin top. All of the foresail functions are on the port side of the cabin top including the spinnaker halyard, the pole lift and guy, the jib halyard and the jib furler. The starboard side includes the Main halyard, main sheet, Cunningham, and two reefs.

The cabin top winches are two speeds so they crank in both directions. Helpful for the outer two when the dodger is on. The halyards and sheet are concentrated on the inner two winches as is the jib furler. One can stand on the companionway ladder while cranking but I usually just kneel when the dodger is on. I have the strongtrack system so I can muscle up the main until the last 3' or so. It runs down all by itself.

Late last November, I took a solo cruise to the San Juan Islands. Leaving Friday Harbor, the wind was blowing 12 Knots. By the time I reached the turn point, the wind was 22 knots and the jib was partially furreled and the main had a reef in it. 20 minutes later, the wind was a steady 35. The main disappeared. Over the top of San Juan Island, Terra Nova was doing 9 1/2 knots in a nasty tide and wind induced chop. Most thrilling! By the time I reached Roche Harbor, the wind was a steady 38 with higher gusts. I was sure glad I could do all of this from the cockpit. Solo docking at Roche was sure exciting but that's a different story!
 

Attachments

  • IMG_2251.JPG
    IMG_2251.JPG
    144.8 KB · Views: 501

Loren Beach

O34 - Portland, OR
Senior Moderator
Blogs Author
Lots o' Sheet

On the sub topic of lengthly amounts of main sheet, that can get in the way when jibing, one time-honored solution is to "lower" those boom-mounted blocks on single pieces of wire or line (i.e. a pennant).

You guys cannot get the same reduction in length that I did for our six part tackle on the Olson because ours leads way down to a bridge deck traveler, however...
I note that the center two-part and the aft two-part of the purchase both go to blocks on boom bails.
With short pennants for each it looks like you might be able to remove about 1.5' of length, and that's 3' per loop or approx 6' total. Ok, Not a lot, but it helps a bit.

Given the ease of making a trial pennant up with some low stretch 1/4" line for each of those, you could give it a try out for a while.
I used a piece of vinyl coated life line ss wiring for mine, almost two decades ago. Of course the total longer length of ours enabled me to get rid of a pile of unneeded main sheet line.

Not mentioned a lot is accumulated friction. Replace any/all of those original Lewmar solid-axle blocks with the economical Garhauer roller/ball bearing blocks.
Still time today to ask Santa for some of those!
:)


Regards,
Loren
 
Last edited:

MarineCityBrian

Apprentice Tinkerer
I always get stuck being the other side. But, here goes:

I have a 5-part traveler and find it overkill: Long lines, sloppy to take up when slack, and unnecessarily imposing in scale.

Consider that most of the time we are "relieving" the traveler, i.e. letting it "down." Doesn't take any strength for that.

Consider that most of the time when hauling the traveler "up," the condition is light air. Doesn't take any strength for that.

Also, what's wrong with planting feet and putting your back into it sometimes--if minimal purchase is all you need 90 percent of the time?

I guess I just don;t agree that boats should be "one-handed."

Main sheet: I find a standard cleat, or better yet an open clam cleat, much better than running the main sheet through a line clutch.

the main sheet is a active line, and clutches cause jams. And the main sheet is usually on the winch anyhow.

As for the 5:1 traveller ratio, I did give some thought to the amount of line needed, but hoped to handle that with a continuous traveller line (a splice at each end run to the becket of each double block on the active portion of the traveller, then the remainder bridging the blocks and a bit of slack in order to keep from tripping over it whilst entering the cabin), but since I plan to use bolts rather than rivets when rebuilding the Ronstan blocks, I can easily have the option of going back down to 3:1 (or even 4:1 if I put a becket on the fixed portion of the traveler). Part of my decision to go with this overkill ratio may be based on how difficult the traveler was to operate, but then take a look at these traveller sheaves:!!!
2016-12-24 17.00.41.jpg

So my plan here is to stay with potential overkill, then back of as necessary. If the continuous line proves cantankerous, I can always cut it in the middle and melt the frayed ends. All of this said, I admire, respect, and welcome all of the various angles and opinions received here - such a wonderful and open forum!

As for the main sheet, that was actually exactly my plan - either a cam or large clam cleat that the main sheet could be jammed into whilst using the winch for other duties. No added friction and far less expensive than a rope clutch. Great minds think alike (or at least I thought similarly to a great mind for once... ;) )!
 

Tom Metzger

Sustaining Partner
The program says it auto saves but I don't see a way to retrieve the message.

Ah, they got another one. Sean told me a few years ago that the "auto save" is not for the user. He didn't tell me who it was for, but not us. Many times, including today, I have been victimized by this. I should learn, but I'm too old for new tricks.
 

Cory B

Sustaining Member
Traveller

As for the 5:1 traveller ratio, I did give some thought to the amount of line needed, but hoped to handle that with a continuous traveller line (a splice at each end run to the becket of each double block on the active portion of the traveller, then the remainder bridging the blocks and a bit of slack in order to keep from tripping over it whilst entering the cabin), but since I plan to use bolts rather than rivets when rebuilding the Ronstan blocks, I can easily have the option of going back down to 3:1 (or even 4:1 if I put a becket on the fixed portion of the traveler). Part of my decision to go with this overkill ratio may be based on how difficult the traveler was to operate, but then take a look at these traveller sheaves:!!!

Just as an additional datapoint for you, we replaced the old Ronstan traveller on our boat with a Harken one about 10 years ago. It is 4:1, and we are not using a continuous line. We find it adequate most of the time for our purposes.
 

MarineCityBrian

Apprentice Tinkerer
Just as an additional datapoint for you, we replaced the old Ronstan traveller on our boat with a Harken one about 10 years ago. It is 4:1, and we are not using a continuous line. We find it adequate most of the time for our purposes.

Thanks for the info, Cory!
Out of curiosity, is it a straight traveller track or curved like the original Ronstan? Also, are the cam cleats on the outer fixed portions or the inner moving portion? Just curious for becket location, etc.

Thanks again, and have a great new year!
 

Cory B

Sustaining Member
Thanks for the info, Cory!
Out of curiosity, is it a straight traveller track or curved like the original Ronstan? Also, are the cam cleats on the outer fixed portions or the inner moving portion? Just curious for becket location, etc.

Thanks again, and have a great new year!

We went with curved like the original. That is the one thing I would consider doing differently if doing again. It looks good, but its not as easy to control the trim with as you adjust the mainsheet as it would be with a straight traveler. The traveler came with cams built in to the end, but I eventually removed them as they were difficult to pop out under load, and moved the cams to the edge of the cabintop on small risers where they are much easier to use. I'll see if I can find a picture later.
 

MarineCityBrian

Apprentice Tinkerer
We went with curved like the original. That is the one thing I would consider doing differently if doing again. It looks good, but its not as easy to control the trim with as you adjust the mainsheet as it would be with a straight traveler. The traveler came with cams built in to the end, but I eventually removed them as they were difficult to pop out under load, and moved the cams to the edge of the cabintop on small risers where they are much easier to use. I'll see if I can find a picture later.

I think in a perfect world I'd remove the towers and use a straight traveller with brackets and have all the room in the world to run aft led lines. BUT, I've neither the skills nor time (nor $$$, for that matter) to do so.
With 4:1 and the cleats on the fixed portion your becket must be on the fixed portion as well. I'd love to see pictures if you get a chance.
I, too, have always had trouble cleating and uncleating the original Ronstan setup with the cam cleat on the fixed portion (though I think stacking the plates with the formed one on the bottom by the cleat would have made more sense than putting it on the top as they did...) and am interested to see an alternate solution.

Thanks once again!
 
Last edited:

Christian Williams

E381 - Los Angeles
Senior Moderator
Blogs Author
Just for the record, here is my original factory Ronstan gear.

No ball bearings. The car looked awful, but I prepped and repainted it and it actually functions OK despite the rather loose ride on the rails.

The cam stops are a different story. I believe the previous owner moved the fiddle (the stainless loop attachment) to its present position, or added it. The block parts were formerly held by long rivets (I think), but he replaced them with bolts. The bolts are too long, as you can see by the castle nut. Was the fiddle block supposed to be on the car end? Was this originally a 3-part rig? I haven't figured that out yet.

Even so, it functions and doesn't look bad to the eye. Butter-smooth movements? Nah. Jams? Well, no, it doesn't jam. But the line on the slack side tends to foul when the traveler is relieved more than a foot which is typical but gets irritating after a while (why I prefer minimal purchase).

I asked Ronstan if they had new sheaves but the parts are so old they were not sure what would fit, and it would be ordering by trial and error.

I'll make all this new but it's a low priority. I do play the traveler a lot, and it does work fine for all that.
attachment.php
attachment.php
attachment.php
attachment.php
 

Attachments

  • 1-T2 (1).JPG
    1-T2 (1).JPG
    96.6 KB · Views: 223
  • 1-T2 (2).JPG
    1-T2 (2).JPG
    76.2 KB · Views: 200
  • 1-T3.JPG
    1-T3.JPG
    79.5 KB · Views: 257
  • 1-traveler car painted.jpg
    1-traveler car painted.jpg
    87.6 KB · Views: 245
Last edited:

MarineCityBrian

Apprentice Tinkerer
Just for the record, here is my original factory Ronstan gear.

No ball bearings. The car looked awful, but I prepped and repainted it and it actually functions OK despite the rather loose ride on the rails.

The cam stops are a different story. I believe the previous owner moved the fiddle (the stainless loop attachment) to its present position, or added it. The block parts were formerly held by long rivets (I think), but he replaced them with bolts. The bolts are too long, as you can see by the castle nut. Was the fiddle block supposed to be on the car end? Was this originally a 3-part rig? I haven't figured that out yet.

Even so, it functions and doesn't look bad to the eye. Butter-smooth movements? Nah. Jams? Well, no, it doesn't jam. But the line on the slack side tends to foul when the traveler is relieved more than a foot which is typical but gets irritating after a while (why I prefer minimal purchase).

I asked Ronstan if they had new sheaves but the parts are so old they were not sure what would fit, and it would be ordering by trial and error....

Mine (from what I know) was unmolested from the factory, and is 3:1. The becket (fiddle) is on the movable car with a single block, and then the double block (as you have it) on the fixed. My fixed cars were still riveted, and did not have the becket sandwiched as yours appears to.

With regards to letting out slack, have you considered reversing the order of the block plates (the teardrop shaped plates on either side of the sheave)? The top plate has a form to it which looks designed to aid in the slacking of line, but for some reason this plate is put on the top of the unit. In just causally rebuilding mine (proper length bolts can be found, I might add) I tried this, and it seemed to allow the line to be relieved much more easily.

So far as ball bearing sheaves go, Garhauer sells 1 3/4" self-contained ball-bearing sheaves - the same ones that go in their cheek blocks - and I'm hoping the spacer can also be had (which spaces apart the 'tip' of the teardrop shaped plates) such that all align perfectly. If not, there is stainless tubing available on Amazon.com that would work (once cut to length). I measured the Ronstan sheaves and there were around 1.8", close enough to the Garhauer sheaves. With the load distributed by the stationary ball race on the ball bearing sheave, the units should have much less propensity to go "parallelogram", as both of mine did:
2016-12-29 12.36.53.jpg
 
Last edited:

Christian Williams

E381 - Los Angeles
Senior Moderator
Blogs Author
Good to hear the original setup confirmed. I'm going to toss the fake beckets on the cams, replace the bolts, and put single becket blocks on the car.

Back to 3:1 in 10 minutes. Thanks.

I do think the Ericson-recommended line size is unnecessarily hefty.

1-alex A.JPG
 
Last edited:

MarineCityBrian

Apprentice Tinkerer
I've been unhappy with the 3:1 purchase, though. I think your 4:1 may be ideal, and am going to try 5:1 (though I've been warned it'll be annoying - as you mention however it's very easy to back off.

Here is one of my (presumably) original single blocks with becket that is attached to the movable car:

2016-12-29 13.19.15.jpg
 

MarineCityBrian

Apprentice Tinkerer
Honestly not sure who made the track or movable car, but it certainly says Schaefer on the single blocks with becket on the movable car, and it certainly says Ronstan on the fixed blocks with the cam cleats. It certainly could be that the movable car and track are also Schaefer. I didn't specifically see any markings on the track or movable car.
 

Cory B

Sustaining Member
Traveler Cam cleat pic

Hi Brian,

Attached is a pic of how we rigged our traveller. There is an aluminum backing plate under the cam cleat. It has worked well for us.

IMG_4787.jpg
 

MarineCityBrian

Apprentice Tinkerer
THAT might be the ticket right there, assuming the additional clutter from the aft led lines stays out of the way (though this being basically in the middle of the tower, there can't be any lines there anyway). 4:1 purchase, plenty of lead-in to the block, and it prevents you from needing to reach so far forward to get to the cleat.

Thanks for the photo!
 

Tom Metzger

Sustaining Partner
THAT might be the ticket right there, assuming the additional clutter from the aft led lines stays out of the way (though this being basically in the middle of the tower, there can't be any lines there anyway). 4:1 purchase, plenty of lead-in to the block, and it prevents you from needing to reach so far forward to get to the cleat.

I had cam cleats like Cory's and replaced them with Spinlock PXR cleats because they are MUCH easier to release under load. My crew, and her leader, is getting a little long of tooth. :rolleyes:
 

Cory B

Sustaining Member
THAT might be the ticket right there, assuming the additional clutter from the aft led lines stays out of the way (though this being basically in the middle of the tower, there can't be any lines there anyway). 4:1 purchase, plenty of lead-in to the block, and it prevents you from needing to reach so far forward to get to the cleat.

Thanks for the photo!

I'm glad it gave you some ideas. I've borrowed and adapted lots of peoples ideas from this forum over the years. Its an amazing resource.

Anyway, its pretty clean with our aft-led lines, the cams are outboard of our clutches. We have 4 lines led aft on port, and 3 on Starboard.
 

Darrel

Member I
Darrel,
This would be a wonderful post-Christmas gift. Thanks so much, and have a wonderful and hopefully stress-free Christmas. :egrin:

Kindest regards and best wishes,
-Brian.

In the following pictures on the starboard side (left to right) is 75 reef, main sheet, and main halyard. On the port side (left to right)is the jib halyard, 50 reef, and toping lift for wisker pole. As far as I am aware all these lines were led aft from the factory according to the paper work I have from the factory. Except for the topping lift which appears to have originally been a cunningham control line location. The out haul and cunningham are located on the boom and mast respectively. If I am single handing these are two control lines i don't want or need in the cockpit so I am good with this set up. As far as the traveler set up i am fine with it. It works well and except for the cleats.... but this will soon be fixed.


attachment.php
attachment.php
attachment.php
 

Attachments

  • IMG_5112.jpg
    IMG_5112.jpg
    69.6 KB · Views: 313
  • IMG_5113.jpg
    IMG_5113.jpg
    55.6 KB · Views: 315
  • IMG_5115.jpg
    IMG_5115.jpg
    121.2 KB · Views: 339
Top